Instrukcja obsługi StarTech.com UNIRAILS3U
StarTech.com Niesklasyfikowane UNIRAILS3U
Przeczytaj poniżej 📖 instrukcję obsługi w języku polskim dla StarTech.com UNIRAILS3U (2 stron) w kategorii Niesklasyfikowane. Ta instrukcja była pomocna dla 16 osób i została oceniona przez 6 użytkowników na średnio 4.3 gwiazdek
Strona 1/2
Quick-Start Guide
To view manuals, FAQs, videos, drivers, downloads, technical drawings, and more, visit www.startech.com/support.
Manual Revision: April 8, 2024 3:55 PM
For additional self-service support options and community forums, please visit: www.StarTech.com/support
Product ID
UNIRAILS1U / UNIRAILS2U / UNIRAILS3U - Revision 02 or above
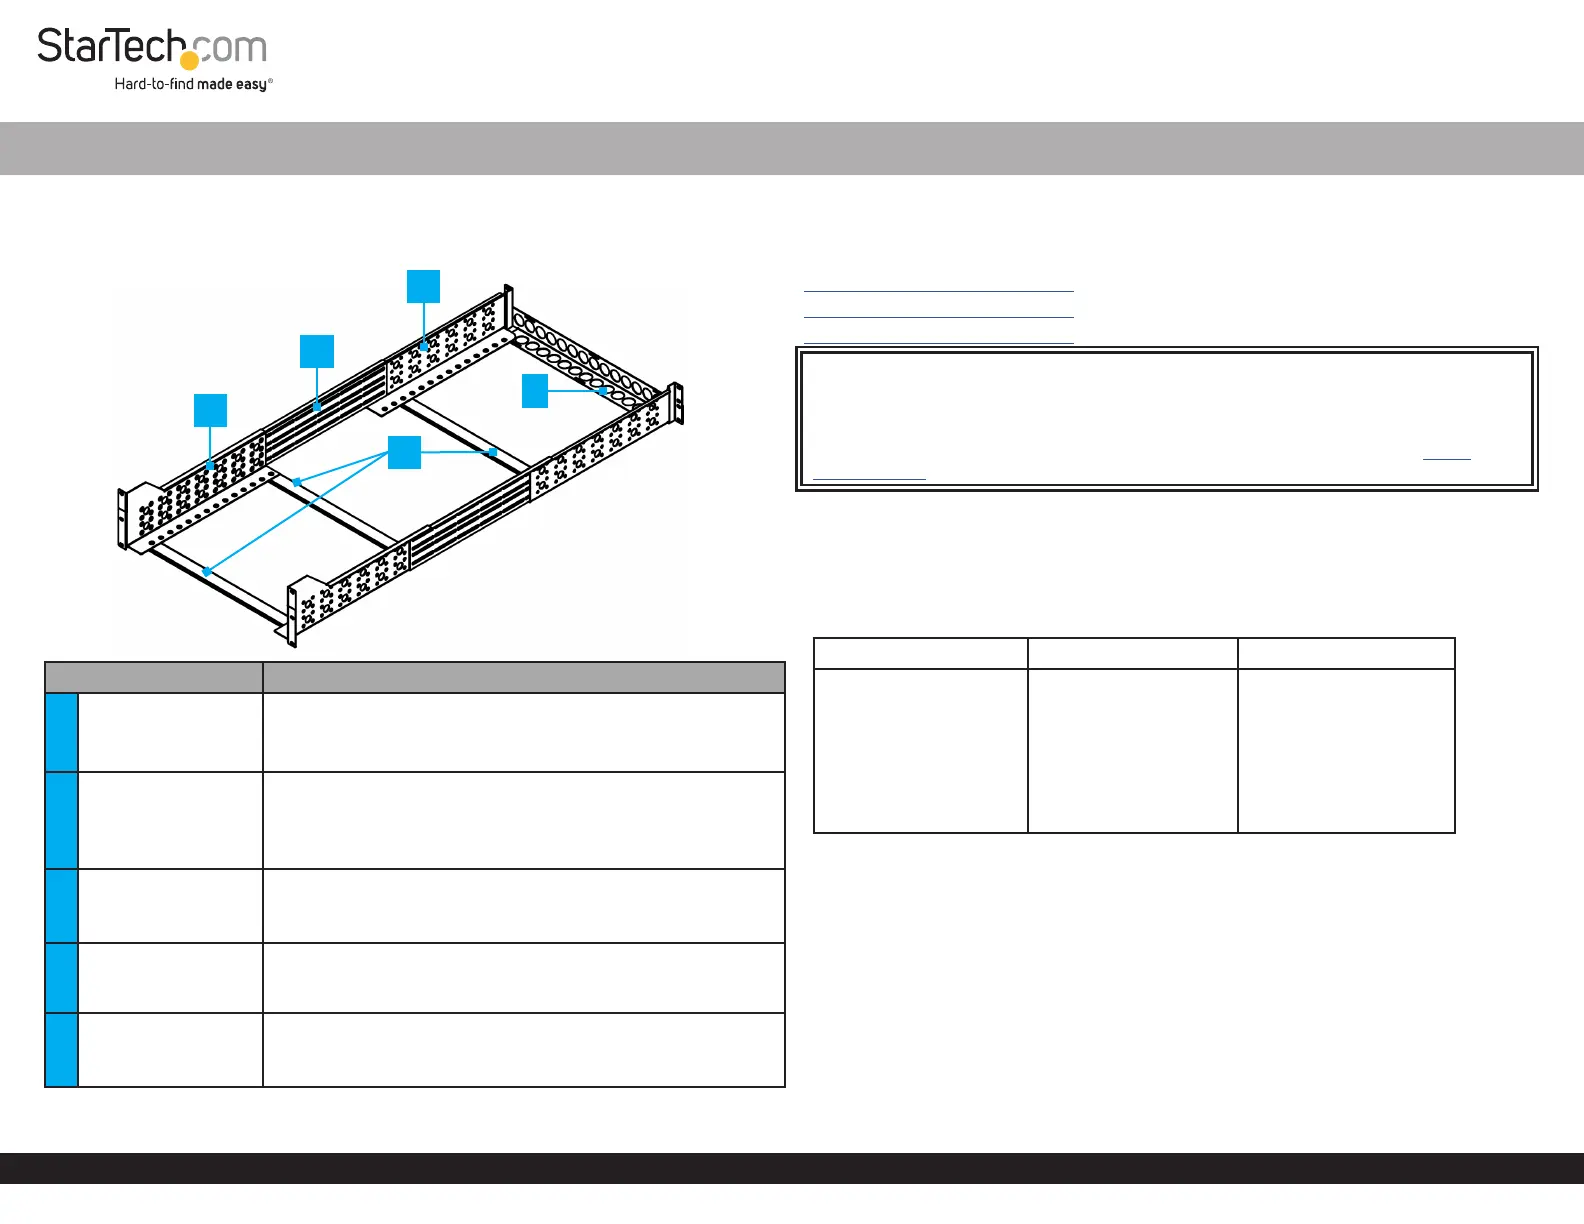
ComponentFunction
1
Front Rail - Rack Rail
Assembly
• Attaches onto the Front Mounting Posts of a Rack
• Slide along the Middle Sliding Rail to adjust depth
2
Middle Sliding Rail -
Rack Rail Assembly
• Fully assembled with Front and Rear Rails
• Loosen Connecting Screws to adjust the depth of the
Front and Rear Rails
3
Rear Rail - Rack Rail
Assembly
• Attaches onto the Rear Mounting Posts of a Rack
• Slide along the Middle Sliding rail to adjust depth
4Cross Braces
• Supports the weight of 19in Non-Rackmount Equipment
• Attaches to the Left and Right Rack Rail Assemblies
5
Cable Management
Plate
• End plate with Cable Management Holes
• Prevents Equipment from sliding o the rear of the Rack
Rails
1U/2U/3U Fixed 19” Adjustable Depth Universal Server Rack Rails
Information
For the latest manuals, product information, technical specications, and declarations of
conformance, please visit:
www.StarTech.com/UNIRAILS1U
www.StarTech.com/UNIRAILS2U
www.StarTech.com/UNIRAILS3U
How to Identify the LOT Code Revision Number
The Revision Number (Rev #) appears as the fth and sixth digits of the LOT code,
located on the sticker axed to the product and its packaging. If the LOT code sticker
is missing, the product is Rev 01. Refer to the specic Product ID page on www.
StarTech.com to download the manual for Revision 01.
Requirements
• Phillips Head Screwdriver
• (Optional) Cage Nut Tool
Package Contents
UNIRAILS1UUNIRAILS2UUNIRAILS3U
1 - Set Universal Rack Rails
6 - Cross Brace Screws
8 - M5 Panel Screws
8 - M5 Cage Nuts
1 - M5 Wrench
1 – Quick-Start Guide
1 - Set Universal Rack Rails
6 - Cross Brace Screws
16 - M5 Panel Screws
16 - M5 Cage Nuts
1 - M5 Wrench
1 – Quick-Start Guide
1 - Set Universal Rack Rails
6 - Cross Brace Screws
14 - M5 Panel Screws
14 - M5 Cage Nuts
1 - M5 Wrench
1 – Quick-Start Guide
Warnings!
Read the entire Quick-Start Guide and ensure the instructions are fully understood
before assembling and using this product. Before adding equipment to this product,
ensure this product has been properly mounted. Never operate this product if parts are
missing or damaged. Ensure the weight of the equipment does not exceed the weight
capacity of this product. If the weight capacity is exceeded, personal injury or damage
to the equipment is possible. These products can support the following weights:
UNIRAILS1U: up to 55.1 lb (25 kg)
UNIRAILS2U: up to 99.8 lb (45.2 kg)
UNIRAILS3U: up to 214.5 lb (97.3 kg)
All four mounting points must be properly secured to each of the posts on a four-post
rack. Never exceed the maximum mounting depth specication for this shelf: 41.5in
(1055mm)
*Product may vary from image
5
3
1
2
4
Specyfikacje produktu
| Marka: | StarTech.com |
| Kategoria: | Niesklasyfikowane |
| Model: | UNIRAILS3U |
Potrzebujesz pomocy?
Jeśli potrzebujesz pomocy z StarTech.com UNIRAILS3U, zadaj pytanie poniżej, a inni użytkownicy Ci odpowiedzą
Instrukcje Niesklasyfikowane StarTech.com

9 Stycznia 2025
9 Stycznia 2025
9 Stycznia 2025
9 Stycznia 2025
9 Stycznia 2025
8 Stycznia 2025
8 Stycznia 2025
8 Stycznia 2025
8 Stycznia 2025
8 Stycznia 2025
Instrukcje Niesklasyfikowane
Najnowsze instrukcje dla Niesklasyfikowane
29 Stycznia 2025
29 Stycznia 2025
29 Stycznia 2025
29 Stycznia 2025
29 Stycznia 2025
29 Stycznia 2025
29 Stycznia 2025
29 Stycznia 2025
29 Stycznia 2025
29 Stycznia 2025