Instrukcja obsługi Techno Line MA 10005
Techno Line Niesklasyfikowane MA 10005
Przeczytaj poniżej 📖 instrukcję obsługi w języku polskim dla Techno Line MA 10005 (2 stron) w kategorii Niesklasyfikowane. Ta instrukcja była pomocna dla 26 osób i została oceniona przez 7 użytkowników na średnio 4.9 gwiazdek
Strona 1/2
MA10005 – Starter Set
Gateway + WL 2000
Instructions manual
APP DOWNLOAD
Download the MOBILE-ALERTS app from "Apple App Store" or
"Google Play".
CONNECT THE GATEWAY
Connect gateway to power supply using the supplied AC adapter.
Connect included LAN cable with gateway and your router. After
about 10 seconds, the gateway is in operation. The LED will turn static
green.
If no DHCP server is available in your network, you can configure the
gateway in the app under the
point “Settings” manually.
Important: The Gateway
should always be put into operation
before starting the sensors!
FEATURES WL 2000:
•Quartz clock
•12/24h time display
•Indoor temperature display in °C/°F
•Indoor humidity display in %RH
•Outdoor temperature display in °C/°F
•Air quality sensor for monitoring of indoor air quality
•Display of CO
2
equivalent values and quality indicator
•Air quality alarm per LED
•Low battery indicator
SETTING UP:
1. Open the battery cover at the back of the transmitter and open
the battery cover at the back of the air quality monitor.
2. Checking the correct polarization, insert 2 x C, IEC LR14, 1.5V
Alkaline batteries into the battery compartment of the outdoor
transmitter and insert 2 x AA, LR06, 1.5V Alkaline batteries in
the air quality monitor. Replace the cover.
3. When the batteries are inserted, all the segments of the LCD
will light up briefly. The monitor will receive data signal from the
outdoor transmitter in a few seconds.
4. Hold the SET key for 3 seconds to manually enter a time.
(See manual settings.)
NOTE:
•The equivalent CO
2
ppm will only be displayed after 30 minutes.
•The air quality sensor will take up to 5 days after inserting
battery to condition itself for the room it is placed. If the unit is
placed into another room, there might be a reconditioning time
of several days as well.
•Insert the holder to the bottom of the outdoor transmitter for
table standing or insert it to the back of the transmitter for wall
mounting purpose.
•Set the air quality monitor in a dry and shaded interior and
away from sources of interference, such as televisions or metal
plates. The transmitter should be mounted protected from rain
and direct sunlight.
INSTALLING AND REPLACING THE BATTERY IN THE AIR
QUALITY MONITOR
The outdoor transmitter uses 2 x AA, LR06, 1.5V batteries.
The air quality monitor uses 2 x C, LR14, 1.5V batteries.
To install and replace the batteries, please follow the steps below:
1. Remove the cover at the back of the air quality monitor or the
outdoor transmitter. Remove the old batteries and wait 2
minutes before the next step.
2. Insert batteries observing the correct polarity (see marking).
3. Replace compartment cover.
BATTERY CHANGE:
It is recommended to replace the battery regularly to ensure optimum
accuracy of the unit.
ADD WL 2000 TO MOBILE-ALERTS SYSTEM
Open the app, dashboard is displayed. Tap "Add new sensor" and
scan the QR code on the back of the WL 2000. Then set a name for
the sensor. To set a name, select the transmitter and then tap on the
left area of the pencil icon in the upper right.
READ MEASUREMENTS
Now you can read the measurements on your mobile phone.
KEY FUNCTIONS:
The Air Quality Monitor has 4 easy-to-use keys:
SET key:
•Press and hold to enter the manual setting modes:12/24 hour
time display, manual time setting, ºC / ºF temperature display,
•Exit the manual setting mode
+ key:
•Press to change values of all manual settings
ALERT key:
•Press to set the air quality alert to ON / OFF
MIN / MAX key:
•Press to view MIN and MAX temperature and humidity values
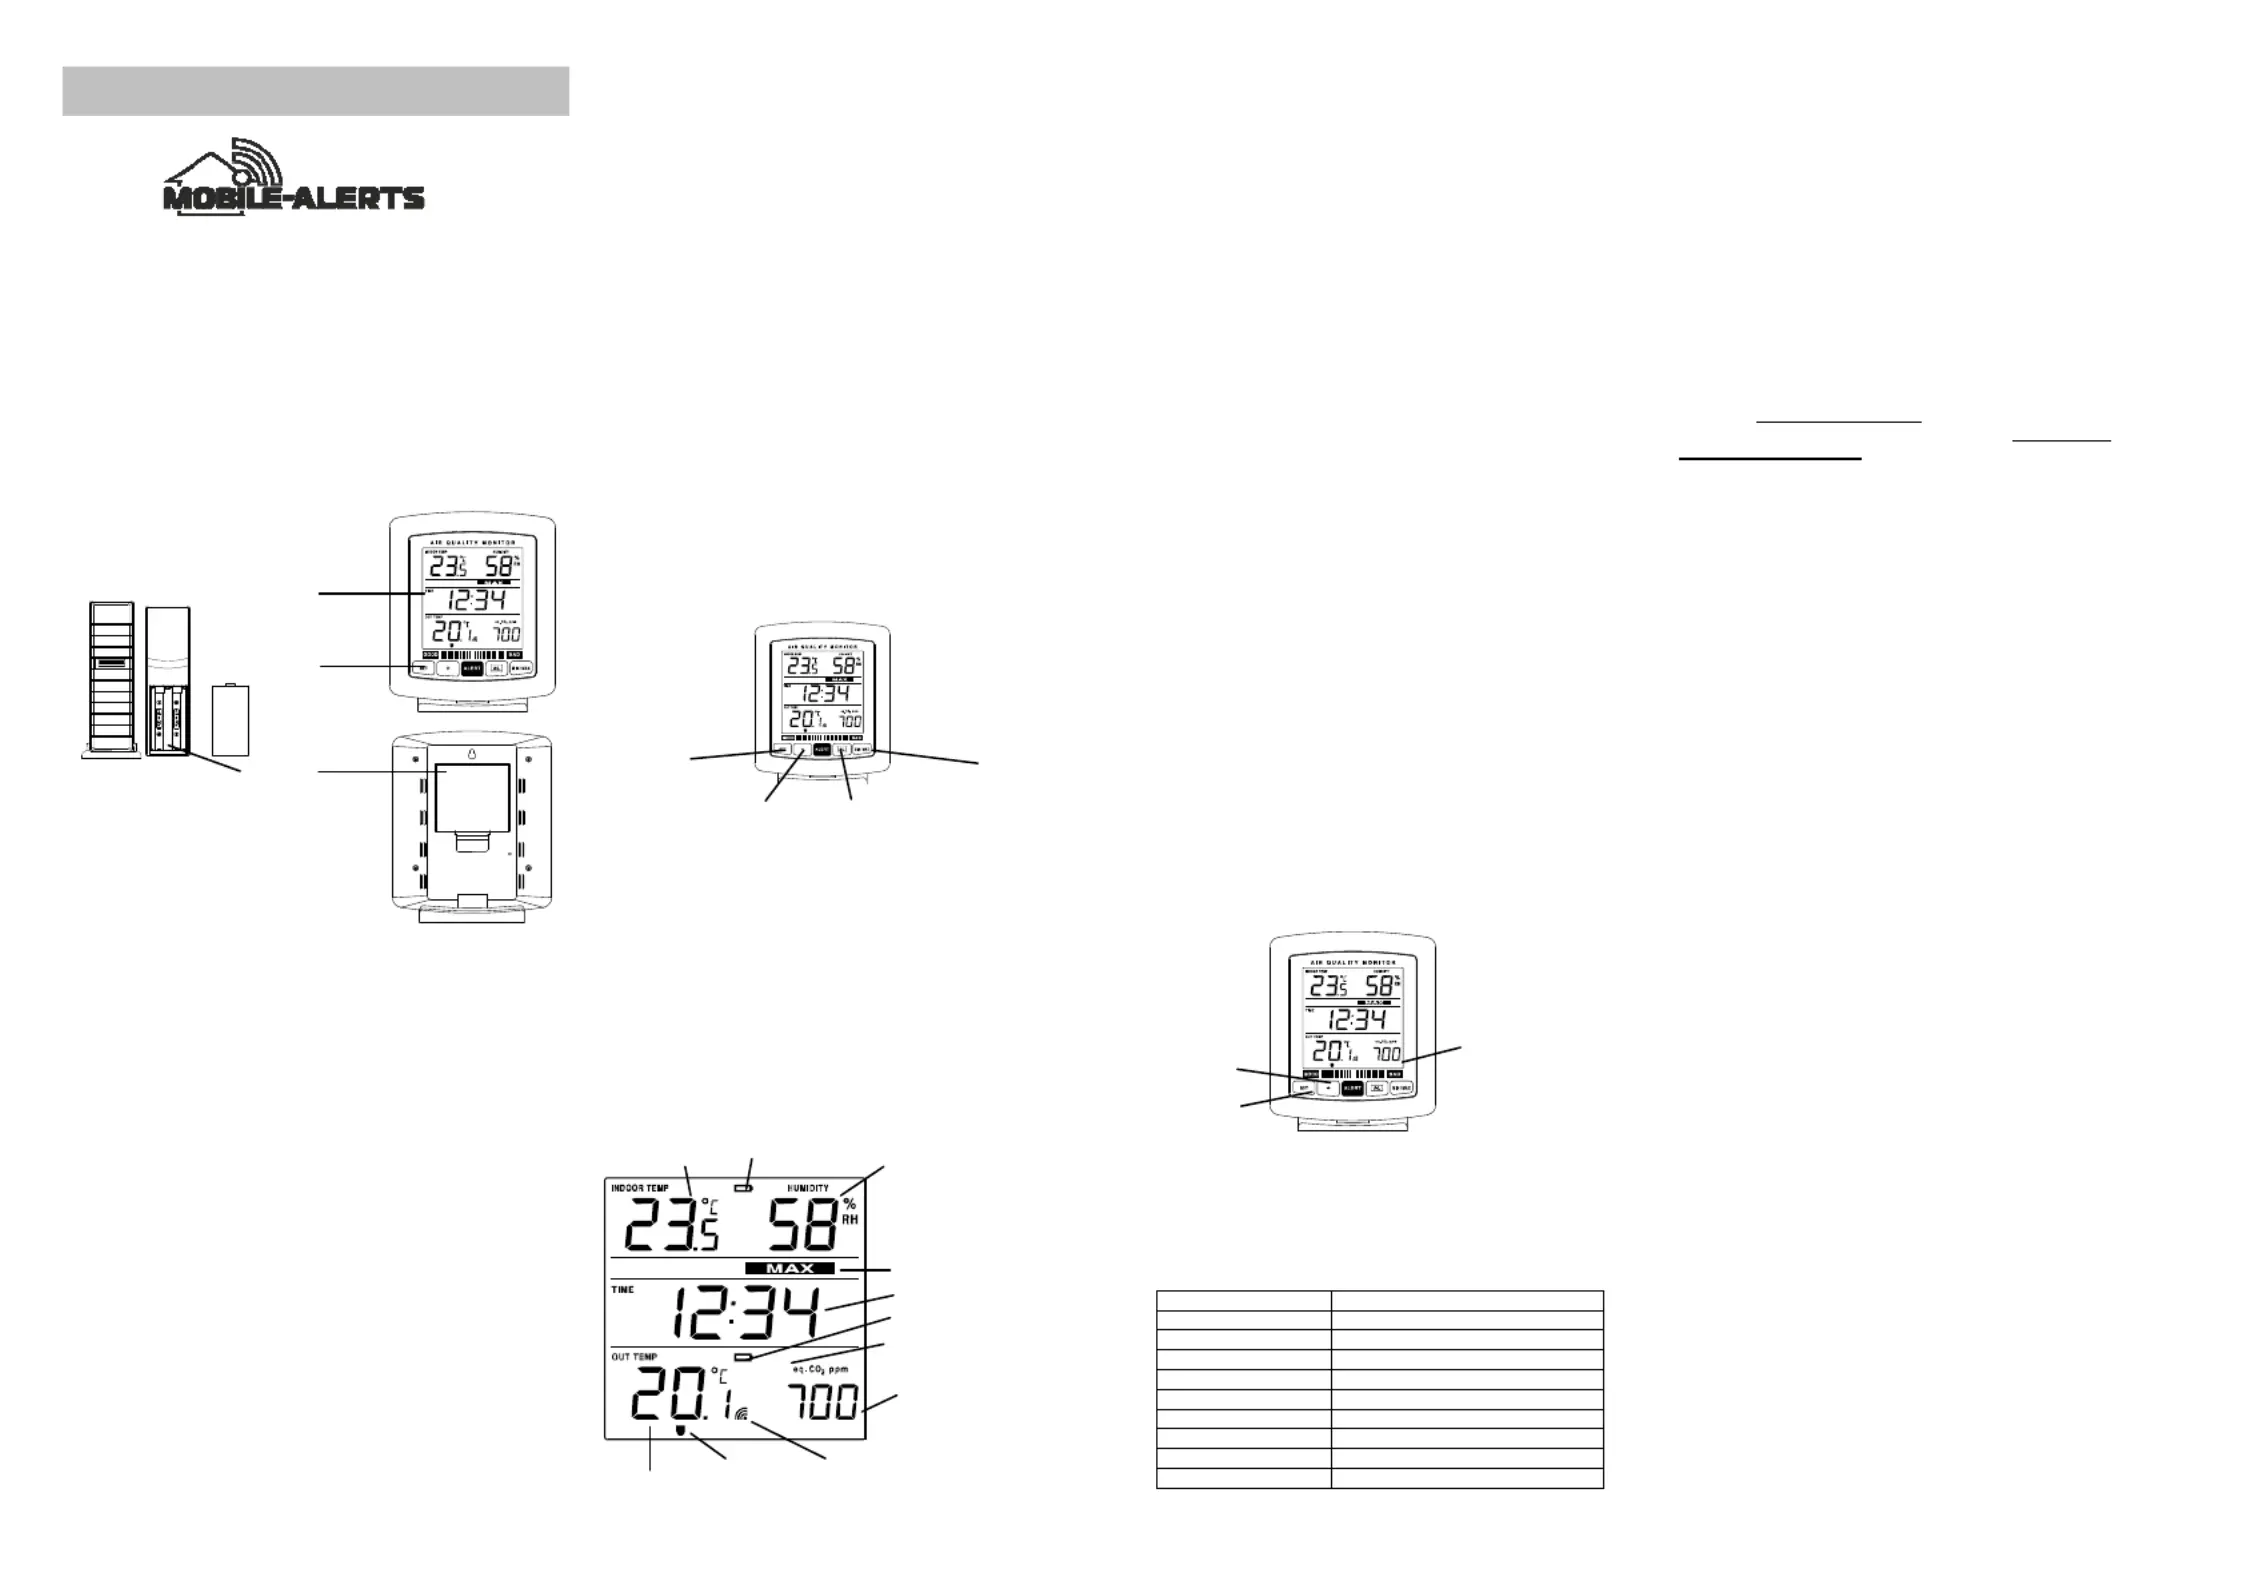
LCD SCREEN
MANUAL SETTINGS:
The following manual settings can be done in the setting mode:
1. 12/24 hour time setting
2. Time setting
3. ºC / ºF temperature display setting
Press and hold the SET button for about 3 second to enter the setting
mode:
12/24 HOUR TIME DISPLAY SETTING
•“12hr” or “24hr” flashes in the LCD. (default 24hr)
•Press the + key to select the “12hr” or “24hr” display mode.
•Confirm with the SET key and enter the Manual time setting.
MANUAL TIME SETTING
To set the clock:
•The hour digits start flashing in the time display section.
•Use the + key to adjust the hours and then press SET key to go
to the minute setting.
•The minute will be flashing. Press the + key to set the minutes.
•Confirm with the SET key and enter the °C/°F temperature
setting.
°C/°F TEMPERATURE UNIT SETTING
The default temperature reading is set to °C (degree Celsius). To
select °F (degree Fahrenheit):
1. The “°C” will be flashing, use the + key to toggle between “°C”
and “°F”.
2. Confirm with the SET key and exit the manual settings.
Max./ Min. for the indoor/outdoor temperature and humidity
Press “MIN/MAX” for displaying of max./min. of temperature and
humidity.
AIR QUALITY ALERT SETTING
Press the ALERT button to activate the air quality alert. The air
quality alert OFF icon indicates that the alert is set off. No air quality
OFF icon indicates that the alert is set on.
Note:
The LED Alert blinks, if the air quality alert has been set to “ON” and
the Equivalent CO
2
ppm
is higher than 1500ppm:
AIR QUALITY INDICATOR
The air quality indicator is located on the bottom of the LCD. It
changes from GREEN to RED by according to the equivalent CO
2
ppm value.
* The air quality value shown, after sensor conditioning, may differ
+/- 250 ppm.
Note:
A 9-level bar graph is used to indicate “GREEN” to “RED” air quality
level in the surrounding environment:
LevelsEquivalent CO
2
ppm
GREEN (level 1) 450 – 600ppm
Level 2 650 – 800ppm
Level 3 850 – 1000ppm
Level 4 1050 – 1200ppm
Level 5 1250 – 1500ppm
Level 6 1550 – 1800ppm
Level 7 1850 – 2100ppm
Level 8 2150 – 2400ppm
RED (level 9) ≥ 2450ppm
Troubleshooting
When no sensor readings are displayed in the app, check if the green
LED on the gateway is permanently lit. If not, please check if:
- The gateway is properly connected to the power plug, the router and
is turned on.
- Restart the station by removing the batteries for a minute and
reinserting, to restart the device.
- Your phone is connected to the internet.
- The signal is weakened by thick walls and ceilings. Put the device in
operation near the gateway and then locate a suitable location.
-If the outdoor sensor connection is lost repeatedly, keep in mind that
the outdoor transmitter only has the optimal transmission range in
open area with no obstructions. Each obstruction between the
transmitter and the station (roof, walls, floors, ceilings, thick trees, etc.)
will effectively cut the transmission range in half or more.
More information and detailed instructions can be found in the app at
“Info” or at www.mobile-alerts.eu
The declaration of Conformity can be found at: www.mobile-
alerts.eu/technoline/doc
SPECIFICATIONS:
Recommended temperature range:
+5ºC to +40ºC / +41ºF to 104ºF
Temperature measuring range:
Indoor: -9.5ºC to +59.5ºC with 0.5ºC resolution /
14.0ºF to +139.5ºF with 0.5ºF resolution
(OFL displayed if outside this range. In degree F
splay, OFL will displayed when over 99.9ºF) di
Outdoor: -39.9ºC to +59.9ºC with 0.1ºC resolution /
-39.8ºF to +139.8ºF with 0.2ºF resolution
(OFL displayed if outside this range. In degree F
display, OFL will displayed when over 99.9ºF)
Relative humidity measuring range:
Indoor: 20% to 95% with 1% resolution (display “- -“ if
temperature is OFL, except when the temperature is
100ºF to 139.8ºF; display “19%” if < 20% and “96%”
if > 95%)
Equivalent CO
2
ppm measuring range:
450ppm to 3950ppm with 50ppm resolution (display OFL > 3950ppm)
Measuring intervals:
Indoor temperature checking interval: every 16 seconds
Indoor humidity checking interval: every 16 seconds
Air quality level checking interval: every 3 minutes
Transmission:
Transmission range: 100m (free field)
Transmission frequency: 868 MHz
Power consumption: 2 x C, IEC LR14, 1.5V
Dimensions (L x W x H): 135.4 x 35.3 x 153.9 mm
Precautions
•This main unit is intended to be used only indoors.
•Do not subject the unit to excessive force or shock.
•Do not expose the unit to extreme temperatures, direct sunlight,
dust or humidity.
•Do not immerse in water.
•Avoid contact with any corrosive materials.
•Do not dispose this unit in a fire as it may explode.
•Do not open the inner back case or tamper with any components
of this unit.
Batteries safety warnings
•Please read all instructions carefully before use.
•Use only alkaline batteries, not rechargeable batteries.
•Install batteries correctly by matching the polarities (+/-).
•Always replace a complete set of batteries.
•Never mix used and new batteries.
•Remove exhausted batteries immediately.
•Remove batteries when not in use.
•Do not recharge and do not dispose of batteries in fire as the
batteries may explode.
•Ensure batteries are stored away from metal objects as contact
may cause a short circuit.
•Avoid exposing batteries to extreme temperature or humidity or
direct sunlight.
Function keys
LCD displa
y
Batter
y
compartmen
t
SET key
MIN / MAX key
+ key
A
LERT ke
y
Air quality aler
t
OFF icon
Low battery icon (outdoor)
Indoo
r
temperature
in ºC/ºF
Equivalent CO
2
ppm / seconds
display
A
ir quality
indicator
Bar graph
A
ir quality
indicator
Time
Outdoo
r
temperature in
ºC/ºF
Low battery icon
(indoor)
Reception
icon
Indoor
humidity in
%RH
MIN / MAX icons
Equivalent CO
2
ppm (parts per
million) value*
Specyfikacje produktu
| Marka: | Techno Line |
| Kategoria: | Niesklasyfikowane |
| Model: | MA 10005 |
Potrzebujesz pomocy?
Jeśli potrzebujesz pomocy z Techno Line MA 10005, zadaj pytanie poniżej, a inni użytkownicy Ci odpowiedzą
Instrukcje Niesklasyfikowane Techno Line

27 Grudnia 2024
27 Grudnia 2024
27 Grudnia 2024
27 Grudnia 2024
27 Grudnia 2024
27 Grudnia 2024
27 Grudnia 2024
27 Grudnia 2024
27 Grudnia 2024
27 Grudnia 2024
Instrukcje Niesklasyfikowane
Najnowsze instrukcje dla Niesklasyfikowane
29 Stycznia 2025
29 Stycznia 2025
29 Stycznia 2025
29 Stycznia 2025
29 Stycznia 2025
29 Stycznia 2025
29 Stycznia 2025
29 Stycznia 2025
29 Stycznia 2025
29 Stycznia 2025