Instrukcja obsługi Thermaltake Commander F6 RGB
Thermaltake Niesklasyfikowane Commander F6 RGB
Przeczytaj poniżej 📖 instrukcję obsługi w języku polskim dla Thermaltake Commander F6 RGB (1 stron) w kategorii Niesklasyfikowane. Ta instrukcja była pomocna dla 14 osób i została oceniona przez 7 użytkowników na średnio 4.5 gwiazdek
Strona 1/1
English
● Support up to 6 independent fans
● RGB 16 different display colors
● 30W for each fan control channel
● 6 independent sensors for each channel temperature monitoring
● Voltage and RPM readout for precise airflow control
● Warning alarm and short circuit protection
● Switch between Celsius and Fahrenheit
● Comprehensive control of fan cooling performance and noise
● Compatible with Thermaltake Lumi color LED strip
● Fits in a standard 5.25” driver bay for easy installation
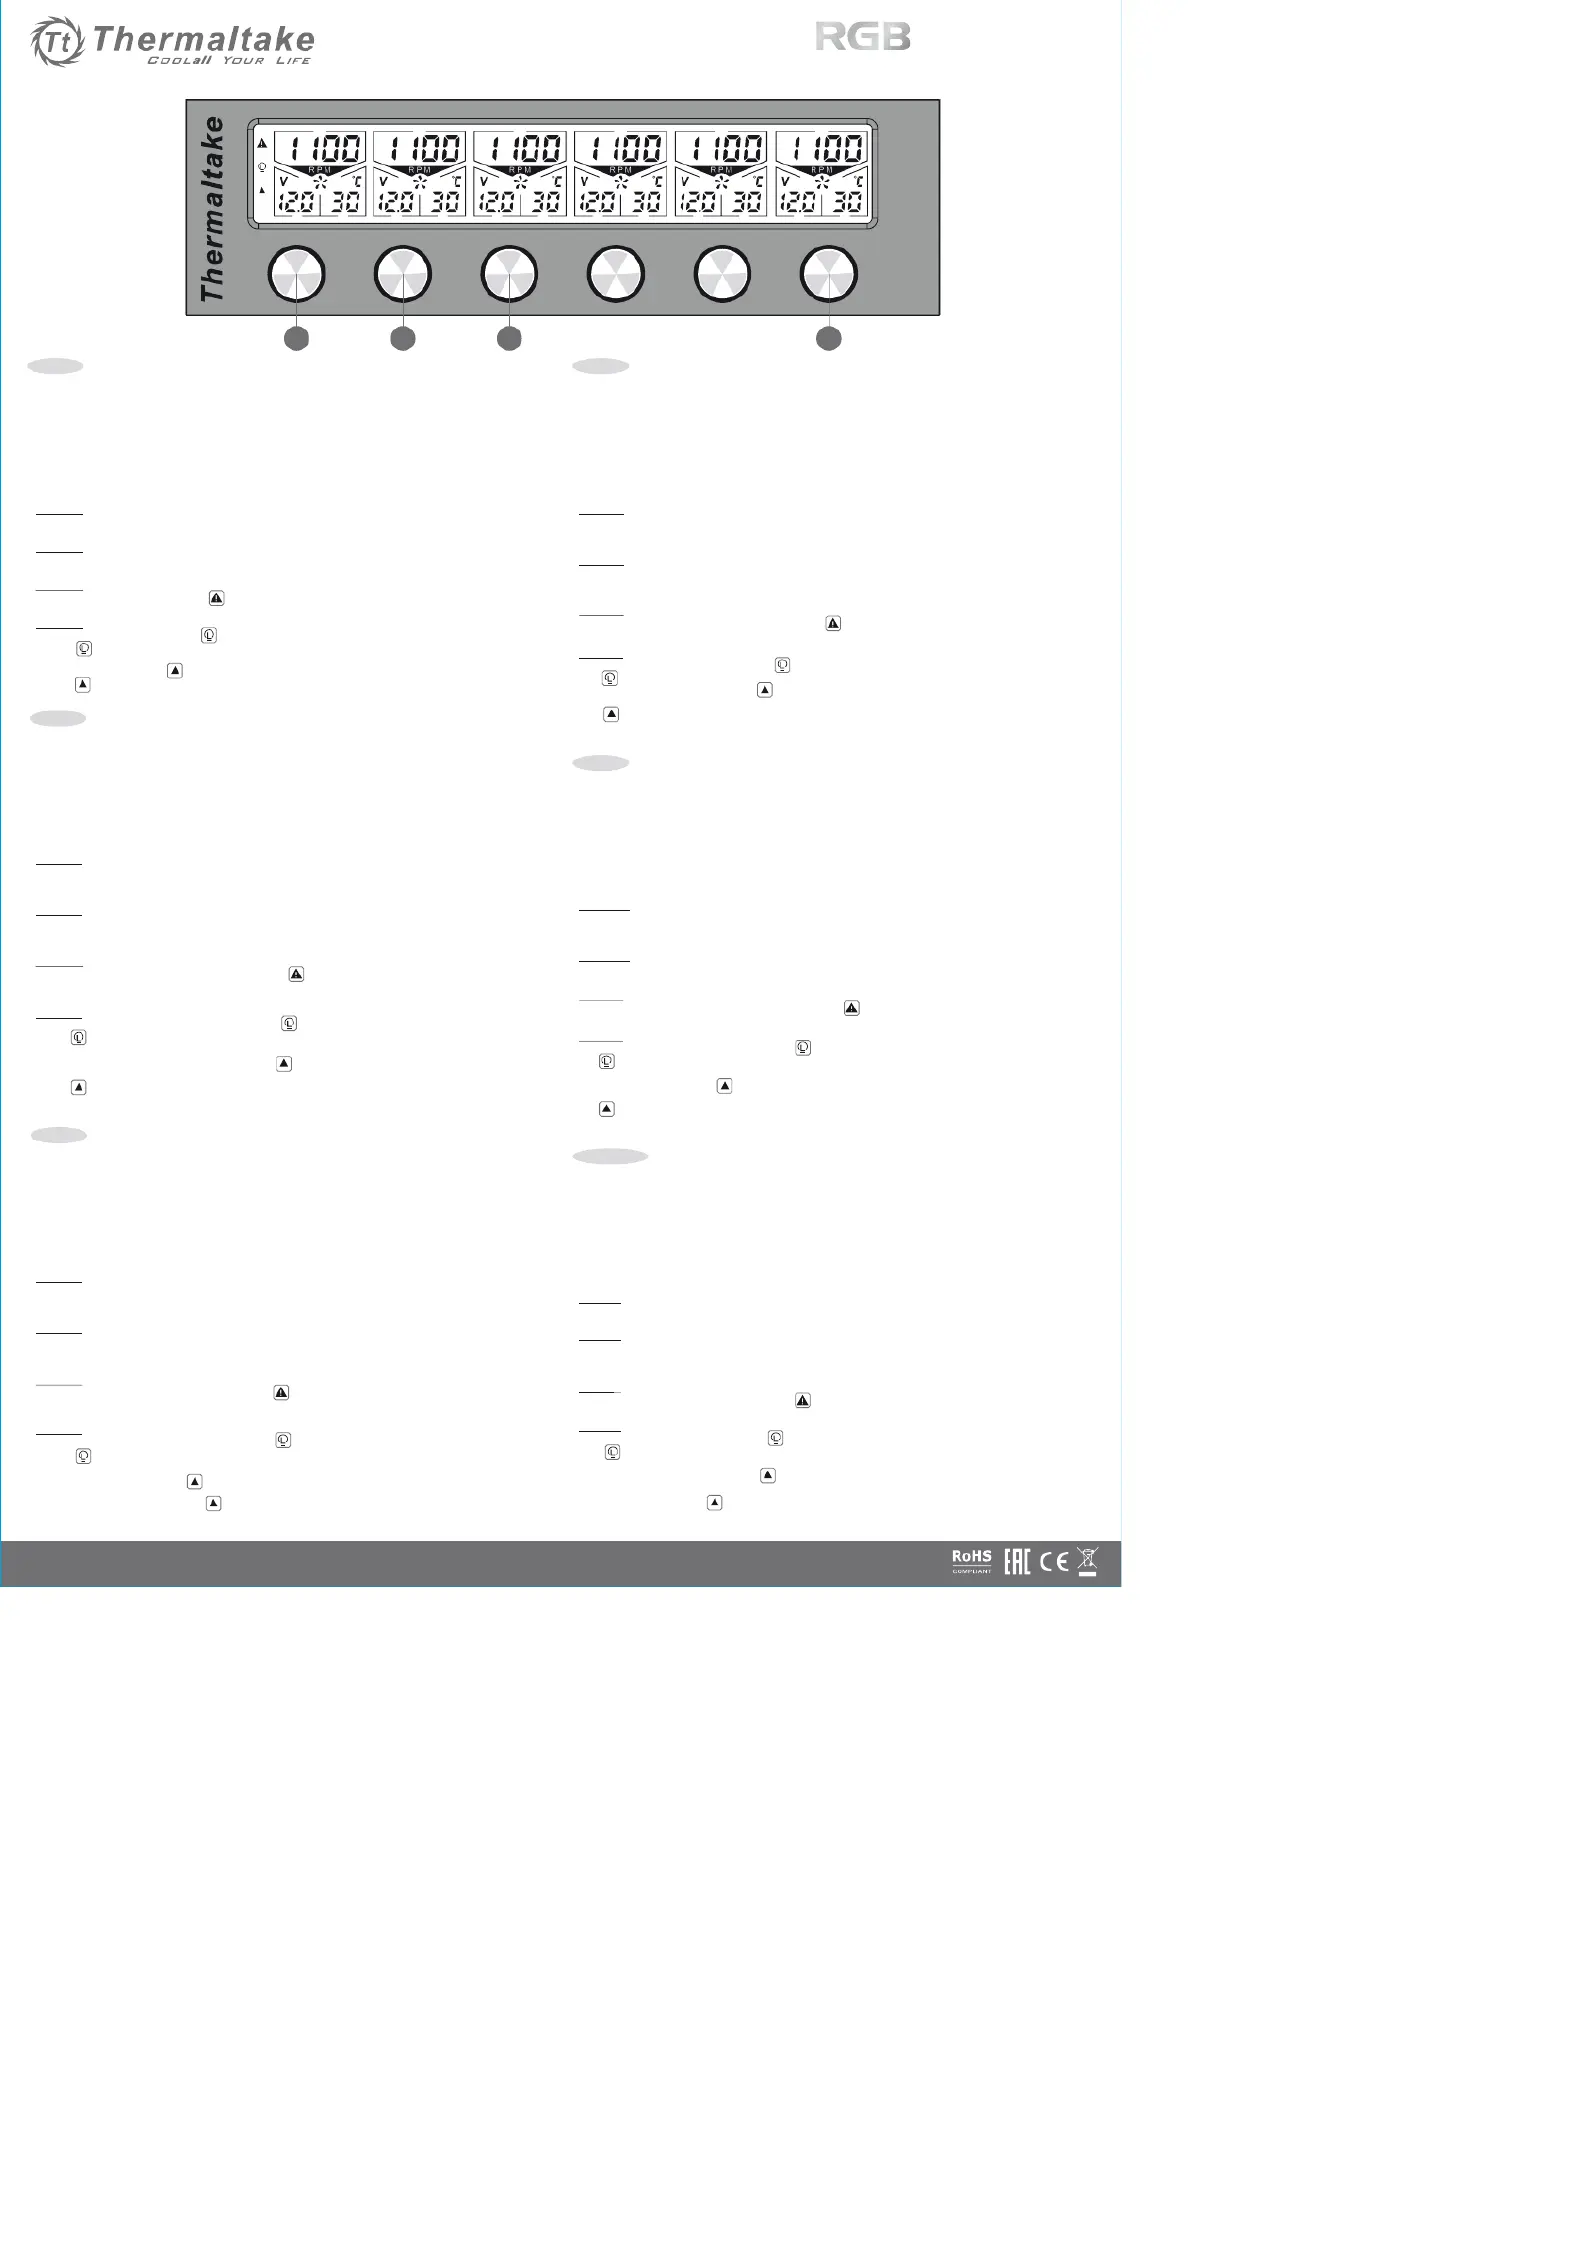
Function 1
Push channel 1 to start backlight color display, push again to stop backlight color display.
Press and hold for 3 seconds to adjust the temperature alarm warning value.
Function 2
Push channel 2 to adjust screen brightness.
Press and hold for 3 seconds to disable the screen display; press and hold again to bring the display back on.
Function 3
Push channel 3 to enable alarm mode ; push again to disable alarm mode.
Press and hold for 3 seconds to change temperature unit ℃/℉.
Function 4
Push channel 6 to enable LED mode ; push again to disable LED mode.
※Under , only channel #1~#4 will trigger the alarm when detect false RPM, as LED strip does not provide
RPM status.
Press and hold for 3 seconds to enable start boost mode; press and hold again to disable start boost mode.
※Under start boost mode, during booting phase it will provides max output 12V to all channels for 3 seconds,
this can avoid the fans remain static when channel voltage set too low for startup.
Deutsch
● Unterstützt bis zu sechs unabhängige Gebläse
● RGB 16 verschiedene Anzeigefarben
● 30 W für jeden Gebläsesteuerkanal
● 6 unabhängige Sensoren pro Kanaltemperatur-Überwachung
● Spannung und U/min für präzise Luftflusssteuerung
● Warnungen, Alarme und Kurzschlussschutz
● Umschalten zwischen Celsius und Fahrenheit
● Umfassende Steuerung der Gebläseleistung und der Geräuschentwicklung
● Kompatibel mit Thermaltake Lumi Color LED-Streifen
● Passt in einen Standard 5,25 ” Einbauschacht, für einfache Installation
Funktion 1
Drücken Sie Kanal 1, um die Hintergrundlicht-Farbanzeige zu aktivieren, drücken Sie erneut, um die
Hintergrundlicht-Farbanzeige wieder zu de aktivieren.ld for 3 seconds to adjust the temperature alarm warning value.
Drücken und halten Sie für 3 Sekunden lang gedrückt, um den Wert für den Temperaturalarm einzustellen.
Funktion 2
Drücken Sie Kanal 2, um die Bildschirmhelligkeit einzustellen.
Drücken und halten Sie für 3 Sekunden lang gedrückt, um die Bildschirmanzeige zu deaktivieren; drücken und halten
Sie erneut, um die Anzeige wieder zu aktivieren.
Funktion 3
Drücken Sie Kanal 3, um den Alarmmodus zu aktivieren ; drücken Sie erneut, um den Alarmmodus zu
deaktivieren.
Drücken und halten Sie für 3 Sekunden lang gedrückt, um die Temperatureinheit zu ändern ℃/℉.
Funktion 4
Drücken Sie Kanal 6, um den LED-Modus zu aktivieren ; drücken Sie erneut, um den LED-Modus zu deaktivieren.
※Unter , nur Kanal 1~4 löst einen Alarm aus, wenn eine falsche Drehzahl entdeckt wird, da der LED-Streifen
keinen U/min-Status anzeigt.
Drücken und halten Sie für 3 Sekunden lang gedrückt , um den Start Boost-Modus zu aktivieren; drücken und
halten Sie erneut, um Start Boost-Modus zu deaktivieren.
※Unter Start Boost-Modus, während der Boot-Phase liefert es eine maximale Ausgansleistung von 12 V an alle
Kanäle und 3 Sekunden lang.
Dieses kann verhindern, dass die Gebläse statisch bleiben, falls die Kanalspannung für den Start zu niedrig ist.
Français
● Supporte jusqu’à 6 ventilateurs indépendants
● 16 couleurs RGB différentes
● 30 W pour chaque canal de commande de ventilateur
● 6 capteurs indépendants de mesure de température de chaque canal
● Lecture de la tension et de la vitesse de rotation pour un contrôle précis du débit d’air
● Alarme et protection contre les courts-circuits
● Conversion entre Celsius et Fahrenheit
● Contrôle complet des performances de refroidissement du ventilateur et du bruit
● Compatible avec le ruban LED Lumi Color de Thermaltake
● S’installe facilement dans les baies de lecteur standard de 5,25”
Fonction 1
Appuyez sur le canal 1 pour démarrer le rétro-éclairage couleur de l’écran ;
appuyez de nouveau pour l’arrêter.
Appuyez pendant 3 secondes pour régler la valeur de température d’alarme.
Fonction 2
Appuyez sur le canal 2 pour régler la luminosité de l’écran.
Appuyez pendant 3 secondes pour désactiver l’écran ; appuyez à nouveau pendant
3 secondes pour le réactiver.
Fonction 3
Appuyez sur le canal 3 pour activer le mode d’alarme ; appuyez à nouveau
pour le désactiver.
Appuyez pendant 3 secondes pour pour changer l’unité de température °C/°F.
Fonction 4
Appuyez sur le canal 6 pour activer le mode LED ; appuyez à nouveau pour le désactiver.
※ Sous , seuls les canaux 1 à 4 peuvent déclencher l’alarme en cas de détection d’une vitesse de r
otation erronée, car les rubans LED ne transmettent pas de données de vitesse.
Appuyez pendant 3 secondes sur pour activer le mode de démarrage rapide ; appuyez de nouveau pendant 3
secondes pour le désactiver.
※ Sous le mode de démarrage rapide , lors de la phase de démarrage, il fournit une tension max de sortie de
12 V à tous les canaux pendant 3 secondes ; cela évite que les ventilateurs restent statiques lorsque la tension du
canal est trop basse pour le démarrage.
Español
● Compatible con hasta 6 ventiladores independientes
● 16 colores RGB diferentes de pantalla
● 30W para cada canal de control de ventilador
● 6 sensores independientes para cada control de temperatura de canal
● Voltaje y lectura RPM para control de flujo de aire preciso
● Alarma de advertencia y protección frente a cortocircuitos
● Cambio entre grados Celsius y Fahrenheit
● Control exhaustivo de ruido y rendimiento de refrigeración de ventiladores
● Compatible con tira LED Lumi color de Thermaltake
● Se ajusta a una bahía de controlador de 5,25” estándar para una fácil instalación
Función 1
Pulse el canal 1 para retroiluminar la pantalla de color; pulse de nuevo para detener la retroiluminación de la
pantalla de color.
Mantenga pulsado durante 3 segundos para ajustar el valor de advertencia de la alarma de temperatura.
Función 2
Pulse el canal 2 para ajustar el brillo de la pantalla.
Mantenga pulsado durante 3 segundos para deshabilitar la pantalla; mantenga pulsado de nuevo para volver a
encender la pantalla.
Función 3
Pulse el canal 3 para habilitar el modo de alarma , pulse de nuevo para deshabilitarlo.
Mantenga pulsado durante 3 segundos para cambiar la unidad de temperatura ℃/℉.
Función 4
Pulse el canal 6 para habilitar el modo LED ; pulse de nuevo para deshabilitar el modo LED.
※En , solo el canal #1~#4 activará la alarma si detecta RPM falso, en tanto que la tira LED no ofrece estado RPM.
Mantenga pulsado durante 3 segundos para habilitar el modo de impulso de inicio; mantenga pulsado de nuevo
para deshabilitarlo.
※En el modo de impulso de inicio, durante la fase de arranque se darán 12 V máx. de salida a todos los canales
durante 3 segundos, esto puede evitar que los ventiladores permanezcan estáticos cuando el voltaje de canal se ha
establecido demasiado bajo para el inicio.
Italiano
● Supporta fino a 6 ventole indipendenti
● Display con 16 diversi colori RGB
● 30 W per ciascun canale di controllo delle ventole
● 6 sensori indipendenti per il monitoraggio della temperatura di ciascun canale
● Tensione e lettura giri/min. per una maggiore precisione del controllo del flusso d'aria
● Allarme di avvertimento e protezione da cortocircuiti
● Conversione da gradi Celsius a gradi Fahrenheit e viceversa
● Controllo completo delle prestazioni in termini di raffreddamento e di rumore delle ventole
● Compatibile con striscia a colori LED Thermaltake Lumi
● Compatibile con vani unità standard da 5,25” per una facile installazione
Funzione 1
Premere il canale 1 per avviare la retroilluminazione del display a colori; premerlo nuovamente per interrompere
la funzione.
Premere per 3 secondi per regolare il valore dell’allarme di avvertimento della temperatura.
Funzione 2
Premere il canale 2 per regolare la luminosità dello schermo.
Premere per 3 secondi per disattivare il display dello schermo; tenere nuovamente premuto per riattivarlo.
Función 3
Premere il canale 3 per attivare la modalità di allarme ; premere nuovamente per disattivare la funzione.
Tenere premuto per 3 secondi per modificare l'unità di temperatura ℃/℉.
Función 4
Premere il canale 6 per attivare la modalità LED ; premere nuovamente per disattivare la funzione.
※In , solo il canale #1~#4 attiverà l'allarme in caso di rilevamento di falsi giri/min., in quanto la striscia a LED non
fornisce alcuna indicazione sullo stato di questa funzione.
Tenere premuto per 3 secondi per attivare la modalità di avvio potenziato; tenere premuto nuovamente per
disattivare la funzione.
※In modalità avvio potenziato, durante la fase di accensione, il dispositivo fornisce per 3 secondi una corrente in
uscita massima di 12 V a tutti i canali per impedire alle ventole di rimanere statiche se la tensione dei canali impostata
è troppo bassa per consentire l'avvio.
Português
● Suporta até 6 ventoinhas independentes
● RGB com 16 cores de ecrã diferentes
● 30W para cada canal de controlo da ventoinha
● 6 sensores independentes para monitorização de cada canal de temperatura
● Leitura de tensão e RPM para um controlo do fluxo de ar preciso
● Alarme de aviso e proteção contra curto-circuito
● Alterar entre graus Celsius e Fahrenheit
● Controlo completo do desempenho de arrefecimento da ventoinha e do ruído
● Compatível com a faixa LED Lumi cor da Thermaltake
● Encaixa numa baía de disco série de 5.25” para instalação fácil
Função 1
Prima em canal 1 para iniciar a exibição da cor de fundo, prima novamente para parar a exibição da cor de fundo.
Mantenha premido durante 3 segundos para ajustar o valor de aviso da temperatura.
Função 2
Prima em canal 2 para ajustar a luminosidade do ecrã.
Mantenha premido durante 3 segundos para desativar a exibição no ecrã; volte a manter premido para voltar a ligar
o ecrã.
Função 3
Prima em canal 3 para ativar o modo de alarme ; prima novamente para desativar o modo de alarme.
Mantenha premido durante 3 segundos para alterar a unidade de temperatura ℃/℉.
Função 4
Prima em canal 6 para ativar o modo LED ; prima novamente para desativar o modo LED.
※ Em , apenas os canais #1~#4 irão ativar o alarme quando detetam RPM falsas, uma vez que a faixa LED não
apresenta o estado RPM.
Mantenha premido durante 3 segundos para ativar o modo de arranque rápido; mantenha premido novamente
para desativar o modo de arranque rápido.
※No modo arranque rápido , durante a fase de arranque, apresenta a saída máxima de 12V para todos os canais
durante 3 segundos, isto pode evitar que a ventoinha permaneça estática quando a tensão do canal está definida
demasiado baixa para o arranque.
P/N:AC-024-BN1NAN-A1
LCD Multi Fan Controller
Commander F6
© 2015 Thermaltake Technology Co., Ltd. All Rights Reserved. www.thermaltake.com
1
2
3
4
Specyfikacje produktu
| Marka: | Thermaltake |
| Kategoria: | Niesklasyfikowane |
| Model: | Commander F6 RGB |
Potrzebujesz pomocy?
Jeśli potrzebujesz pomocy z Thermaltake Commander F6 RGB, zadaj pytanie poniżej, a inni użytkownicy Ci odpowiedzą
Instrukcje Niesklasyfikowane Thermaltake

28 Stycznia 2025
2 Stycznia 2025
2 Stycznia 2025
2 Stycznia 2025
2 Stycznia 2025
2 Stycznia 2025
2 Stycznia 2025
1 Stycznia 2025
30 Grudnia 2025
18 Grudnia 2024
Instrukcje Niesklasyfikowane
Najnowsze instrukcje dla Niesklasyfikowane
29 Stycznia 2025
29 Stycznia 2025
29 Stycznia 2025
29 Stycznia 2025
29 Stycznia 2025
29 Stycznia 2025
29 Stycznia 2025
29 Stycznia 2025
29 Stycznia 2025
29 Stycznia 2025