Instrukcja obsługi Audio-Technica AT8699R
Audio-Technica Niesklasyfikowane AT8699R
Przeczytaj poniżej 📖 instrukcję obsługi w języku polskim dla Audio-Technica AT8699R (3 stron) w kategorii Niesklasyfikowane. Ta instrukcja była pomocna dla 22 osób i została oceniona przez 9 użytkowników na średnio 4.6 gwiazdek
Strona 1/3
日本語
EnglishDeutschEspañol
FrançaisItaliano
User Manual
Manuel de l’utilisateur
Bedienungsanleitung
Manuale dell'utente
Manual de usuario
Manual do Usuário
Руководство пользователя
用户手册
使用說明書
사용설명서
AT8699 / AT8699R
AT8699AT8699R
マイクロホンデスクスタンドスイッチ付きマイクロホンデスクスタンド
Microphone desk standMicrophone desk stand with switch
Pied de microphone de tablePied de microphone de table avec commutateur
MikrofontischfußMikrofontischfuß mit Schalter
Microfono con supporto da scrivaniaMicrofono con supporto da scrivania e interruttore
Soporte de sobremesa para micrófonSoporte de sobremesa para micrófono con conmutador
Suporte de mesa do microfoneSuporte de mesa do microfone com interruptor
话筒台架话筒台架(带开关)
麥克風桌面支架麥克風桌面支架(含開關)
마이크 데스크 스탠드스위치가 있는 마이크 데스크 스탠드
お買い上げいただきありがとうございます。ご使用の前にこ
の取扱説明書を必ずお読みのうえ、正しくご使用ください。
また、いつでもすぐ読める場所に保管しておいてください。
■
•
•
ユニットに伝わる表面振動を最小限に抑える、重厚なダ
イキャスト構造とすべり止めのボトムパッド
•
•
反射を抑え、目立ちにくい黒色仕上げの薄型デザイン
•
•
リバーシブルなXLRタイプコネクターを本製品の上部と
背面に装備
•
•
操作音の極めて少ない電子スイッチに対し、3つの作動
モード「タッチ・オン/タッチ・オフ」、「タッチ・トゥー・トー
ク」、「タッチ・トゥー・ミュート」の設定が可能(AT8699R)
•
•
ATUCグースネックマイクロホンのLEDを3ピンXLRコ
ネクターを介し、操作可能(AT8699R)
■
本製品は安全性に充分な配慮をして設計していますが、使
いかたを誤ると事故が起こることがあります。事故を未然
に防ぐために下記の内容を必ずお守りください。
この表示は「取り扱いを誤った場合、
使用者が死亡または重傷を負う可能
性があります」を意味しています。
この表示は「取り扱いを誤った場合、
使用者が傷害を負う、または物的損
害が発生する可能性があります」を
意味 しています。
•強い衝撃を与えないでください。
•分解、改造、修理を行わないでください。
•濡れた手で触れないでください。感電やけがの原因に
なります。
•直射日光の当たる場所、暖房装置の近く、高温多湿や
ほこりの多い場所に置かないでください。
■
•
本製品内回路は電源供給開始から安定するまで30秒ほ
ど要します。起動中は音の乱れが聞こえることがあります。
•
本製品は、遮るものがない平坦な取り付け面に設置して
ください。音源が取り付け面の下にならないようにしてく
ださい。
•
テーブルの表面処理によっては、本製品の跡がテーブル
に残る場合があります。
■
本製品出力端子をファントム電源対応のマイク入力(平衡
入力)を有する機器に接続します。
出力コネクターはXLR-Mコネクターであり、極性は図の通
りです。
出力端子
本製品はファントム電源供給が必要です。
■
本製品の上部にあるXLRタイプコネクターの向きを逆にす
るためには以下のようにしてください。
1. プラスのスクリュードライバーを使用して本製品の上部
にあるXLRシャーシコネクターの角にある2本のねじを
取り外します。
2. 「PUSH」と書かれたレバーを少し持ち上げ、コネクター
を180°回転させて、プッシュレバーが本製品の前面にく
るようにします。
3. XLRシャーシコネクターの角のねじを取り付けて締め付
けます。
■
ファントム電源11~52VDC、1.1mA
スイッチ•
(AT8699R)
タッチセンサー:ON/OFF
スイッチ:タッチON/OFF、モメンタ
リーON、モメンタリーOFF
質量AT8699:782g
AT8699R:805g
寸法AT8699: 42.5 mm × 91 mm ×
133 mm (H×W×D)
AT8699R: 42.5 mm × 91 mm ×
133 mm (H×W×D)
入力コネクター3ピンXLR-Fタイプ
出力コネクター3ピンXLR-Mタイプ
改良などのため、本製品は予告なく変更することがあります。
PIN1
(LEDグランド)
PIN3••
(コールド)
PIN2(ホット)
■ /
Switch setting and functions (AT8699R) /
Réglages et fonctions du commutateur (AT8699R) /
Schaltereinstellung und -funktionen (AT8699R) /
Impostazioni dell’interruttore e funzioni (AT8699R) /
Ajuste y funciones del conmutador (AT8699R)
スイッチ
/
Switch function /
Fonction du commutateur /
Schalterfunktion /
Funzione interruttore /
Función del conmutador
スイッチ動作
/
Action /
Action /
Aktion /
Azione /
Acción
マイクロホン
/
Audio status /
État de l’audio /
Audiostatus /
Stato audio /
Estado del audio
LED
/
LED status /
État LED /
LED-Status /
LED di stato /
Estado del audio
Thank you for purchasing this product. Before using
the product, read through the user manual to ensure
that you will use the product correctly. Please keep this
manual for future reference.
■Features
•
Heavy die-cast construction and non-slip bottom
pads minimize coupling of surface vibration to the
unit
•
Low-profile design with low-reflectance black
finish for minimum visibility
•
Reversible XLR-type connector on the top and the
rear of the product
•
Ultra-quiet electronic switch can be set to any
of three operating modes: “touch-on/touch-off,”
“touch-to-talk” and “touch-to-mute” (AT8699R)
•
Gooseneck LED control over 3-pin XLR w/ ATUC
microphones (AT8699R)
■Safety precaution
Although this product was designed to be used safely,
failing to use it correctly may result in an accident. To
ensure safety, observe all warnings and cautions while
using the product.
Cautions for the product
•Do not subject the product to strong impact to avoid
malfunction.
•Do not disassemble, modify or attempt to repair the
product.
•Do not handle the product with wet hands to avoid
electric shock or injury.
•Do not store the product under direct sunlight, near
heating devices or in a hot, humid or dusty place.
■Notes on use
•The electronics in the product take up to 30 seconds
to stabilize after power is applied; if the system is
live during this start-up period and you activate the
switch, you may hear some sonic disturbances.
•The product should be placed on a flat, unobstructed
mounting surface. The sound source should not be
below the plane of the mounting surface.
•Placing any object on a surface (such as a
conference table) before its finish is fully cured may
result in damage to the finish.
■Connection procedure
Connect the output terminals of the product to a
device that has a microphone input (balanced input)
compatible with a phantom power supply.
The output connector is an XLRM-type with polarity as
shown in the figure below.
Output terminals
This product requires 11-52 V DC phantom power.
■Arrangement of the connector
To reverse the direction of the XLR-type connector on
top of the product:
1. Using a Phillips screwdriver, remove two screws
at the corners of the XLR chassis connector on the
top of the product.
2. Grasp the “push” lever, lift it slightly, and turn the
connector 180°, so the push lever is near the front
of the product.
3. Replace and tighten the corner screws on the XLR
chassis connector.
■Specifications
Phantom power
requirements
11-52 V DC, 1.1 mA
Switches
(AT8699R)
Touch-sensitive control: on/o;
Switch function: touch on/o,
momentary on, momentary o
WeightAT8699: 782 g (27.6 oz)
AT8699R: 805 g (28.4 oz)
DimensionsAT8699: 42.5 mm (1.67”) × 91 mm (3.58”) ×
133 mm (5.24”) (H×W×D)
AT8699R: 42.5 mm (1.67”) × 91 mm (3.58”) ×
133 mm (5.24”) (H×W×D)
Input connectorIntegral 3-pin XLR-F type
Output connectorIntegral 3-pin XLR-M type
For product improvement, the product is subject to
modification without notice.
Nous vous remercions d’avoir choisi ce produit. Avant
utilisation, merci de lire attentivement ce manuel
pour vous assurer du bon usage du produit. Veuillez
conserver ce manuel pour consultation ultérieure.
■Caractéristiques
•
Corps robuste moulé et socle antidérapant
réduisant les vibrations de surface
•
Design discret avec finition noire à faibles reflets
pour une visibilité minimale
•
Connecteur réversible de type XLR sur le dessus et
à l’arrière du produit
•
Le commutateur électronique ultra-silencieux
peut être réglé sur l'un des trois modes de
fonctionnement suivants : “touch-on/touch-off,”
“touch-to-talk” et “touch-to-mute” (AT8699R)
•
Contrôle LED col de cygne sur connecteur XLR 3
broches avec microphones ATUC (AT8699R)
■Consignes de sécurité
Bien que la conception de ce produit garantisse
la sécurité d'utilisation, une utilisation incorrecte
peut entraîner un accident. Pour assurer la sécurité,
respectez l'ensemble des avertissements et mises en
garde lorsque vous utilisez le produit.
Précautions d'utilisation
•Ne pas soumettre le produit à des chocs violents
afin d'éviter tout dysfonctionnement.
•Ne pas démonter, modifier ou tenter de réparer le
produit.
•Ne pas manipuler le produit avec les mains
mouillées pour éviter tout choc électrique ou toute
blessure.
•Ranger le produit à l'abri des rayons du soleil,
des appareils générant de la chaleur et des
environnements chauds, humides ou poussiéreux.
■Remarques sur l'utilisation
•Il faut jusqu’à 30 secondes pour que l’électronique
du produit se stabilise après la mise sous tension.
Si le système est actif durant cette période de
démarrage et que vous activez le commutateur, des
perturbations sonores peuvent être audibles.
•Le produit doit être placé sur une surface
d’installation plane sans obstacle. La source du son
ne doit pas se trouver sous le plan de la surface
d'installation.
•Si vous placez un objet sur une surface (par exemple
une table de conférence) avant que sa finition soit
entièrement sèche, vous risquez d'endommager la
finition.
■Procédure de connexion
Connectez les bornes de sortie du produit à un appareil
équipé d’une entrée microphone (entrée symétrique)
compatible avec une alimentation fantôme.
Le connecteur de sortie est de type XLRM avec des
pôles tels qu'affichés dans l'illustration ci-dessous.
Bornes de sortie
Ce produit nécessite une alimentation fantôme 11-52
V CC.
■Disposition du connecteur
Pour inverser la direction du connecteur de type XLR
sur le dessus du produit:
1. À l’aide d’un tournevis cruciforme, retirez les deux
vis dans les coins du connecteur sur châssis XLR
situé sur le dessus du produit.
2. Saisissez le levier “push”, soulevez-le légèrement,
puis faites tourner le connecteur de 180° afin que
le levier se retrouve proche de la partie avant du
produit.
3. Remettez les vis en place dans les coins du
connecteur sur châssis XLR et resserrez-les.
■Caractéristiques techniques
Alimentation
fantôme
11-52 V CC, 1,1 mA
Commutateurs
(AT8699R)
Commande tactile: activée/désactivée ;
Fonction du commutateur : fonction tactile
activée/désactivée,
instantané activé, instantané désactivé
PoidsAT8699 : 782 g
AT8699R : 805 g
DimensionsAT8699 : 42,5 mm × 91 mm × 133 mm
(H×L×P)
AT8699R : 42,5 mm × 91 mm × 133 mm
(H×L×P)
Connecteur
d'entrée
Type XLR-F 3 broches intégral
Connecteur de
sortie
Type XLRM 3 broches intégré
Dans le cadre de l'amélioration du produit, ce dernier
peut être modifié sans préavis.
PIN1 (terre)
PIN3
(cold)
PIN2
(point chaud)
Vielen Dank für den Kauf dieses Produkts. Lesen Sie
diese Bedienungsanleitung vor Gebrauch des Produkts
um sicherzustellen, dass Sie es korrekt verwenden.
Bewahren Sie diese Anleitung für später anfallende
Fragen auf.
■Merkmale
•
Durch das schwere Druckgussgehäuse und die
rutschfesten Beläge an der Geräteunterseite wird
die Übertragung von Oberflächenschwingungen
auf das Gerät minimiert
•
Flaches Design mit reflexionsarmer schwarzer
Lackierung für geringe Sichtbarkeit
•
Drehbare XLR-Anschlüsse auf Ober- und Rückseite
des Produkts
•
Der geräuscharme elektronische Schalter kann auf
einen der drei Betriebsmodi eingestellt werden:
„Bei Berührung an/Bei Berührung aus“, „Bei
Berührung reden“ und „Bei Berührung stumm“
(AT8699R)
•
Mikrofone: Schwanenhals, LED-Kontrollleuchte,
3-poliger XLR-Anschluss mit ATUC (AT8699R)
■Sicherheitsvorkehrungen
Obwohl dieses Produkt für die sichere Anwendung
konstruiert wurde, kann falsche Verwendung einen
Unfall verursachen. Beachten Sie zu Ihrer Sicherheit
alle Hinweise, wenn Sie das Produkt verwenden.
Vorsichtshinweise für das Produkt
•Setzen Sie das Produkt keinen starken
Erschütterungen aus, um Störungen zu vermeiden.
•Zerlegen oder verändern Sie das Produkt nicht und
versuchen Sie nicht es zu reparieren.
•Fassen Sie das Produkt nicht mit nassen Händen
an, ansonsten kann es zu Stromschlägen oder
Verletzungen kommen.
•Bewahren Sie das Produkt nicht in direktem
Sonnenlicht, in der Nähe von Heizvorrichtungen
oder an einem heißen, feuchten oder staubigen Ort
auf.
■Hinweise zum Gebrauch
•Es kann bis zu 30 Sekunden dauern, bis sich die
Elektronik im Produkt nach dem Anlegen der
Versorgungsspannung stabilisiert hat. Wenn das
System währenddessen eingeschaltet ist und Sie
den Schalter betätigen, kann es zu Störgeräuschen
kommen.
•Das Produkt muss auf einer ebenen, nicht verstellten
Montagefläche aufgestellt werden. Die Tonquelle
darf sich nicht unterhalb der Montagefläche
befinden.
•Durch das Aufstellen auf einer Oberfläche (z.B.
einem Konferenztisch) mit noch nicht vollständig
ausgehärteter Lackierung kann es zu Schäden an
der Lackierung kommen.
■Anschlussverfahren
Verbinden Sie die Ausgangsanschlüsse
des Produkts mit einem Gerät, das einen
phantomspeisungskompatiblen Mikrofoneingang
(symmetrischen Eingang) besitzt.
Der Ausgangsstecker ist ein XLRM-Stecker, dessen
Polarität Sie auf der nachstehenden Abbildung sehen
können.
Ausgangsanschlüsse
Dieses Produkt benötigt eine 11–52V DC
Phantomspeisung.
■Ausrichtung des Anschlusses
Gehen Sie wie folgt vor, um den XLR-Anschluss auf
der Oberseite des Produkts umzudrehen:
1. Entfernen Sie mit einem Kreuzschlitz-
Schraubendreher die zwei Schrauben an den
Chassisecken des XLR-Anschlusses auf der
Oberseite des Produkts.
2. Heben Sie den Hebel mit der Beschriftung „PUSH“
leicht an und drehen Sie den Anschluss um 180°,
sodass der PUSH-Hebel in Richtung Vorderseite
des Produkts zeigt.
3. Setzen Sie die Eckschrauben wieder in das Chassis
des XLR-Anschlusses ein und ziehen Sie sie an.
■Technische Daten
Phantomspeisung11–52V DC, 1,1mA
Schalter
(AT8699R)
Berührungsempfindliche Steuerung:
an/aus
Schalterfunktion: bei Berührung an/aus
kurzzeitig an, kurzzeitig aus
GewichtAT8699: 782g
AT8699R: 805 g
AbmessungenAT8699: 42,5mm × 91mm × 133mm
(H × B × T)
AT8699R: 42,5mm × 91mm × 133mm
(H × B × T)
EingangsanschlussIntegrierter 3-poliger XLR-F-Anschluss
AusgangsanschlussIntegrierter 3-poliger XLRM-Anschluss
Im Rahmen der Produktverbesserung unterliegt das
Produkt Änderungen ohne Vorankündigung.
PIN 1 (Masse)
PIN 3
(kalt)
PIN 2 (heiß)
Grazie per aver acquistato questo prodotto. Prima
dell'utilizzo, leggere attentamente il manuale dell'utente
per assicurarsi che il prodotto sia utilizzato correttamente.
Conservare il manuale come riferimento futuro.
■Caratteristiche
•
Telaio pressofuso resistente e cuscinetti antiscivolo
per ridurre al minimo la trasmissione delle
vibrazioni dalla superficie di appoggio
•
Design a profilo ribassato con finitura nera
antiriflesso per la minima visibilità
•
Connettore XLR reversibile sul pannello superiore e
posteriore del prodotto
•
Selettore elettronico ultra silenzioso per tre distinte
modalità operative: “tocco accendi/spegni”,
“tocca per parlare” e “tocca per escludere l'audio”
(AT8699R)
•
LED di controllo a collo d'oca XLR a tre poli con
microfoni ATUC (AT8699R)
■Precauzioni di sicurezza
Anche se questo prodotto è stato realizzato per essere
utilizzato in piena sicurezza, l'uso scorretto potrebbe
causare incidenti. Per garantire il massimo grado di
sicurezza, osservare tutte le avvertenze e le precauzioni
fornite per l'utilizzo del prodotto.
Precauzioni nell'utilizzo del prodotto
•Per evitare malfunzionamenti, evitare possibili urti.
•Non smontare, modificare o tentare di riparare il
prodotto.
•Per evitare scosse elettriche o lesioni, non toccare il
prodotto con le mani bagnate.
•Non riporre il prodotto alla luce diretta del sole,
vicino a un dispositivo di riscaldamento o in luogo
caldo, umido o polveroso.
■Note sull'utilizzo
•Dopo l’accensione, l’elettronica del prodotto impiega
circa 30 secondi per stabilizzarsi; se il sistema di
diffusione sonora è già attivo, l’uso dell’interruttore
potrebbe causare disturbi audio.
•Il prodotto dovrebbe essere posizionato su una
superficie piana e senza ostacoli.La sorgente sonora
non dovrebbe trovarsi al di sotto della superficie sulla
quale è stato posizionato il supporto da scrivania.
•Posizionando un qualsiasi oggetto su una superficie
(come ad esempio un tavolo per riunioni) non
perfettamente levigato o rifinito, si potrebbe
danneggiare la finitura.
■Procedura di collegamento
Collegare i terminali di uscita del prodotto al dispositivo
dotato di ingresso microfonico (ingresso bilanciato) e
compatibile con l’alimentazione phantom.
Il connettore di uscita è del tipo XLRM, con la polarità
come indicata nella figura in basso.
Terminali di uscita
Questo prodotto richiede alimentazione phantom a 11-
52 V CC.
■Configurazione del connettore
Per invertire l’orientamento del connettore XLR sul
pannello superiore del prodotto:
1. Utilizzare un cacciavite Phillips per rimuovere le
due viti agli angoli del blocco connettore XLR, sul
pannello superiore del prodotto.
2. Afferrare la levetta “push”, sollevarla leggermente
e ruotare il connettore di 180°, in modo da portare
la levetta più vicino alla parte frontale del prodotto.
3. Ricollocare le viti per assicurare in sede il blocco
connettore XLR.
■Specifiche tecniche
Requisiti
alimentazione
phantom
11-52 V CC, 1,1 mA
Selettori
(AT8699R)
Controllo tattile: accendi/spegni;
Funzione interruttore: tocco accendi/
spegni,
accendi temporaneamente, spegni
temporaneamente
PesoAT8699: 782 g
AT8699R: 805 g
DimensioniAT8699: 42,5 mm × 91 mm × 133 mm
(A×L×P)
AT8699R: 42,5 mm × 91 mm × 133 mm
(A×L×P)
Connettore ingressoXLR-F a 3 poli integrale
Connettore di uscitaXLR-M a 3 poli integrale
Ai fini del miglioramento, il prodotto è soggetto a
modifiche senza preavviso.
PIN1 (terra)
PIN3
(freddo)
PIN2 (caldo)
Le agradecemos la compra de este producto. Antes de
utilizarlo, lea el manual de usuario para asegurarse de
que lo utilizará correctamente. Conserve este manual
para consultarlo en un futuro.
■Características
•
Sólida construcción por moldeo y almohadillas
antideslizantes en la base que minimizan la
transmisión de vibraciones de la superficie a la
unidad
•
Diseño de perfil bajo con acabado negro poco
reflectante para visibilidad mínima
•
Conector de tipo XLR reversible en la parte
superior y la parte trasera del producto
•
Conmutador electrónico ultrasilencioso que puede
ajustarse en tres modos de funcionamiento:
“activación/desactivación táctil”, “tocar para
hablar” y “tocar para silenciar” (AT8699R)
•
Control LED de cuello de ganso para XLR de
3pines con micrófonos ATUC (AT8699R)
■Advertencias de seguridad
Aunque este producto se p1-ha diseñado para su uso
seguro, si no lo utiliza de manera correcta puede
provocar un accidente. Con el fin de garantizar
la seguridad, respete todas las advertencias y
precauciones mientras utiliza el producto.
Precauciones para el producto
•No someta el producto a impactos fuertes para
evitar averías.
•No desmonte, modifique o intente reparar el
producto.
•No manipule el producto con las manos húmedas
para evitar descargas o daños.
•No deje el producto bajo la luz solar directa, junto
a dispositivos de calefacción o en lugares cálidos,
húmedos o polvorientos.
■Notas sobre el uso
•La electrónica del producto tarda hasta 30 segundos
en estabilizarse desde que empieza a recibir
alimentación; si el sistema está activo durante este
periodo de inicio y acciona el conmutador, podría oír
alguna perturbación acústica.
•El producto debe colocarse sobre una superficie de
montaje plana y libre de obstáculos. La fuente de
sonido no debe quedar por debajo del plano de la
superficie de montaje.
•Si coloca un objeto sobre una superficie (como
una mesa de conferencias) antes que su acabado
esté totalmente seco, podría provocar daños en el
acabado.
■Procedimiento de conexión
Conecte los terminales de salida del producto a
un dispositivo con entrada de micrófono (entrada
balanceada) compatible con suministros eléctricos
phantom.
El conector de salida es de tipo XLRM con la polaridad
que se muestra en la siguiente figura.
Terminales de salida
Este producto precisa de alimentación phantom de 11-
52VCC.
■Disposición del conector
Para invertir la dirección del conector de tipo XLR en la
parte superior del producto:
1. Utilice un destornillador Phillips para extraer dos
tornillos de las esquinas del conector del chasis
XLR en la parte superior del producto.
2. Sujete la palanca de “empuje”, levántela levemente
y gire el conector 180°, de forma que la palanca
quede cerca de la parte frontal del producto.
3. Sustituya los tornillos de las esquinas del conector
del chasis XLR y apriételos.
■Especificaciones
Requisitos de
alimentación
Phantom
11-52 V CC, 1,1 mA
Interruptores
(AT8699R)
Control táctil: activado/desactivado;
Función del conmutador: control táctil
activado/desactivado,
activado momentáneo, desactivado
momentáneo
PesoAT8699: 782 g
AT8699R: 805 g
DimensionesAT8699: 42,5 mm × 91 mm × 133 mm (Al
× An × F)
AT8699R: 42,5 mm × 91 mm × 133 mm (Al
× An × F)
Conector de
entrada
Tipo XLR-F de 3pines integral
Conector de salidaTipo XLR-M de 3pines integral
El producto está sujeto a modificaciones sin previo
aviso con fines de mejora del mismo.
PIN1 (tierra)
PIN3
(frío)
PIN2 (caliente)
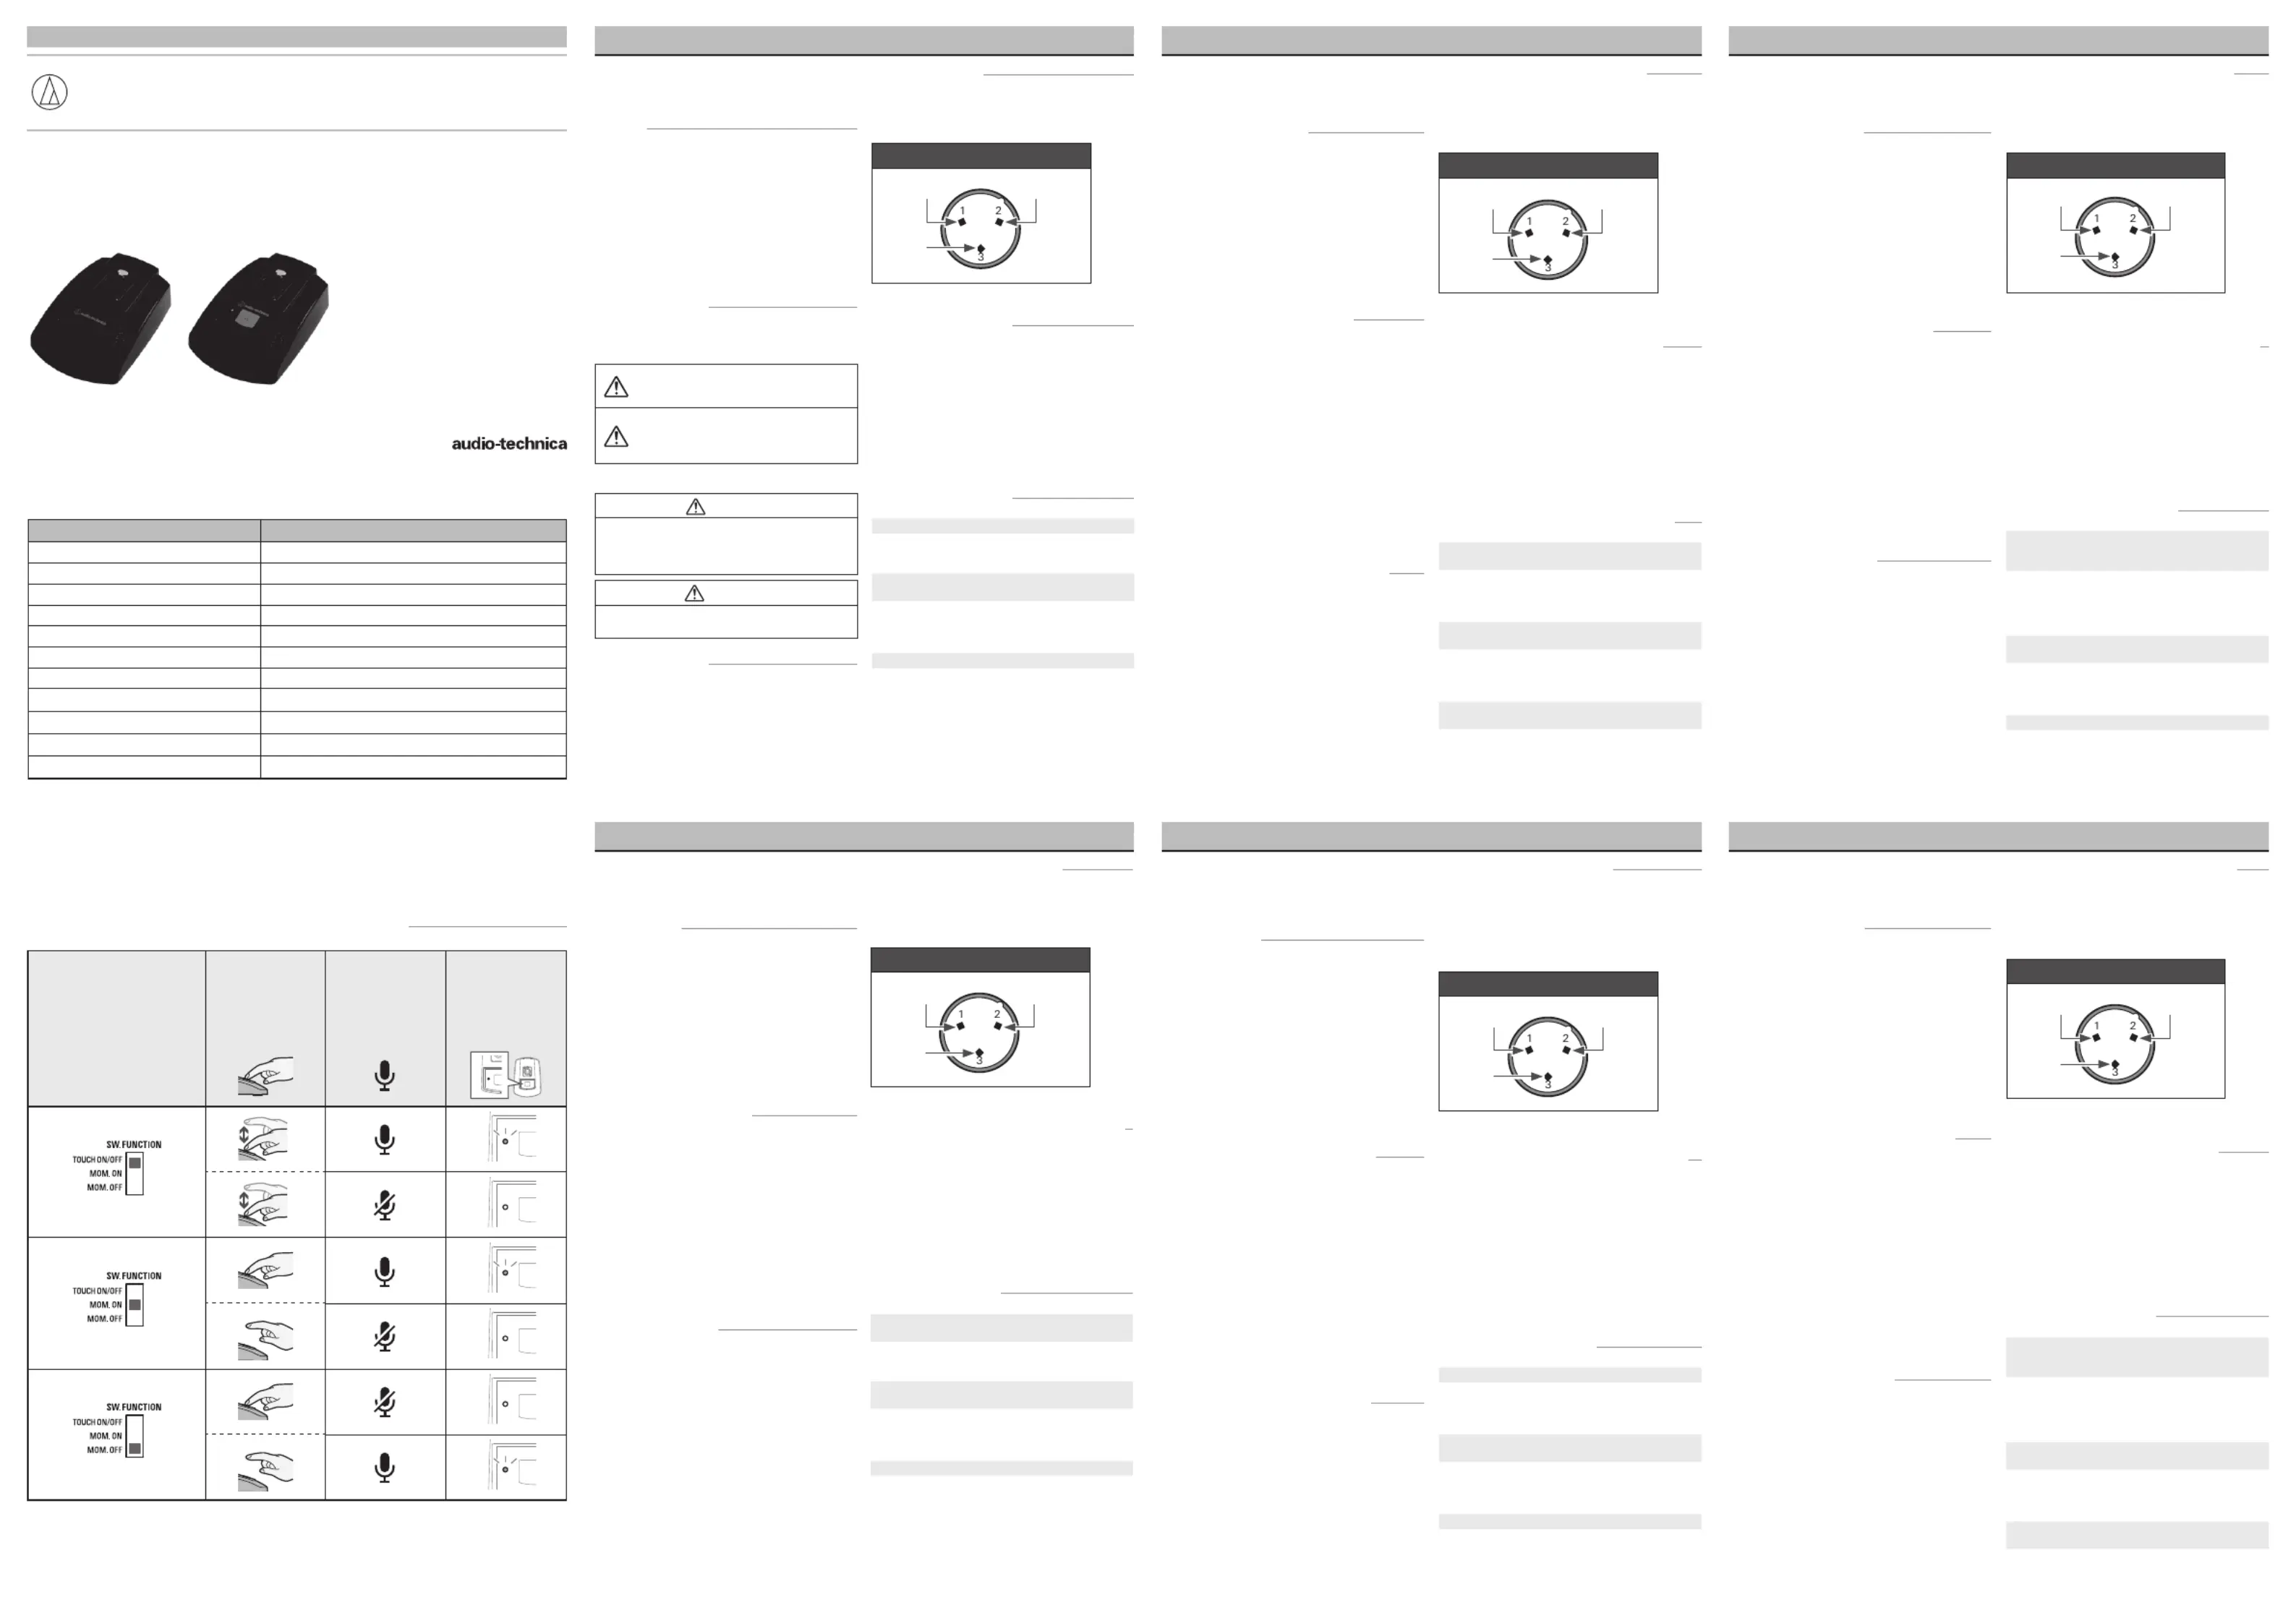
PIN1 (ground)
PIN3
(cold)
PIN2 (hot)
Specyfikacje produktu
| Marka: | Audio-Technica |
| Kategoria: | Niesklasyfikowane |
| Model: | AT8699R |
Potrzebujesz pomocy?
Jeśli potrzebujesz pomocy z Audio-Technica AT8699R, zadaj pytanie poniżej, a inni użytkownicy Ci odpowiedzą
Instrukcje Niesklasyfikowane Audio-Technica

27 Grudnia 2024
7 Grudnia 2024
6 Grudnia 2024
6 Grudnia 2024
6 Grudnia 2024
6 Grudnia 2024
6 Grudnia 2024
6 Grudnia 2024
6 Grudnia 2024
6 Grudnia 2024
Instrukcje Niesklasyfikowane
Najnowsze instrukcje dla Niesklasyfikowane
29 Stycznia 2025
29 Stycznia 2025
29 Stycznia 2025
29 Stycznia 2025
29 Stycznia 2025
29 Stycznia 2025
29 Stycznia 2025
29 Stycznia 2025
29 Stycznia 2025
29 Stycznia 2025