Instrukcja obsługi CTA Digital PAD-GFS
CTA Digital Niesklasyfikowane PAD-GFS
Przeczytaj poniżej 📖 instrukcję obsługi w języku polskim dla CTA Digital PAD-GFS (2 stron) w kategorii Niesklasyfikowane. Ta instrukcja była pomocna dla 27 osób i została oceniona przez 8 użytkowników na średnio 4.1 gwiazdek
Strona 1/2
Use this table to determine the appropriate
foam pad to use with your tablet.
Note: sizes refer to total tablet size with
or without a case.
Foam Pad
Thickness
Tablet
Thickness:
1mm 0.67-1.06in
5mm0.51-0.91in
10mm0.31-0.71in
17-27mm
13-23mm
8-18mm
/
/
/
1.Select the suitable foam pad according
to your tablet thickness ,then stick it correctly
to the middle circle of the tablet holder.
5mm
Foam
Pad
10mm
Foam
Pad
PAD-GFS
•
•
Easily-
Removable tablet
holder for convenience
Compatible with all 7-13
inch tablets
4 removable wheels
for mobility
1
5 inch Gooseneck for
orientation and position
Specifications:
•15-inch Gooseneck for orientation,
position and angle adjustment
•Adjustable height bar
•Four wheels for mobility
•Weighted bottom for stability
•Solid steel construction for durability
•
Compatible with 7-13 inch tablets,
including iPad (2017), iPad mini, iPad
Air, iPad Pro 12.9, Surface Pro 4, and
more
Features Include:
Package Includes:
(1)Weighted Base and Metal Plate
(1)Adjustable Pole
(1)Gooseneck Extender
(1)Plastic Tablet Holder
(1)Set of hardware
(4)Wheels (with nuts & gaskets)
•Tablet holder range: 8.625 – 15.5 inches
•Height(Max): Approximately 57 inches
Adjustable Height of 15 inches
Weight:
12.9 pounds
•Flexible 15-inch steel gooseneck
•Assembly required
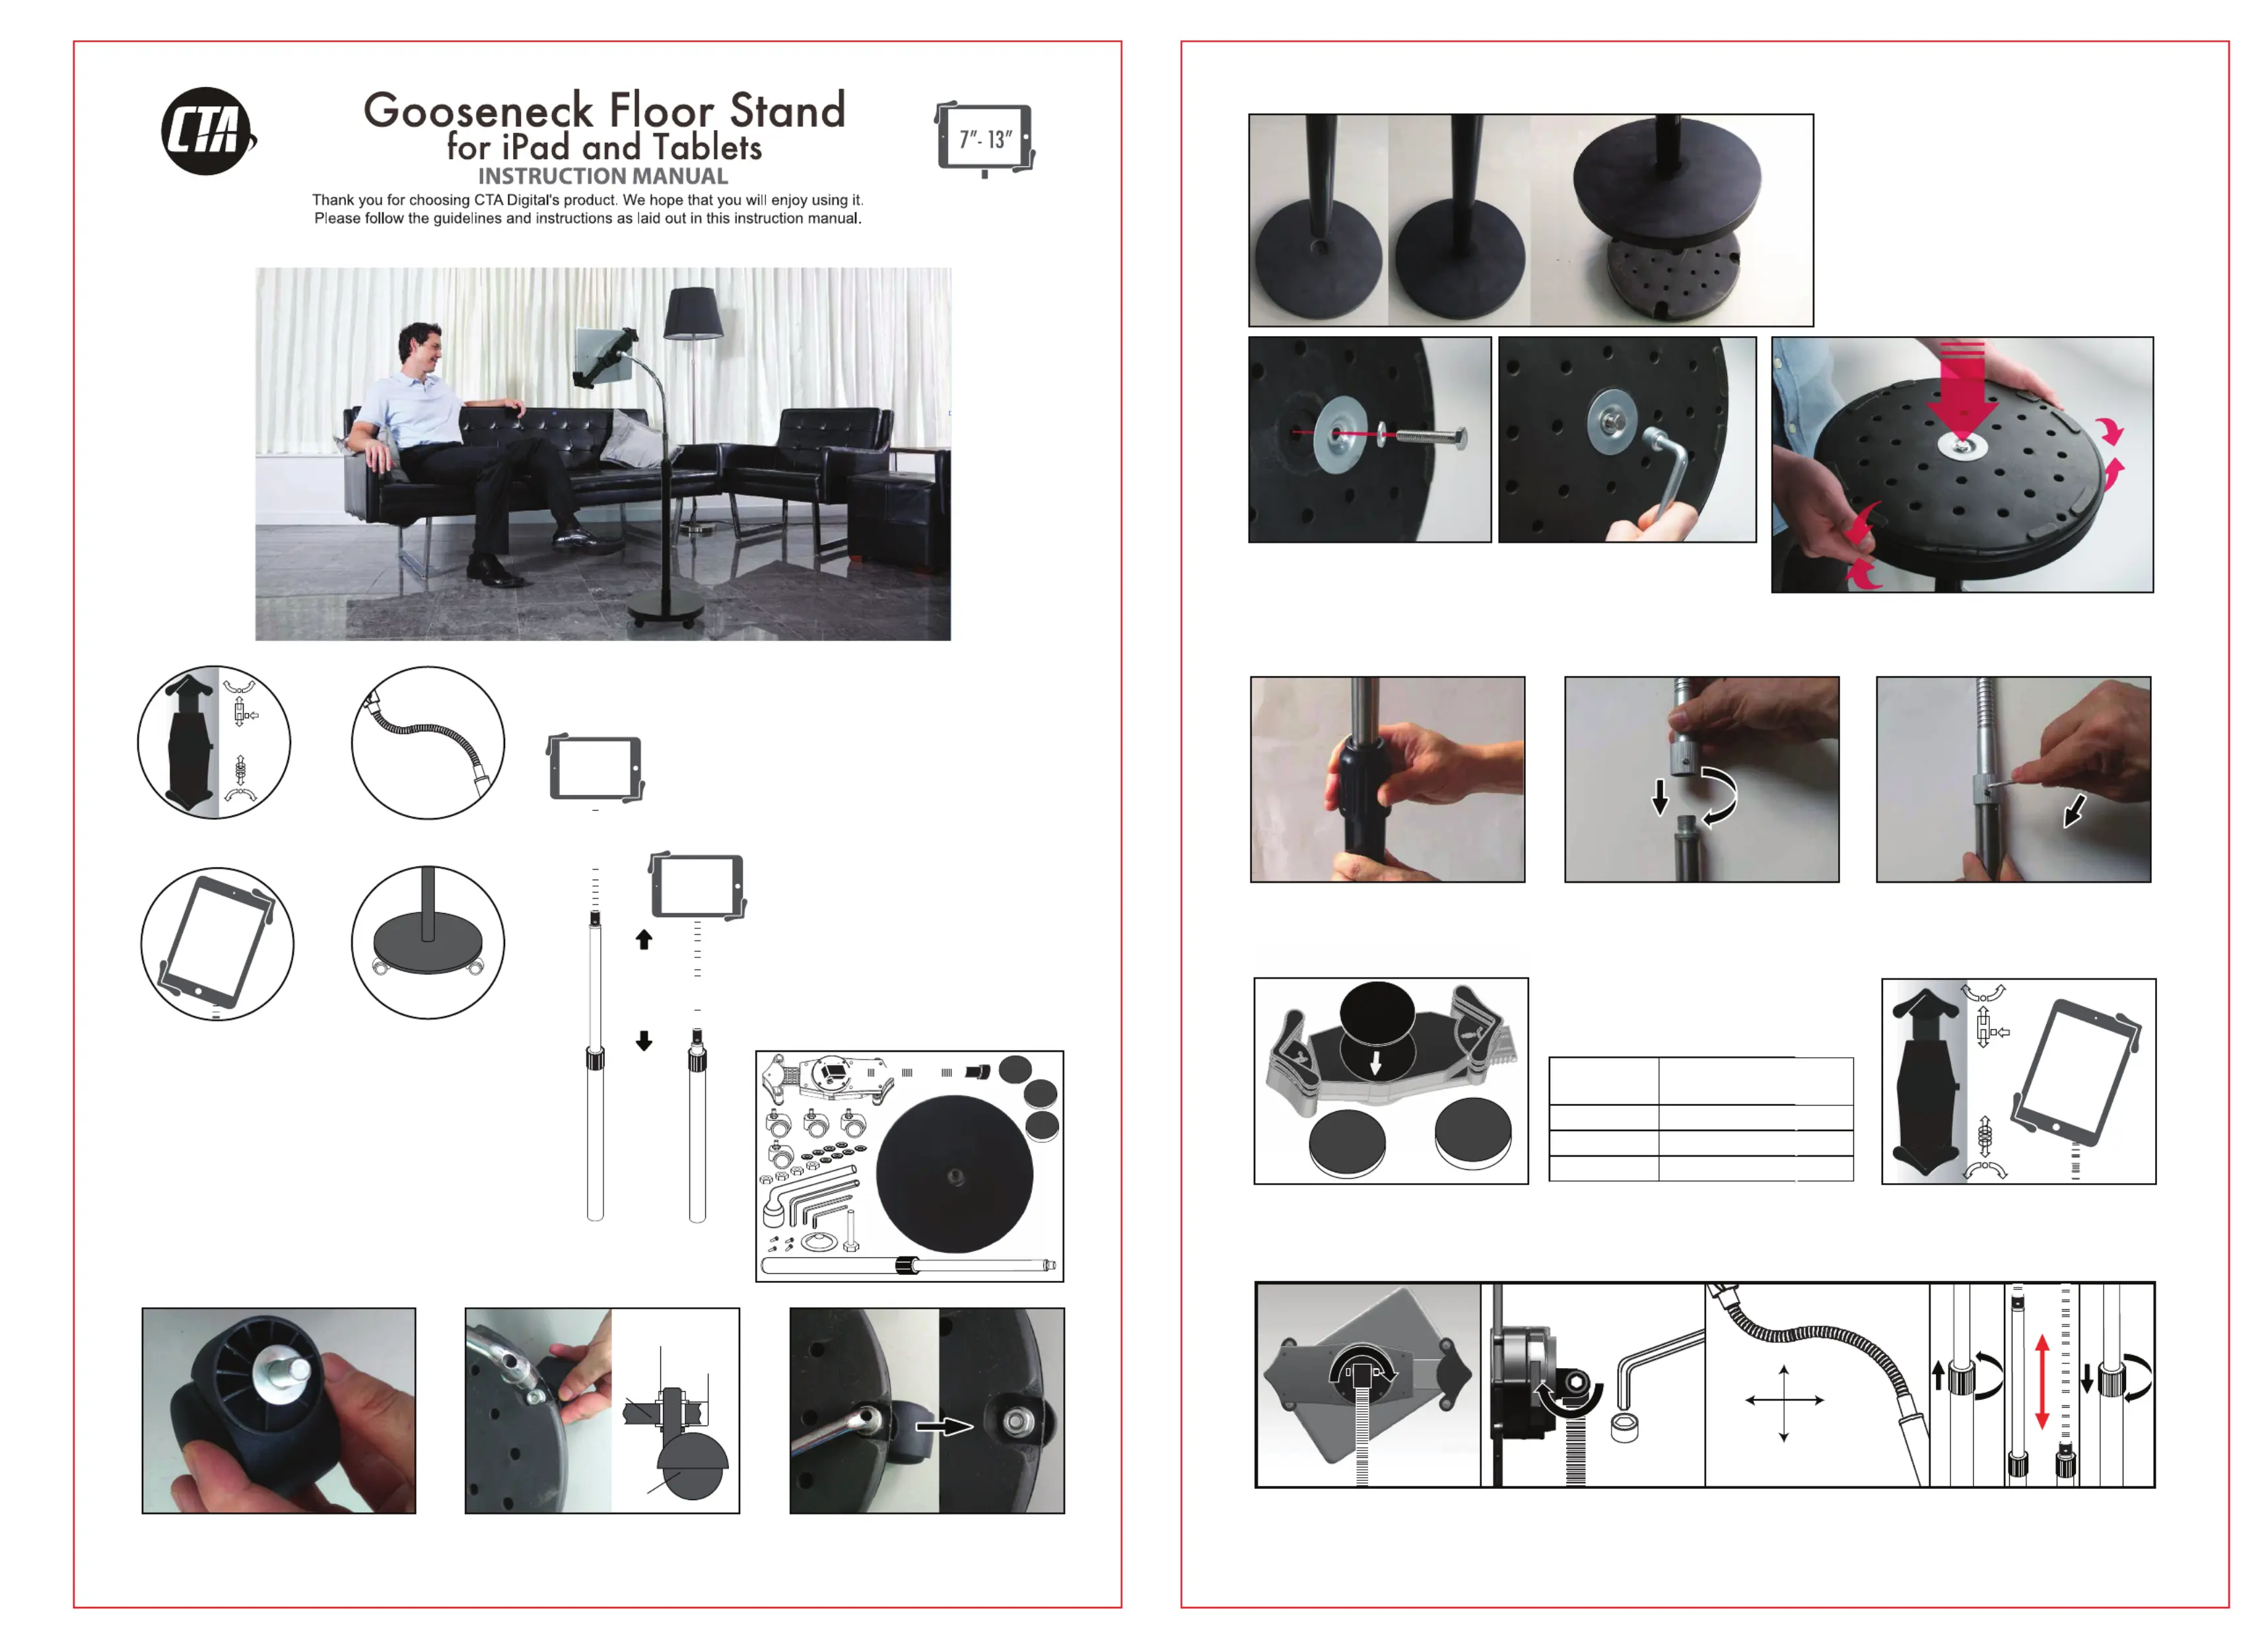
Instructions:
1.Installing the Wheels
Wheel
Place a gasket over the screw bolt on
each wheel
Place the screw bolt from each wheel through the weight base, then place a gasket
and nut over the top of each and tighten. Hold the wheel by one hand, use another
hand with the socket spanner to tighten further.
Screw Nut
Gaskets
Weight
Base
Adjust the inner pole to the desired height,
twist the plastic cover to tighten it into place
Screw the gooseneck extender onto the inner pole by turning clockwise.
Once tightly in place, tighten the small screw at the base of the
gooseneck extender using the smaller Allen key.
Bring the plastic cover to the head
of the outer pole, make sure it is
upright, then fasten by turning
clockwise.
To flex the gooseneck for multi direction adjustion.To adjust
the height of the pole, turn plastic cover counter-clockwise
and raise or lower the pole then turn clockwise again to lock
it.
4.Attaching Foam Pad to Tablet Holder and Installing your Device
5.Adjusting the Floor Stand:
Adjustable
Height of
15 inches
2.Press button on side of tablet holder to slide open.
Insert your tablet against spring arm,then slide other
end back down.
To rotate the tablet holder or use the bigger Allen key to
tighten and loosen the gooseneck connection screw,
adjusting ease of rotation.
Bigger
AllenKey
360 rotation
180 rotation
o
Multi
direction
flexing
Note: if meter screws are already in,
unscrew before attaching gooseneck.
1mm Foam Pad
2.Connecting the Pole and Metal Cover to the Weight Base
1.Insert pole into top of stand base.
Press firmly down until pole is fully in.
3.Flip the stand around and continue pressing and
wiggling pole into the stand base. Flip again and
tighten with socket wrench. Repeat as necessary.
2.Put spring washer over bolt, than pass bolt through
the gasket into the bottom of the stand base. Use
socket wrench to tighten.
Note: be sure the bolt is perpendicular to the pole and
weight base, and not at an angle.
3.
Connecting the Gooseneck Extender
Specyfikacje produktu
| Marka: | CTA Digital |
| Kategoria: | Niesklasyfikowane |
| Model: | PAD-GFS |
Potrzebujesz pomocy?
Jeśli potrzebujesz pomocy z CTA Digital PAD-GFS, zadaj pytanie poniżej, a inni użytkownicy Ci odpowiedzą
Instrukcje Niesklasyfikowane CTA Digital

5 Stycznia 2025
27 Grudnia 2024
12 Grudnia 2024
11 Grudnia 2024
11 Grudnia 2024
11 Grudnia 2024
11 Grudnia 2024
10 Grudnia 2024
10 Grudnia 2024
10 Grudnia 2024
Instrukcje Niesklasyfikowane
Najnowsze instrukcje dla Niesklasyfikowane
29 Stycznia 2025
29 Stycznia 2025
29 Stycznia 2025
29 Stycznia 2025
29 Stycznia 2025
29 Stycznia 2025
29 Stycznia 2025
29 Stycznia 2025
29 Stycznia 2025
29 Stycznia 2025