Instrukcja obs艂ugi CTA Digital PAD-SICCB
CTA Digital
Niesklasyfikowane
PAD-SICCB
Przeczytaj poni偶ej 馃摉 instrukcj臋 obs艂ugi w j臋zyku polskim dla CTA Digital PAD-SICCB (3 stron) w kategorii Niesklasyfikowane. Ta instrukcja by艂a pomocna dla 13 os贸b i zosta艂a oceniona przez 7 u偶ytkownik贸w na 艣rednio 4.8 gwiazdek
Strona 1/3

888-733-4448
PAD-SICCB
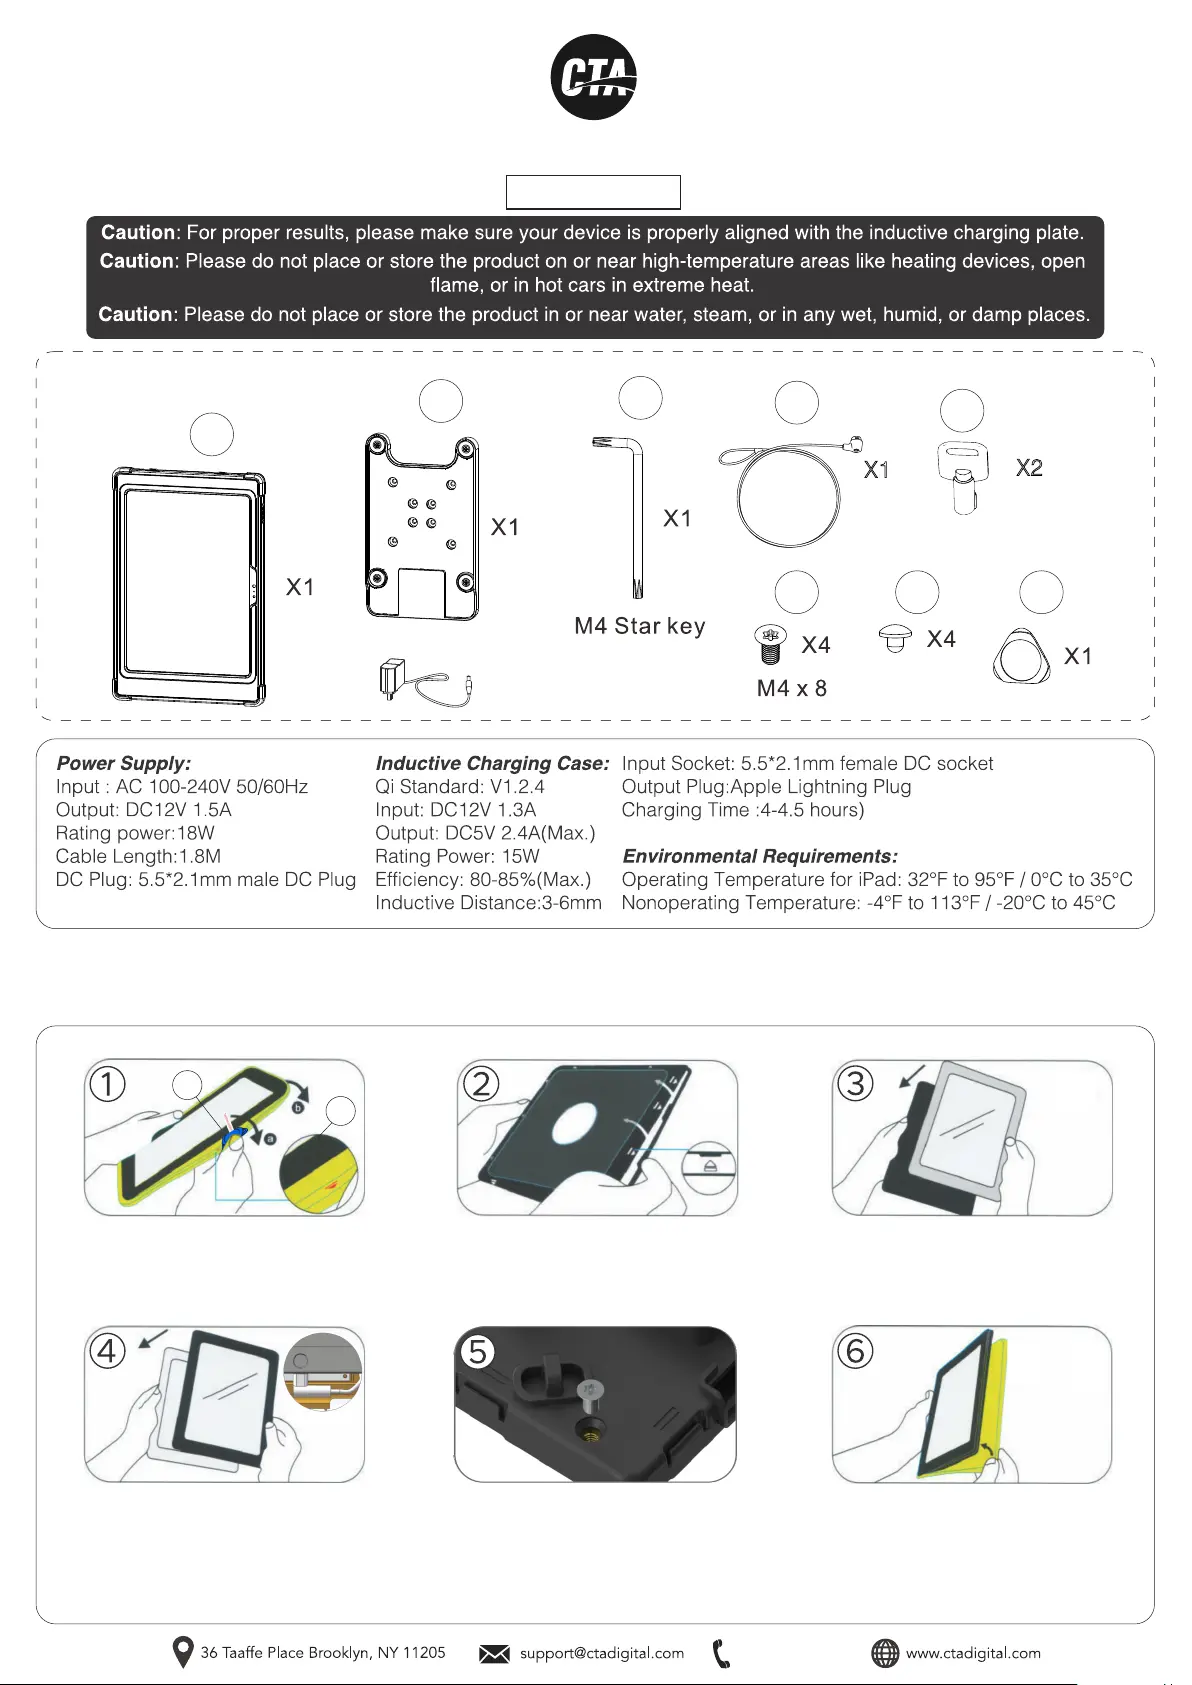
INSTALLATION - MANUAL
INSTALLATION:
1. Inserting Tablet into Enclosure
Wireless Inductive Charging Case w/ Security Lock
A
B
E F
C
D
E
X2
D
X1
CONTENTS:
Once the tablet device is inside, plug
the charging cable into the power
socket. Then place the internal front
(hard) cover on top of the case, and
gently clip all four sides shut.
Tighten the anti-theft screw with
the included star key (C) if you
want the case security.
Reinstall the external silicone
rubber sleeve.
Peel the external silicone sleeve
from the internal hard case using
component (F).
To open case, apply gentle pressure to
the small clips (noted on the diagram by
arrows). The internal hard case will
open when all four sides are unclipped.
Insert the iPad into the back
portion of the hard cover.
A
F

2. Setting the Cover in Tabletop or Handheld Mode
1. Locate kickstand at case (A) rear and fold out underneath strap.
2. Display tablet at desired viewing angle.
3. Press kickstand in to return to handheld mode.
3. Charging the Tablet Device
Connect the AC/DC power supply to the charging plate as shown above. Make sure that the
charging case and the
back charging plate
are aligned properly.
You should see a blue
indicator lighting up
on the back of the
charging plate.
The blue indicator light indicates that the
tablet device is properly connected to
the inductive charging plate.
There should be a power level
indicator on the tablet screen.
4. Using with kiosk stand (ADD-ICCSTAND)
4A. Place component (E) in the
(4) outter holes in the back of
the charging plate.
4B. Align VESA holes of the charging plate (B) and
the stand, and rotate in (4) screws (D) using the
included allen key (C) until securely tightened.
4C. Place the tablet device
on top of the charging plate
by aligning the magnets.
A
B
A
E
B
B
D
C
A
B

5. Key & Lock Security Option
5A. Easily Click-in Cable lock (D) into security hub to secure device. 5B. To release cable-lock insert provided Key
(E) into lock cable (D) and turn it clockwise
then take out the cable lock.
A
D
E
A
D
A
D
6. How to Anchor Into Table 7. ADD-ON Option
6A. Take the looped end of lock cable (D) and turn it around leg
table then click-in head of lock cable into the security hub. 7A. Attach Add-On into threaded holes (x4) when needed,
such as card readers, led lights, etc. As shown above.
A
D
Specyfikacje produktu
Marka: | CTA Digital |
Kategoria: | Niesklasyfikowane |
Model: | PAD-SICCB |
Potrzebujesz pomocy?
Je艣li potrzebujesz pomocy z CTA Digital PAD-SICCB, zadaj pytanie poni偶ej, a inni u偶ytkownicy Ci odpowiedz膮
Instrukcje Niesklasyfikowane CTA Digital
5 Stycznia 2025
27 Grudnia 2024
12 Grudnia 2024
11 Grudnia 2024
11 Grudnia 2024
11 Grudnia 2024
11 Grudnia 2024
10 Grudnia 2024
10 Grudnia 2024
10 Grudnia 2024
Instrukcje Niesklasyfikowane
- Niesklasyfikowane Hawk-Woods
- Niesklasyfikowane Baxi
- Niesklasyfikowane Rovo Kids
- Niesklasyfikowane Decimator
- Niesklasyfikowane Welltech
- Niesklasyfikowane Little Giant
- Niesklasyfikowane APSystems
- Niesklasyfikowane Apantac
- Niesklasyfikowane Beper
- Niesklasyfikowane Goliath
- Niesklasyfikowane CEEM
- Niesklasyfikowane Dreame
- Niesklasyfikowane Flamingo
- Niesklasyfikowane Forza
- Niesklasyfikowane HomeCraft
Najnowsze instrukcje dla Niesklasyfikowane
29 Stycznia 2025
29 Stycznia 2025
29 Stycznia 2025
29 Stycznia 2025
29 Stycznia 2025
29 Stycznia 2025
29 Stycznia 2025
29 Stycznia 2025
29 Stycznia 2025
29 Stycznia 2025