Instrukcja obsługi Motorola MA1
Przeczytaj poniżej 📖 instrukcję obsługi w języku polskim dla Motorola MA1 (16 stron) w kategorii Niesklasyfikowane. Ta instrukcja była pomocna dla 48 osób i została oceniona przez 7 użytkowników na średnio 4.9 gwiazdek
Strona 1/16
Bienvenue…
dans votre nouvel adaptateur de voiture sans fil Motorola
pour Android Auto !
•Assure la connexion sans fil avec votre téléphone pour
vous permettre de rester concentré sur la route.
•Se connecte au port USB activé par Android Auto existant
d’une voiture ou d’un camion compatible.
Consignes de sécurité importantes
Veuillez observer ces précautions lors de l’utilisation de votre
adaptateur pour limiter les risques de départ de feu, de choc
électrique et de blessures ou de dommages matériels :
•Maintenez dégagées toutes les fentes et ouvertures
de votre adaptateur. Ne le posez pas sur une grille de
chauage ou au-dessus d'un radiateur.
•Ne l’utilisez pas lorsqu’il est mouillé ou immergé dans l’eau.
•N’introduisez jamais d’objets quels qu’ils soient dans les
orifices de ventilation de votre adaptateur, ce qui peut
provoquer un départ de feu ou un choc électrique.
•N’utilisez pas de nettoyants liquides, de produits
chimiques nettoyants en aérosol ou de détergents pour
nettoyer votre adaptateur.
•Nettoyez votre adaptateur avec un chion doux et humide.
•Ne démontez pas votre adaptateur.
•Réglez uniquement les commandes indiquées dans le
mode d’emploi.
•Observez toutes les mises en garde et instructions figurant
sur votre adaptateur.
Conservez cez instructions
Veuillez lire attentivement le mode d’emploi et sachez que cet
adaptateur sans fil ne peut être utilisé que dans une voiture
compatible Android
TM
Auto avec votre smartphone sur lequel
l'application Android Auto est installée.
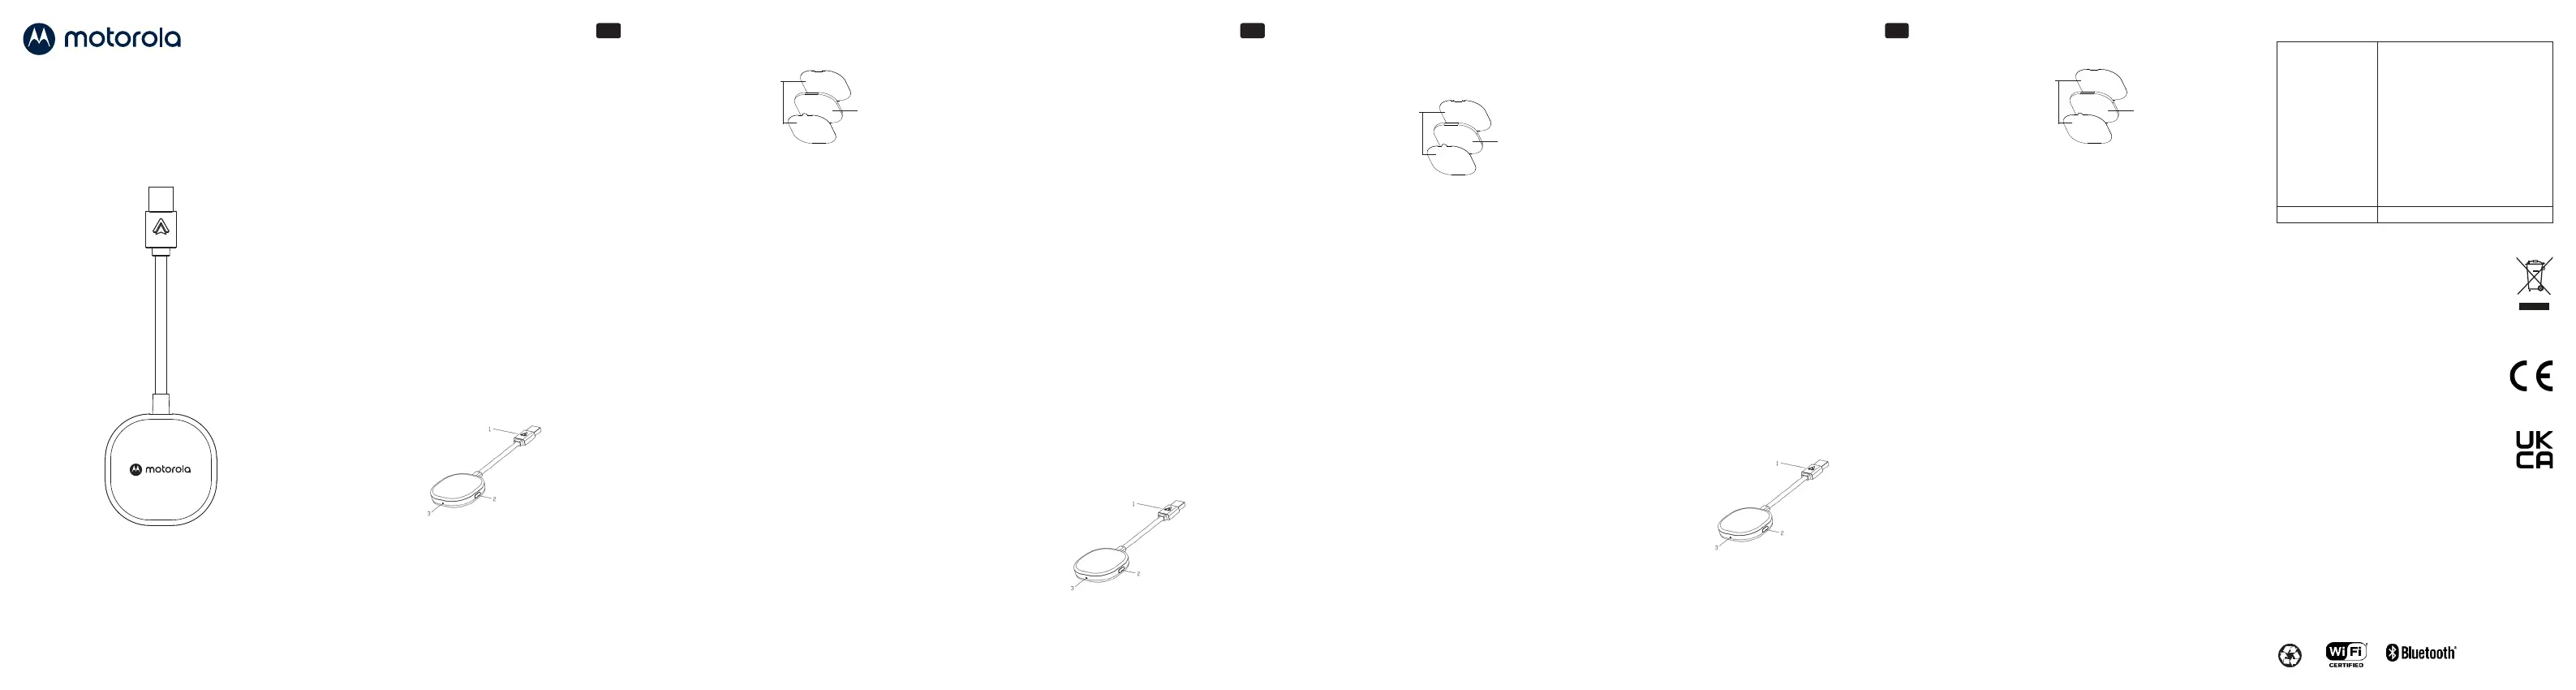
1.Apprendre à connaître votre adaptateur
1.Connecteur USB Type A standard à brancher sur le port
USB activé par Android Auto de votre voiture
2.Bouton de l’adaptateur pour le couplage avec Bluetooth et
la réinitialisation
3. Voyant :
•Blanc = adaptateur allumé
•Bleu : mode couplage avec Bluetooth
•Vert = connexion avec Android Auto
Willkommen…
zu Ihrem neuen Motorola Wireless Car Adapter für Android
Auto!
•Verbindet Ihr Telefon drahtlos, damit Sie sich auf den Weg
machen können.
•Wird an den vorhandenen Android Auto-fähigen
USB-Anschluss eines kompatiblen Autos oder LKWs
angeschlossen.
Wichtige Sicherheitshinweise
Befolgen Sie diese Sicherheitsvorkehrungen bei der
Verwendung des Geräts, um die Gefahr von Feuer,
Stromschlag und Verletzungen von Personen oder
Sachschäden zu verringern:
•Halten Sie alle Schlitze und Önungen des Produkts frei.
Stellen Sie das Gerät nicht auf ein Heizregister oder über
einen Heizkörper.
•Verwenden Sie das Gerät nicht in nassem Zustand oder
wenn Sie in Waser stehe Wasser stehen.
•Stecken Sie niemals irgendwelche Gegenstände in die
Lüftungsönungen des Produkts, da dies zu Feuer oder
Stromschlag führen kann.
•Verwenden Sie zum Reinigen dieses Produkts keine
flüssigen oder chemischen Reinigungsmittel oder
Reinigungsmittel in Sprühdosen.
•Reinigen Sie dieses Produkt mit einem weichen, feuchten
Tuch.
•Bitte zerlegen Sie dieses Produkt nicht.
•Ändern Sie nur die Bedienungselemente, die in der
Bedienungsanleitung beschrieben sind.
•Befolgen Sie alle auf dem Produkt angegebenen
Warnhinweise und Anweisungen.
Bewahren Sie diese Anleitungen auf
Bitte lesen Sie diese Bedienungsanleitung sorgfältig durch
und beachten Sie, dass dieser drahtlose Autoadapter nur für
den Betrieb in Ihrem Android
TM
Auto-kompatiblen Fahrzeug
zusammen mit Ihrem Smartphone mit installierter Android
Auto-App vorgesehen ist.
1.Lernen Sie Ihren Adapter kennen
1. Standard-USB-Typ-A-Stecker für Anschluss an den
Android-Auto-fähigen USB-Port Ihres Fahrzeugs
2. Adaptertaste für Bluetooth-Kopplung und zurücksetzen
3. LED
•Weiß = Adapter schaltet sich ein
2.Attach the adapter (OPTIONAL)
You can find a Gel pad inside the pack. This can be used to fix
the adapter on your car.
3.Setting up your adapter
Check for any updates available to Android Auto for your
mobile device via the Google Play app store.
Check that Wireless Android Auto is enabled in the Android
Auto settings on your mobile device.
Before setting up your adapter, connect your phone to
Android Auto using a wired USB connection following your
vehicle manufacturer's instructions.
While the Android Auto connection is active on your car
screen, unplug your phone from the car and immediately plug
your adapter into the same USB port.
To use Android Auto wirelessly, your phone should be running
version 11 or higher of the Android operating system.
4.Pair with the wireless car adapter
When the adapter LED flashes blue, pair your phone with it
(look for 'AndroidAuto-XXXX' under Settings > Bluetooth on
your phone).
Now, wait for your phone to automatically re-establish its
Android Auto connection wirelessly through the adapter; this
may take a while.
On subsequent drives, Android Auto will start wirelessly after
the car connects to your phone for hands-free calling (HFP)
from the car's Bluetooth menu.
5.Factory reset
While powered on, press and hold the adapter button. To pair
a new phone, release the button when it begins blinking blue.
The adapter is now ready to accept a new Bluetooth pairing
request from a nearby phone.
To erase adapter memory, do not release the button when it
starts blinking blue; instead, continue holding it down for 35
seconds, and release only when it blinks green quickly. After 3
seconds, it turns to white and completes the factory reset.
6.General Information
For more information about the product and the warranty,
please contact us by visiting: motorolasound.com/support
Model: MA1
User Guide / Benutzerhandbuch /
Mode d’emploi / Gebruikershandleiding/
Guía del usuario / Manuale dell’utente /
Manual do Utilizador
EN
WIRELESS CAR ADAPTER FOR
ANDROID AUTO
TM
Welcome…
to your new Motorola Wireless Car Adapter for Android Auto!
•Wirelessly connects your phone, so you can hit the road.
•Plugs into the existing Android Auto-enabled USB port of
a compatible car or truck.
Important Safety Instructions
Follow these safety precautions when using your product to
reduce the risk of fire, electric shock, and injury to persons or
property:
•Keep all slits and openings of the product unblocked. Do
not set the product on a heating register or over a radiator.
•Do not use while wet or while standing in water.
•Never insert objects of any kind into the product vents as
that may result in fire or electric shock.
•Do not use liquid cleaners or aerosol cleaner chemicals or
cleaning agents to clean this product.
•Clean this product with a soft, damp cloth.
•Do not disassemble this product.
•Adjust only those controls that are covered by the
operating instructions.
•Follow all warnings and instructions marked on the
product.
Save these instructions
Please read this user guide carefully, and be informed that
this wireless car adapter is only intended to work inside
your AndroidTM Auto compatible car together with your
smartphone which has the Android Auto app installed.
1.Getting to know your adapter
1. USB standard Type-A connector to plug into your car’s
Android Auto-enabled USB port
2. Adapter button for Bluetooth pairing and reset
3. LED
•White = adapter powering on
•Blue = Bluetooth pairing mode
•Green = connecting Android Auto
5
Gel pad
Remove the
protective film
•Blau = Bluetooth-Kopplungsmodus
•Grün = Verbindung zu Android Auto
2.Bringen Sie den Adapter an (optional)
In der Packung befindet sich ein Gel pad. Damit können Sie
den Adapter an Ihrem Fahrzeug befestigen.
3.Einrichten Ihres Adapters
Überprüfen Sie im Google Play App Store, ob Updates für
Android Auto für Ihr Mobilgerät verfügbar sind.
Überprüfen Sie, ob Wireless Android Auto in den Android
Auto-Einstellungen auf Ihrem Mobilgerät aktiviert ist.
Bevor Sie Ihren Adapter einrichten, verbinden Sie Ihr Telefon
mit Android Auto über eine kabelgebundene USB-Verbindung
gemäß den Anweisungen Ihres Fahrzeugherstellers.
Während die Android Auto-Verbindung auf dem Bildschirm
Ihres Fahrzeugs aktiv ist, trennen Sie Ihr Telefon vom
Fahrzeug und schließen Sie Ihren Adapter sofort an denselben
USB-Anschluss an.
Für drahtlose Nutzung von Android Auto sollte auf
Ihrem Telefon die Version 11 oder höher des Android-
Betriebssystems installiert sein.
4.Kopplung mit dem drahtlosen Autoadapter
Wenn die LED des Adapters blau blinkt, koppeln Sie Ihr Handy
mit ihm (suchen Sie auf Ihrem Handy unter Einstellungen >
Bluetooth nach "AndroidAuto-XXXX").
Warten Sie nun, bis Ihr Telefon automatisch die drahtlose
Verbindung zu Android Auto über den Adapter
wiederhergestellt hat; dies kann eine Weile dauern.
Bei späteren Fahrten wird Android Auto drahtlos
gestartet, nachdem das Fahrzeug über das Bluetooth-
Menü des Fahrzeugs eine Verbindung zu Ihrem Telefon für
Freisprechanrufe (HFP) hergestellt hat.
5.Zurücksetzen auf Werkseinstellungen
Halten Sie im eingeschalteten Zustand die Adaptertaste
gedrückt. Um ein neues Telefon zu koppeln, lassen Sie die
Taste los, wenn die LED blau zu blinken beginnt. Der Adapter
ist nun bereit, eine neue Bluetooth-Kopplungsanfrage von
einem Telefon in der Nähe anzunehmen.
Um den Speicher des Adapters zu löschen, lassen Sie die
Taste nicht los, wenn sie blau zu blinken beginnt, sondern
halten Sie sie 35 Sekunden lang gedrückt, und lassen Sie sie
erst los, wenn sie schnell grün blinkt. Nach 3 Sekunden wird
sie weiß und die Werksrücksetzung ist abgeschlossen.
6.Allgemeine Informationen
Bitte kontaktieren Sie uns für weitere Informationen über das
Produkt und die Garantie unter: motorolasound.com/support
DE
5
Gel pad
Schutzfolien
entfernen
2.Fixation de l’adaptateur (OPTION)
Un support avec patch en gel est prévu avec votre adaptateur.
Vous pouvez l’utiliser pour le fixer dans votre voiture.
3.Configurer votre adaptateur
Recherchez les éventuelles mises à jour d’Android Auto
disponibles pour votre appareil mobile via l’App Store de
Google Play.
Vérifiez que Wireless Android Auto est activé dans les
paramètres Android Auto de votre appareil mobile.
Avant de configurer votre adaptateur, connectez votre
téléphone à Android Auto par une connexion USB filaire en
suivant les instructions du constructeur de votre véhicule.
Une fois que la connexion Android Auto est active sur l'écran
de votre voiture, débranchez votre téléphone de la voiture
et branchez immédiatement votre adaptateur sur le même
port USB.
Pour utiliser Android Auto sans fil, votre téléphone doit être
doté de la version 11 ou supérieure du système d'exploitation
Android.
4.Couplage avec l’adaptateur de voiture sans fil
Le voyant de l'adaptateur clignotant en bleu, couplez votre
téléphone avec l’adaptateur (recherchez « AndroidAuto-
XXXX » dans Paramètres > Bluetooth sur votre téléphone).
Attendez alors que votre téléphone rétablisse
automatiquement sa connexion Android Auto sans fil via
l'adaptateur, cela pouvant prendre un certain temps.
Lors des trajets suivants, Android Auto fonctionnera sans fil
une fois que la voiture se sera connectée à votre téléphone
pour les appels mains libres (HFP) à partir du menu Bluetooth
de la voiture.
5.Réinitialisation aux paramètres d’usine
L’adaptateur étant sous tension, appuyez sur son bouton et
maintenez-le enfoncé. Pour coupler un nouveau téléphone,
relâchez le bouton lorsqu'il commence à clignoter en bleu.
L'adaptateur est alors prêt à recevoir une nouvelle requête de
couplage avec Bluetooth d'un téléphone à proximité.
Pour eacer la mémoire de l'adaptateur, ne relâchez pas le
bouton lorsqu'il commence à clignoter en bleu, maintenez-
le enfoncé pendant 35 s et ne le relâchez que lorsque qu’il
clignote rapidement en vert. Après 3 s, il devient blanc pour
terminer la réinitialisation aux paramètres d’usine.
6.Informations générales
Pour plus d'informations concernant votre adaptateur et la
garantie, veuillez nous contacter en vous rendant sur le site :
motorolasound.com/support
FR
5
Support avec
patch en gel
Retirez le film
protecteur
Manufactured, distributed or sold by Meizhou Guo Wei
Electronics Co., LTD., official licensee for this product.
MOTOROLA and the Stylised M Logo, are trademarks or
registered trademarks of Motorola Trademark Holdings, LLC.
and are used under license. All other trademarks are the
property of their respective owners. © 2024 Motorola Mobility
LLC. All rights reserved.
Android, Google Play and Android Auto are trademarks of
Google LLC.
Printed in Taiwan
EU_UK V4
Technical Specifications
WirelessWi-Fi® 802.11 a/n
•Frequency band
- a mode: 5745MHz
- n mode HT20: 5745MHz
•Maximum transmitted power
- a mode: 15 ± 0.5 dBm
- n mode HT20: 15 ± 0.5 dBm
Bluetooth 5.0
•Frequency band
- 2402 ~ 2480MHz, 79 channels
•Maximum transmitted power
- 7 ± 0.5 dBm
ConnectionUSB A type Client
Disposal of the Device (environment)
At the end of the product life cycle, you should
not dispose of this product with normal household
waste. Take this product to a collection point for
the recycling of electrical and electronic equipment.
Please contact your local authorities in case you
need more information on the collection points in
your area.
Declaration of Conformity (DoC)
The following information is applicable to products
that carry a CE or UKCA mark. Contact points:
•
UK Address: 207 Regent Street, Suite 8,
Third Floor, London, W1B 3HH. UK
•EU Address: 51 Bracken Road, Carlisle Oces,
Dublin 18, D18 CV48. Ireland
Hereby, MZGW declares that the radio equipment
type is in compliance with RE Directive 2014/53/EU
and the requirements for UKCA marking.
Both the EU and UK Declaration of Conformity
can be obtained at: motorolasound.com/support/
declaration-of-conformities
Specyfikacje produktu
| Marka: | Motorola |
| Kategoria: | Niesklasyfikowane |
| Model: | MA1 |
Potrzebujesz pomocy?
Jeśli potrzebujesz pomocy z Motorola MA1, zadaj pytanie poniżej, a inni użytkownicy Ci odpowiedzą
Instrukcje Niesklasyfikowane Motorola

5 Stycznia 2025
5 Stycznia 2025
5 Stycznia 2025
5 Stycznia 2025
8 Grudnia 2024
2 Października 2024
12 Września 2024
9 Września 2024
4 Września 2024
2 Września 2024
Instrukcje Niesklasyfikowane
Najnowsze instrukcje dla Niesklasyfikowane
29 Stycznia 2025
29 Stycznia 2025
29 Stycznia 2025
29 Stycznia 2025
29 Stycznia 2025
29 Stycznia 2025
29 Stycznia 2025
29 Stycznia 2025
29 Stycznia 2025
29 Stycznia 2025