Instrukcja obsługi Shelly 3EM
Przeczytaj poniżej 📖 instrukcję obsługi w języku polskim dla Shelly 3EM (2 stron) w kategorii Niesklasyfikowane. Ta instrukcja była pomocna dla 55 osób i została oceniona przez 6 użytkowników na średnio 4.4 gwiazdek
Strona 1/2
USER GUIDE
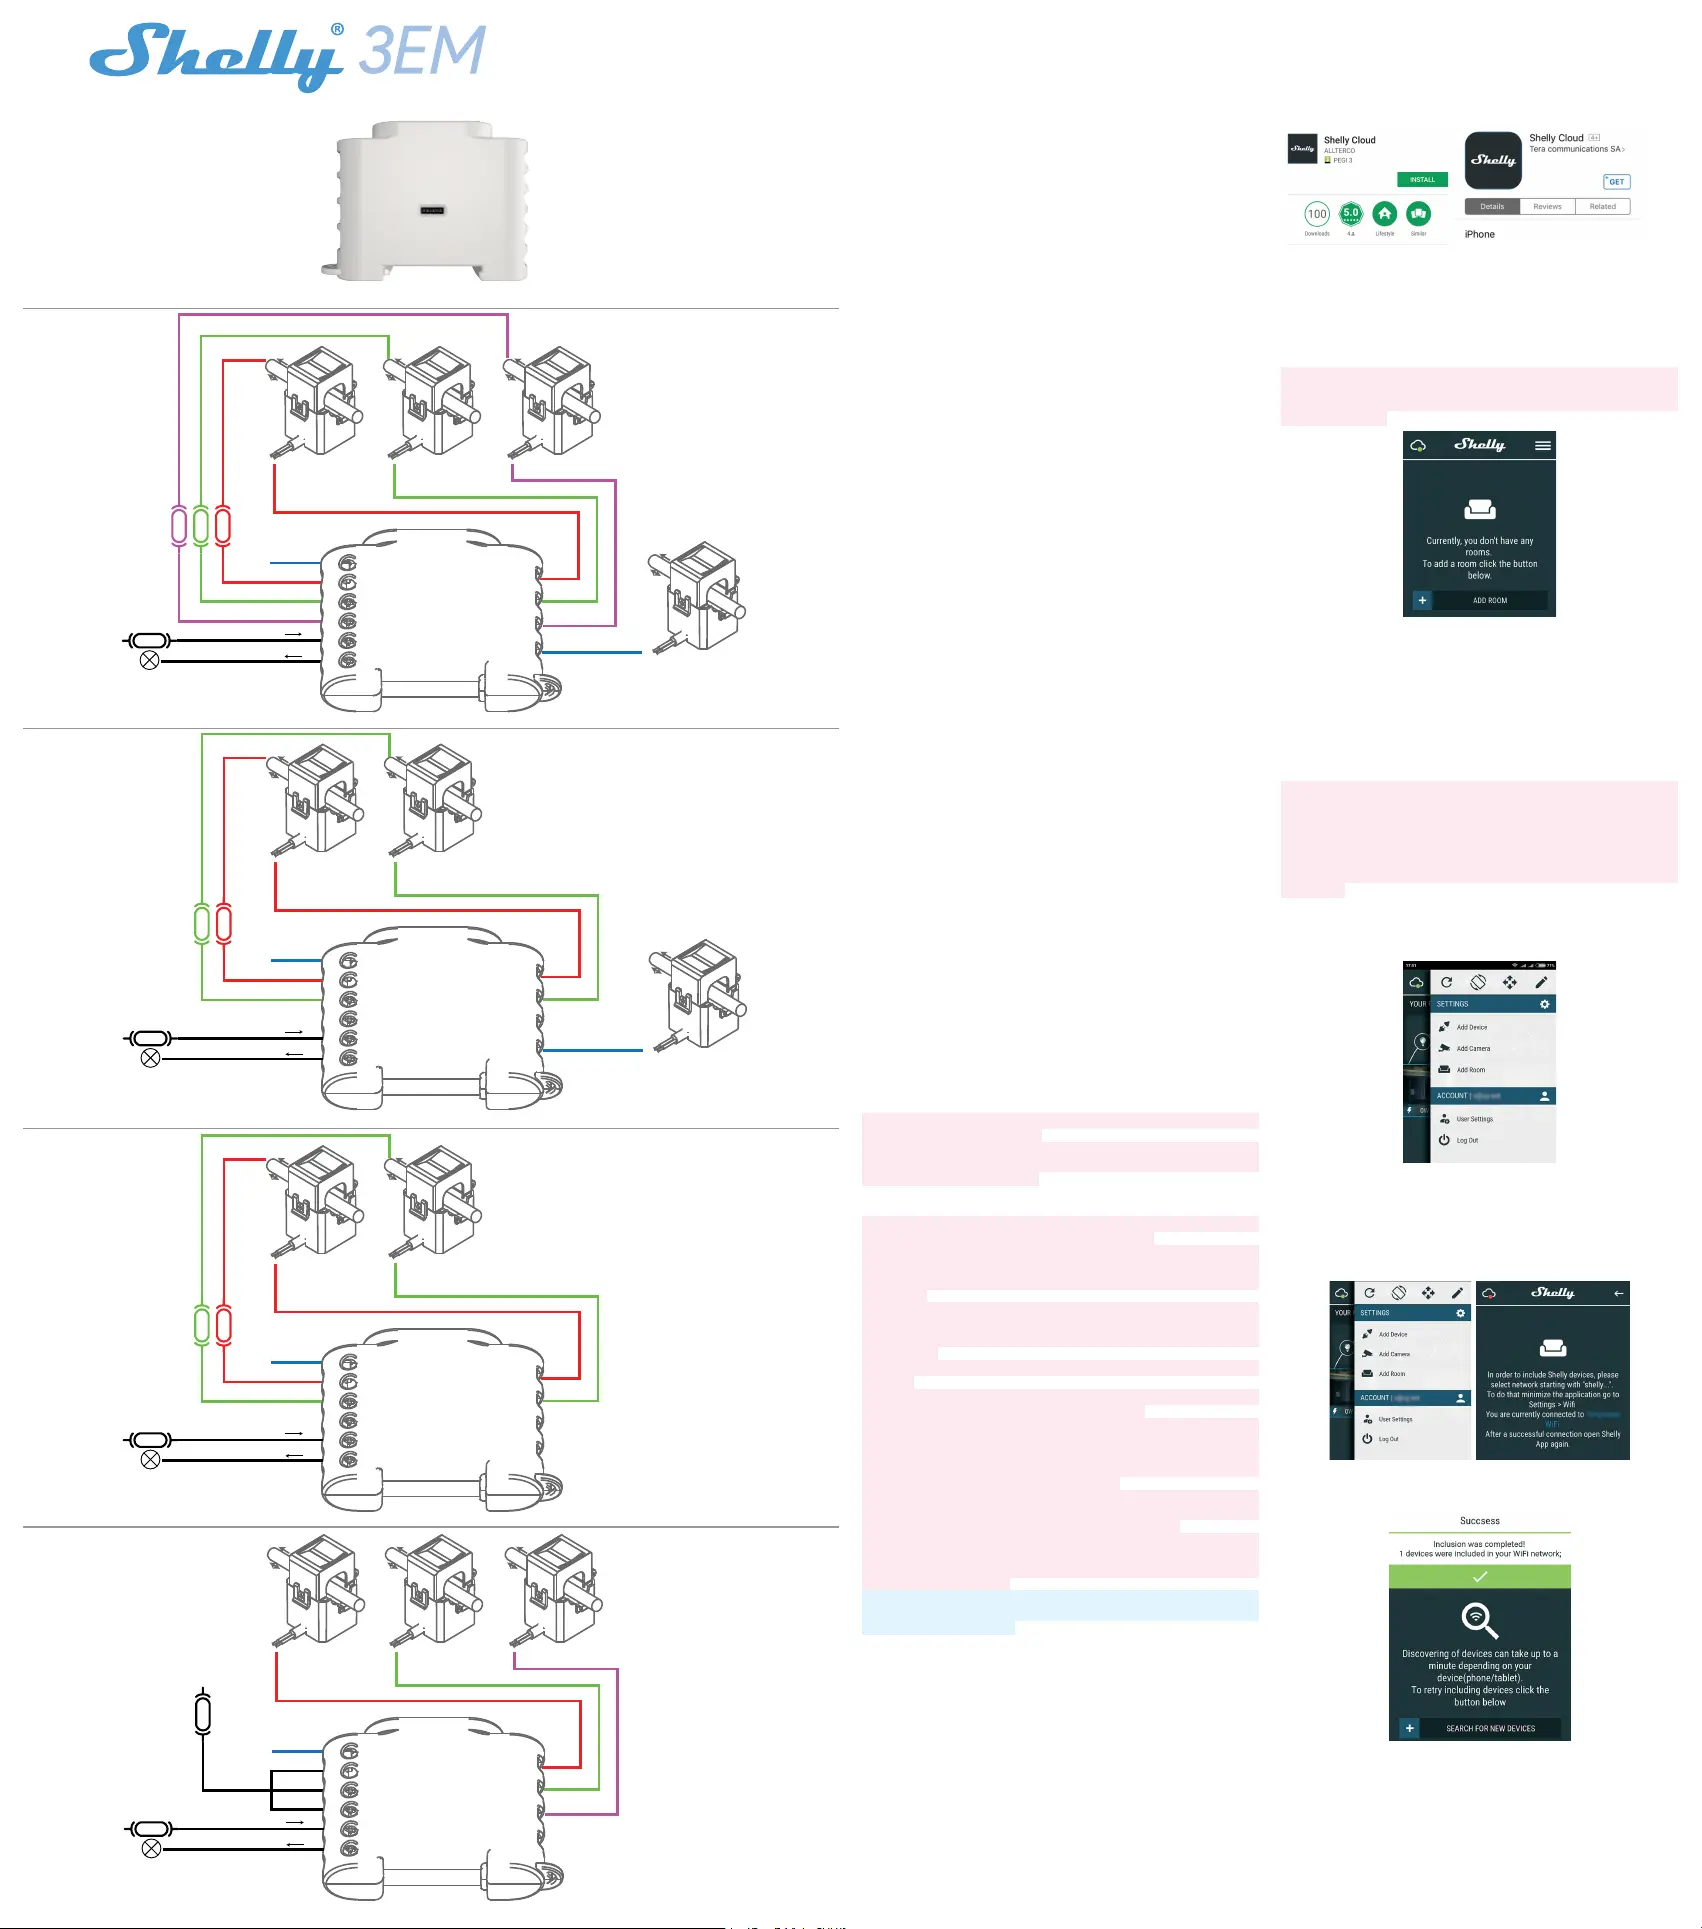
Legend
Left Side:
N - Neutral input (110-230V AC);
VA - Line input of Phase A (110-230V AC);
VB - Line input of Phase B (110-230V AC);
VC - Line input of Phase C (110-230V AC);
I - Line input for contactor control
O - Output for contactor control
Right Side:
IN- IN+ Input for current transformer of
Neutral*
IC- IC+ Input for current transformer of
Phase C
IB- IB+ Input for current transformer of
Phase B
IA- IA+ Input for current transformer of
Phase A
The Triple Phase WiFi Energy Meter, Shelly 3EM by Allterco Robotics is in-
tended to be mounted next to the breakers, in order to monitor the electric
power through it, independent for each channel and heavy-duty contactor
control. Shelly may work as a standalone Device or as an accessory to a
home automation controller. Shelly 3EM can measure incomming and out-
going energy.
• Purpose of control: Operating
• Construction of control: Independently mounted
• Type 1.B Action
• Pollution Degree 2
• Impulse Voltage: 4000 V
Specication
• Power supply: 110-230V ±10% 50/60Hz AC
• Max measurement per channel: 120A/230V
• Relay Max Load: 10A/230V
• Complies with EU standards:
• RED 2014/53/EU
• LVD 2014/35/EU
• EMC 2004/108/WE
• RoHS2 2011/65/UE
• Working temperature: – 40°C up to 40°C
• Radio signal power: 1mW
• Radio protocol: WiFi 802.11 b/g/n
• Frequency: 2400 – 2500 MHz;
• Operational range (depending on local construction):
• up to 50 m outdoors
• up to 30 m indoors
• Dimensions(HxWxL): 73 x 57 x 22 mm
• Electrical consumption: < 1 W
Energy Theft Detection
In order to have this feature available, you might need to update the rm-
ware of your device. With an additional split core current transformer, con-
nected to the IN- IN+ terminal of Shelly 3EM, you may receive a notication,
if there is any energy theft or leakage. Please follow the wiring diagrams on
g. 1 and 2, dependent on your application.
Introduction to Shelly
Shelly® is a family of innovative Devices, which allow remote control of
electric appli-ances through mobile phone, PC or home automation system.
Shelly® uses WiFi to connect to the devices controlling it. They can be in the
same WiFi network or they can use remote access (through the Internet).
Shelly® may work standalone, without being managed by a home automa-
tion controller, in the local WiFi network, as well as through a cloud service,
from everywhere the User has Internet access. Shelly® has an integrated
web server, through which the User may adjust, control and monitor the
Device. Shelly® has two WiFi modes - access Point (AP) and Client mode
(CM). To operate in Client Mode, a WiFi router must be located within the
range of the Device. Shelly® devices can communicate directly with other
WiFi devices through HTTP protocol. An API can be provided by the Manu-
facturer. Shelly® devices may be available for monitor and control even if
the User is outside the range of the local WiFi network, as long as the WiFi
router is connected to the Internet. The cloud function could be used, which
is activated through the web server of the Device or through the settings
in the Shelly Cloud mobile application. The User can register and access
Shelly Cloud, using either Android or iOS mobile applications, or any internet
browser and the web site: https://my.Shelly.cloud/
Technical Information
• Control through WiFi from a mobile phone, PC, automation system or any
other Device supporting HTTP and/or UDP protocol.
• Microprocessor management.
CAUTION! Danger of electrocution. Mounting the Device to the power grid
has to be performed with caution.
CAUTION! Do not allow children to play with the button/switch connected
the Device. Keep the Devices for remote control of Shelly (mobile phones,
tablets, PCs) away from children.
Installation Instructions
CAUTION! Danger of electrocution! The mounting/ installation of the De-
vice should be done by a qualied person (electrician).
CAUTION! Danger of electrocution! Do not connect the current transformer
clamp to the Line, before wiring it to Shelly 3EM. Even if only the current
transformer is connected, there might be high voltage accross its connec-
tion cables.
CAUTION! Danger of electrocution. Even when the Device is turned off, it is
possible to have voltage across its clamps. Every change in the connection
of the clamps has to be done after ensuring all local power is powered off/
disconnected.
CAUTION! Do not connect the Device to appliances exceeding the given
max load!
CAUTION! Connect the Device only in the way shown in these instructions.
Any other method could cause damage and/or injury.
CAUTION! Before beginning the installation please read the accompanying
documentation carefully and completely. Failure to follow recommended
procedures could lead to malfunction, danger to your life or violation of the
law. Allterco Robotics is not responsible for any loss or damage in case of
incorrect installation or operation of this Device.
CAUTION! Use the Device only with power grid and appliances which com-
ply with all applicable regulations. Short circuit in the power grid or any
appliance connected to the Device may damage the Device.
CAUTION! Connect the current transformers accordingly for each channel!
Each current transformer is marked and calibrated for the respective input
of the Device.Any improper connection will lead to incorrect device mea-
surement and visualisation.
RECOMMENDATIONТhe Device may be connected to and may control
electric circuits and appliances only if they comply with the respective
standards and safety norms.
Initial Inclusion
Before installing/mounting the Device ensure that the grid is powered off
(turned down breakers). Connect Shelly 3EM to the power grid and install it
in the breakers box following the scheme that suites the desired purpose.
You may choose if you want to use Shelly with the Shelly Cloud mobile ap-
plication and Shelly Cloud service. You can also familiarize yourself with
the instructions for Management and Control through the embedded Web
interface.
Control your home with your voice
All Shelly devices are compatible with Amazon Echo and Google Home.
Please see our step-by-step guide on:
https://shelly.cloud/compatibility/Alexa
https://shelly.cloud/compatibility/Assistant
The mobile application - Shelly cloud
Shelly Cloud gives you opportunity to control and adjust all Shelly® Devic-
es from anywhere in the world. You only need an internet connection and
our mobile application, installed on your smartphone or tablet. To install
the application please visit Google Play or App Store and install the Shelly
Cloud app.
Registration
The rst time you load the Shelly Cloud mobile app, you have to create an
account which can manage all your Shelly® devices.
Forgotten Password
In case you forget or lose your password, just enter the e-mail address you
have used in your registration. You will then receive instructions to change
your password.
WARNING! Be careful when you type your e-mail address during the regis-
tration, as it will be used in case you forget your password. After register-
ing, create your rst room (or rooms), where you are going to add and use
your Shelly devices.
Shelly Cloud gives you opportunity to create scenes for automatic turning
on or off of the Devices at predened hours or based on other parameters
like temperature, humidity, light etc. (with available sensor in Shelly Cloud).
Shelly Cloud allows easy control and monitoring using a mobile phone, tab-
let or PC.
Device Inclusion
To add a new Shelly device, connect it to the power grid following the Instal-
lation Instructions included with the Device.
• Step 1 - After the installation of Shelly in the breakers boxand the power is
turned on Shelly will create its own WiFi Access Point (AP).
WARNING! In case the Device has not created its own WiFi network with
SSID like shellyem3-35FA58 check if you have connected Shelly correctly
by the schemes described above. If you do not see an active WiFi network
with SSID like shellyem3-35FA58, reset the Device. In order to reset the de-
vice, you will need physical access to it. On the front of the device, you will
see a button. Press and hold it for 10 seconds. Shelly should return to AP
Mode. If not, please repeat or contact our customer support at: support@
shelly.cloud
• Step 2 - Choose “Add Device”. In order to add more Devices later, use the
app menu at the top right corner of the main screen and click “Add Device”.
Type the name (SSID) and password for the WiFi network, to which you want
to add the Device.
•
Step 3 - WiFi network inclusion
If using iOS press the home button of your iPhone/iPad/iPod. Open Set-
tings > WiFi and connect to the WiFi network created by Shelly, e.g. shelly-
em3-35FA58.
If using Android your phone/tablet will automatically scan and include all
new Shelly Devices in the WiFi network that you are connected to.
Upon successful Device Inclusion to the WiFi network you will see this pop-
up:
• Step 4 - Approximately 30 seconds after discovery of any new Devices оn
the local WiFi network, а list will be displayed by default in the “Discovered
Devices” room.
A
B
C
N
N
N
Phase A
2 phase
breaker
Phase B
Phase N*
*Phase N is optional
and allows for detect
theft or energy leakage.
VA
VB
VC
I
O
breaker
0-220V AC or DC
2 phase (US) wiring
A
B
C
N
N
N
Phase A
3 phase
breaker
breaker
0-220V AC or DC
Phase BPhase C
Phase N*
*Phase N is optional
and allows for detect
theft or energy leakage.
VA
VB
VC
I
O
3 phase wiring scheme
A
B
C
N
N
N
Public network
2 phase
breaker
Solar power
VA
VB
VC
I
O
breaker
0-220V AC or DC
1 phase + separate solar power
measurement wiring
A
B
C
N
N
N
Circuit 1
breaker
Circuit 2Circuit 3
VA
VB
VC
I
O
breaker
0-220V AC or DC
1 phase wiring up to
3 different circuits
TRIPLE PHASE WIFI ENERGY METER
Specyfikacje produktu
| Marka: | Shelly |
| Kategoria: | Niesklasyfikowane |
| Model: | 3EM |
Potrzebujesz pomocy?
Jeśli potrzebujesz pomocy z Shelly 3EM, zadaj pytanie poniżej, a inni użytkownicy Ci odpowiedzą
Instrukcje Niesklasyfikowane Shelly

3 Października 2024
3 Października 2024
3 Października 2024
3 Października 2024
3 Października 2024
3 Października 2024
23 Września 2024
11 Września 2024
25 Sierpnia 2024
Instrukcje Niesklasyfikowane
Najnowsze instrukcje dla Niesklasyfikowane
29 Stycznia 2025
29 Stycznia 2025
29 Stycznia 2025
29 Stycznia 2025
29 Stycznia 2025
29 Stycznia 2025
29 Stycznia 2025
29 Stycznia 2025
29 Stycznia 2025
29 Stycznia 2025