Instrukcja obsługi AMX CB-MSA-43
AMX Niesklasyfikowane CB-MSA-43
Przeczytaj poniżej 📖 instrukcję obsługi w języku polskim dla AMX CB-MSA-43 (2 stron) w kategorii Niesklasyfikowane. Ta instrukcja była pomocna dla 25 osób i została oceniona przez 4 użytkowników na średnio 5.0 gwiazdek
Strona 1/2
QUICK START GUIDE
CB-MSA-43 Rough-In Box and Cover Plate for Modero S Series 4.3" Panel
Overview
The CB-MSA-43 Rough-In Box (FG2265-10) is an optional accessory for the Modero
S Series
®
4.3” Wall Mount Touch Panel. It allows the panel to be mounted directly to
the studs/pre-wall.
The back of the Modero S Series 4.3” Wall Mount Touch Panel is contained within a
plastic outer housing or back box, and the back box attaches to the Rough-In Box.
The Rough-In Box kit includes a wall box and cover and mounting screws.
WARNING: In order to guarantee a stable installation of the touch panel, the
distance between the CB-MSA-43 and the outer wall surface must be a minimum
of .50 inches (1.27cm) and a maximum of .1.50 inches (3.81cm).
•Refer to the 95-2265-10 diagram for detailed installation dimensions.
Pre-Wall Installation of the CB-MSA-43 Rough-In Box
1.Remove the rough-in box cover (B in FIG. 1) before installation of the Rough-In
Box (A). Note: the cover MUST be removed before drywall installation. The cover
may be reinstalled after drywall installation using 4-40 screws (not included).
The mounting tabs on the front of the rough-in box (A) are intended to allow
additional anchoring of the rough-in box to its wall, but these can be removed if
necessary.
2.Fasten the CB-MSA-43 rough-in box to the stud through the holes on the Stud
Mounting tabs, using either nails or screws (not provided).
3.Remove the appropriate wiring knockouts from the rough-in box to
accommodate the cables being threaded through to the 7” Wall Mount Touch
Panel.
4.Thread the incoming Ethernet and USB wiring through the bottom knockout.
Leave enough slack in the wiring to accommodate installation of the touch
panel.
5.Install the drywall/sheetrock before inserting the back box for the CB-MSA-43.
6.Cut out the opening for the Wall Mount Touch Panel back box where the wall
has been placed over the Rough-In Box. Cutting out the surface slightly smaller
than what is outlined in the installation drawings, so that you can make any
necessary cutout adjustments, is very highly recommended.
NOTE: The front cover of the CB-MSA-43 (B in FIG.1) should be installed after
the appropriate wiring is pulled to the Rough-In Box. The cover should then be
removed prior to the installation of the touch panel back box and discarded. Do
NOT discard the cover screws, as they are used to secure the Back Box.
7.Remove the matching knockouts on the touch panel’s Back Box. Install the
touch panel’s Back Box into the opening, allowing the stand-ups for the cover
screws to pass through the back of the Back Box. Secure the Back Box to the
Rough-In Box with the cover screws, pass the touch panel’s wiring through the
Back Box knockouts, and install the touch panel.
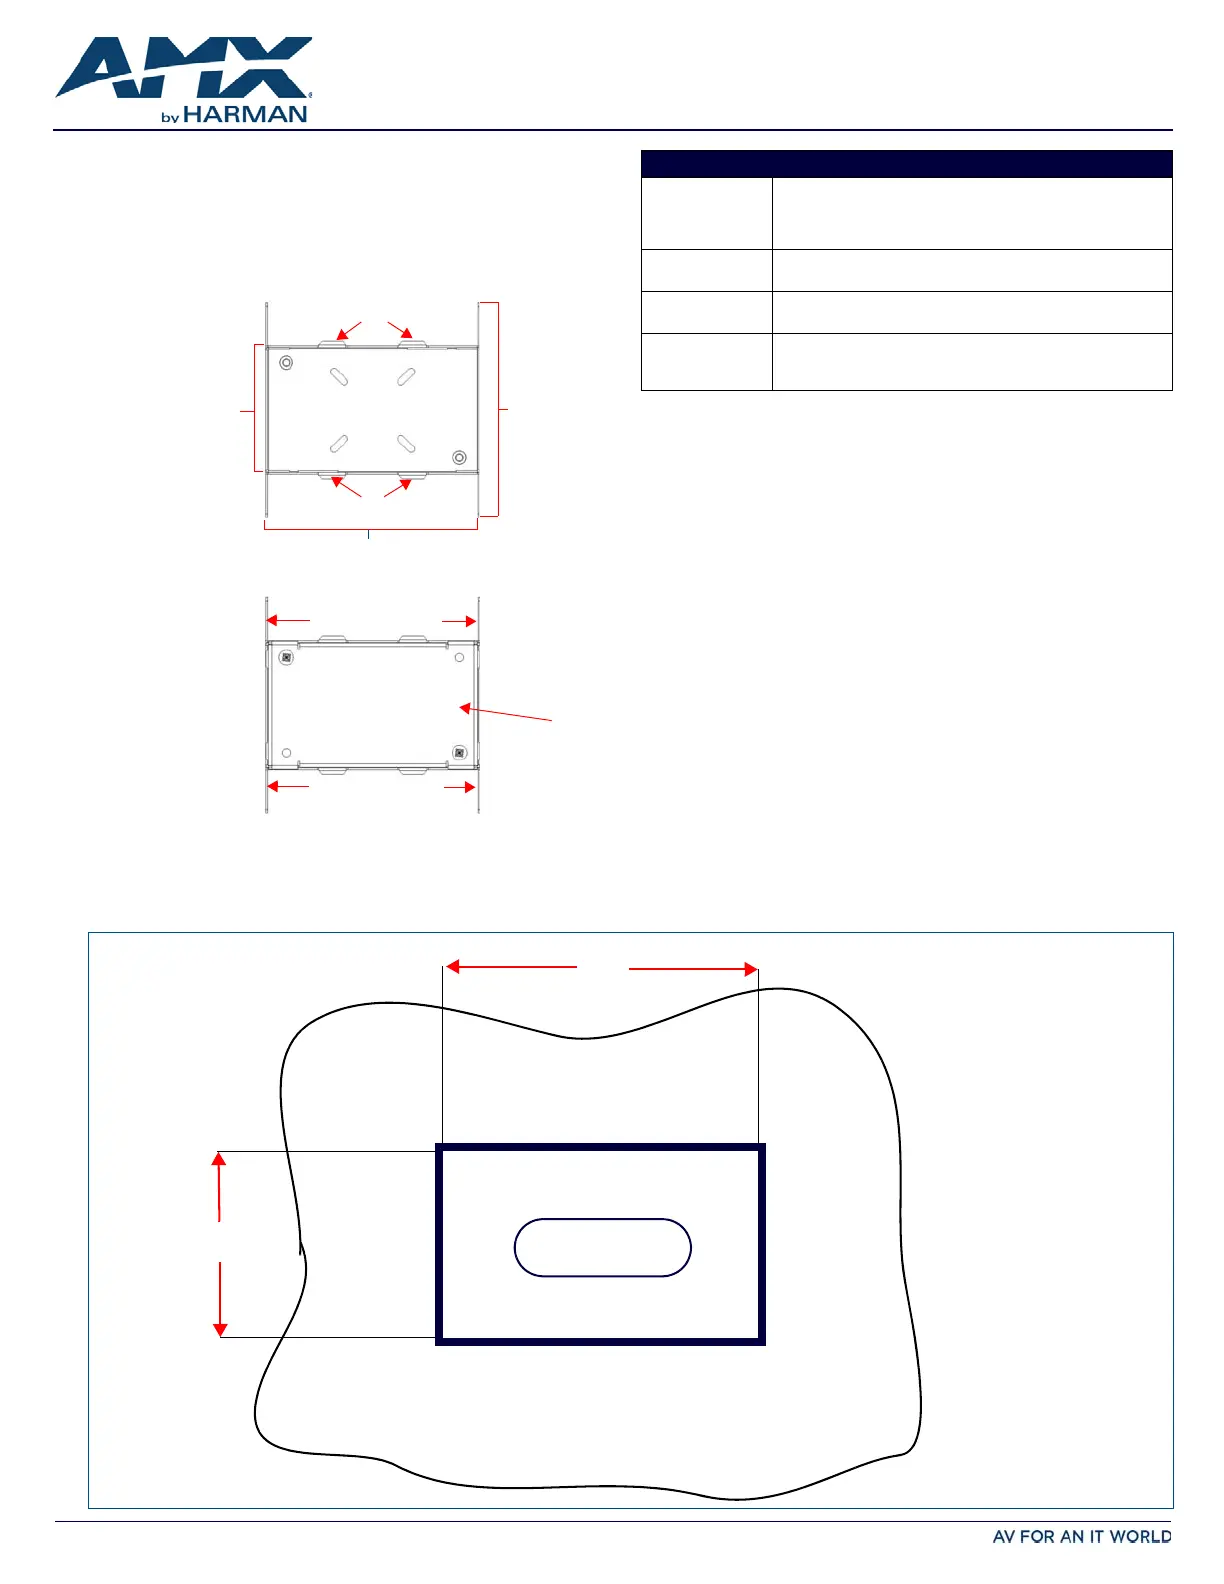
FIG. 1
CB-MSA-43 ROUGH-IN BOX - WITH FRONT COVER
4.64”
(11.78 cm)
A
4.61”
(11.70 cm)
2.79”
(7.08 cm)
B
Rough-In Box With Cover
Cover
Rough-In Box
Mounting Tabs
Mounting Tabs
Stud Mounting Tabs
Stud Mounting Tabs
CB-MSA-43 (FG2265-10) SPECIFICATIONS
Dimensions (HWD)•Rough-In Box: 4.64" x 4.61" x 2.37"
(11.78 cm x 11.70 cm x 5.60 cm)
•Rough-In Box Cover Plate: 2.79” x 4.61” x 0.47”
(7.08 cm x 11.70 cm x 1.19 mm)
Weight•With cover: 0.60 lbs (0.27 kg)
•Without cover: 0.40 lbs (0.18 kg)
Certifications•cTUVus Listed
•UL Listed
Included
Accessories:
•Cover Plate for Rough-in Box (62-2265-22)
•Cover Plate to Rough-In Box Mounting Screws (2)
(80-2265-01)
Recommended
Wall Cutout
for the CB-MSA-43
2.65”
(6.73 cm)
4.50”
(11.43 cm)
Specyfikacje produktu
| Marka: | AMX |
| Kategoria: | Niesklasyfikowane |
| Model: | CB-MSA-43 |
Potrzebujesz pomocy?
Jeśli potrzebujesz pomocy z AMX CB-MSA-43, zadaj pytanie poniżej, a inni użytkownicy Ci odpowiedzą
Instrukcje Niesklasyfikowane AMX

1 Stycznia 2025
1 Stycznia 2025
1 Stycznia 2025
1 Stycznia 2025
1 Stycznia 2025
7 Grudnia 2024
8 Października 2024
8 Października 2024
2 Października 2024
2 Października 2024
Instrukcje Niesklasyfikowane
Najnowsze instrukcje dla Niesklasyfikowane
29 Stycznia 2025
29 Stycznia 2025
29 Stycznia 2025
29 Stycznia 2025
29 Stycznia 2025
29 Stycznia 2025
29 Stycznia 2025
29 Stycznia 2025
29 Stycznia 2025
29 Stycznia 2025