Instrukcja obsługi AMX HPG-10
AMX Niesklasyfikowane HPG-10
Przeczytaj poniżej 📖 instrukcję obsługi w języku polskim dla AMX HPG-10 (1 stron) w kategorii Niesklasyfikowane. Ta instrukcja była pomocna dla 32 osób i została oceniona przez 6 użytkowników na średnio 4.6 gwiazdek
Strona 1/1
QUICK START GUIDE
HPG-10 HydraPort 3/4-inch Mini Grommet
© 2015 Harman. All rights reserved. HydraPort, AMX, AV FOR AN IT WORLD, HARMAN, and their respective logos are registered trademarks of
HARMAN. Oracle, Java and any other company or brand name referenced may be trademarks/registered trademarks of their respective
companies.
AMX does not assume responsibility for errors or omissions. AMX also reserves the right to alter specifications without prior notice at any time.
The AMX Warranty and Return Policy and related documents can be viewed/downloaded at www.amx.com.
3000 RESEARCH DRIVE, RICHARDSON, TX 75082 AMX.com | 800.222.0193 | 469.624.8000 | +1.469.624.7400 | fax 469.624.7153
AMX (UK) LTD, AMX by HARMAN - Auster Road, Clifton Moor, York, YO30 4GD United Kingdom • +44 1904-343-100 • www.amx.com/eu/
Last Revised: 8/11/2015
93-00-0V:572RE B
Overview
The HPG-10 3/4" Mini-Grommets (FG570-01-10K) are an elegant means to control
cables in conference rooms, meeting rooms, and personal workspaces. HPG-10 3/4"
Mini-Grommets are designed to be mounted into a variety of surfaces such as a
conference room table, desk, or lectern in order to manage A/V, power, and/or
networking cables.
Product Specifications
Installation
Tools Required
•Drill
•3/4" Drill bit (Forstner, Auger, or Spade Bit)
CAUTION: This installation requires specific woodworking skills. This installation
should be performed by an experienced person, comfortable with these types of
woodworking operations. Improper installation may result in damage to the mounting
surface. AMX is not responsible for damage caused by improper installation.
Read these instructions in their entirety before beginning the installation. The
installation requires specific steps to be performed in specific order.
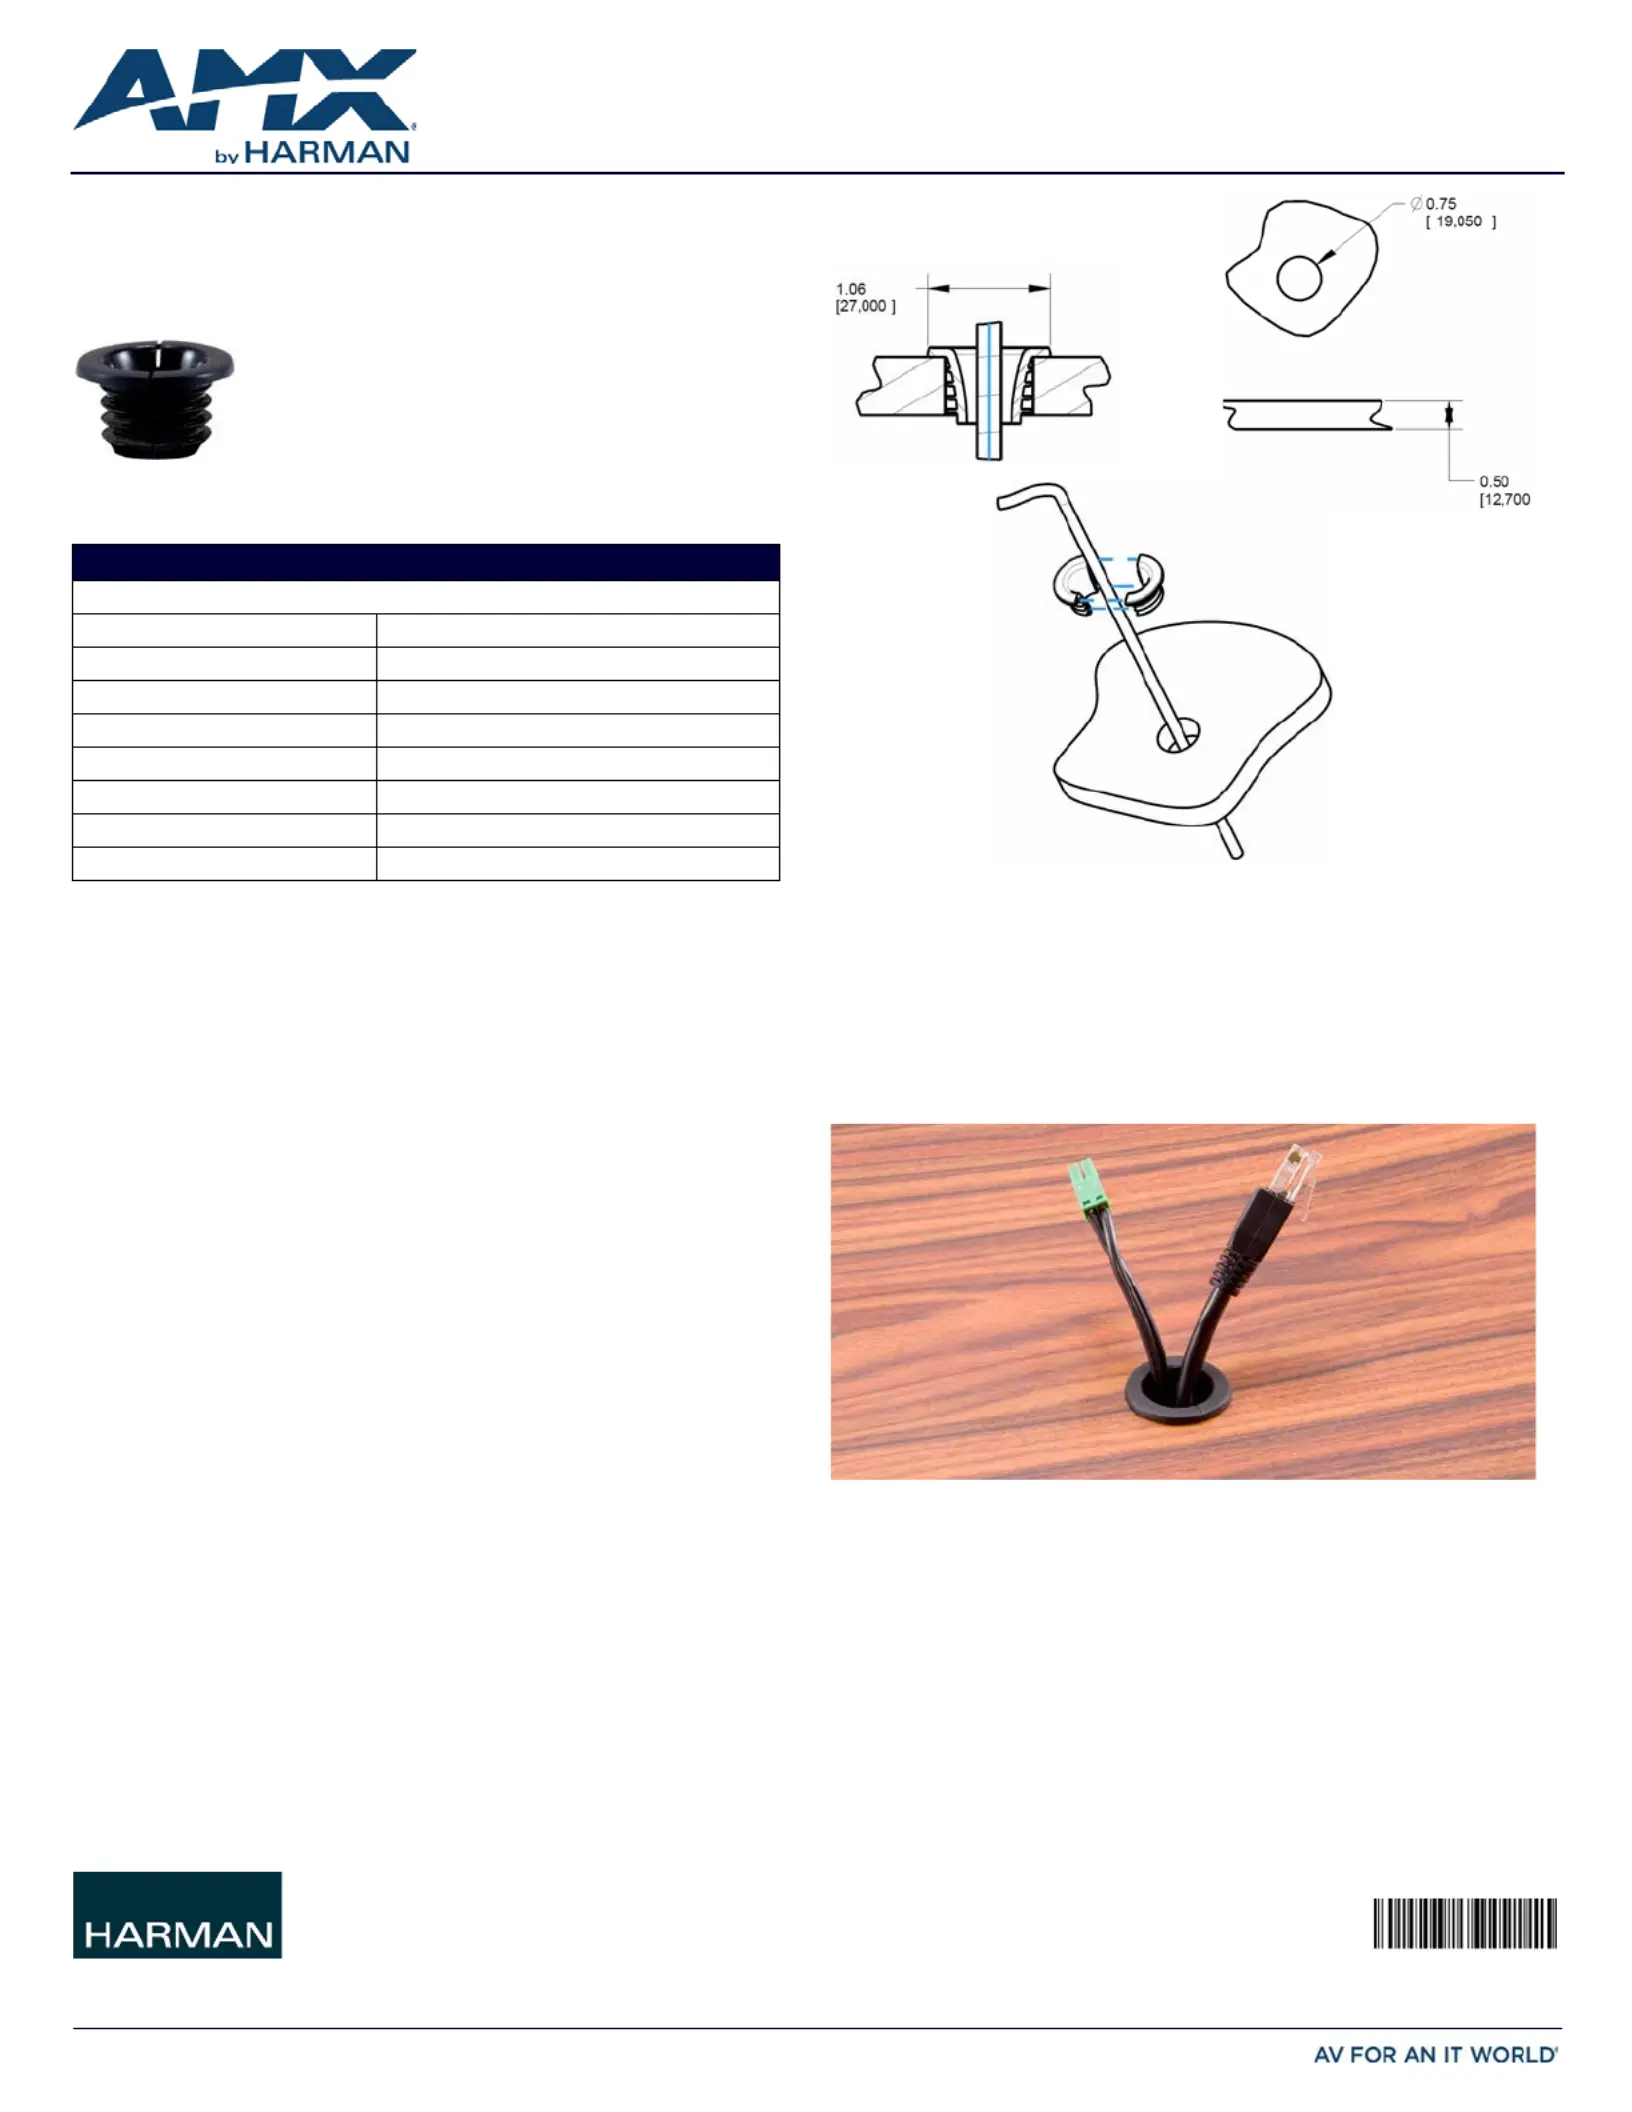
1)Select a Suitable Location for the HPG-10
•Note the space requirements for installing the system (FIG.2).
•Note that the HPG-10 requires 0.2" (5mm) above the mounting surface.
2)Drill The Hole In The Mounting Surface
Note: AMX recommends a high quality (name brand) Forstner Bit, Auger Bit, or Spade Bit
to create the 3/4" (19mm) hole.
Some lower quality drill bits may create torn edges or a slightly larger hole, which will
cause the HPX-10 to fit loosely in the hole or expose edges of the cut. If in doubt, test
the drill bit for proper fit before drilling into the final mounting surface.
1.Carefully measure the tabletop or other mounting surface to locate the desired
position of the HPG-10.
Take care to ensure that the top surface of the mounting surface is not damaged
beyond the width of the trim bezel as the cutout is made.
2.Use an appropriate drill and 3/4" (19mm) drill bit to drill a 3/4" hole in the
mounting surface.
•Make sure cutting tool used is appropriate for the material to be cut and will not
tear or chip the top surface.
•Note that the process of making the cutout will create substantial dust and
prepare the environment appropriately.
3)Insert the Cables and Install the Mini-Grommet
For cables for which the far end of the cable is not accessible, either because the cable
has been run under carpet, is in a conduit or structure, or is otherwise fixed, the cable
must be placed through the cutout in the table prior to installation (see FIG.2).
1.Place the cable through the mounting surface.
2.Place each half of the HPG-10 Mini-Grommet on either side of the cable and press
the two halves together - they will interlock.
3.Press the assembled HPG-10 Mini-Grommet into the ¾" hole (FIG.3). The fit of
the grommet in the hole should be snug.
FIG. 1
HPG-10 3/4" MINI- GROMMET
HPG-10 SPECIFICATIONS
Dimensions (HWD)
•Max above mounting surface:.08" (2mm)
•Max below mounting surface:N/A
•Mounting surface footprint:1.1" (27mm) Diameter
•Min. mounting surface thickness:1/2" (13 mm)
•Max mounting surface thickness:N/A
•Table Cutout Dimensions:3/4" (19mm) Round Hole
Weight1oz (.05 Kg)
EnclosureBlack plastic
FIG. 2 HPG-10 INSTALLATION SPECIFICATIONS
FIG. 3 TOPSIDE OF INSTALLED UNIT
Specyfikacje produktu
| Marka: | AMX |
| Kategoria: | Niesklasyfikowane |
| Model: | HPG-10 |
Potrzebujesz pomocy?
Jeśli potrzebujesz pomocy z AMX HPG-10, zadaj pytanie poniżej, a inni użytkownicy Ci odpowiedzą
Instrukcje Niesklasyfikowane AMX

1 Stycznia 2025
1 Stycznia 2025
1 Stycznia 2025
1 Stycznia 2025
1 Stycznia 2025
7 Grudnia 2024
8 Października 2024
8 Października 2024
2 Października 2024
2 Października 2024
Instrukcje Niesklasyfikowane
Najnowsze instrukcje dla Niesklasyfikowane
29 Stycznia 2025
29 Stycznia 2025
29 Stycznia 2025
29 Stycznia 2025
29 Stycznia 2025
29 Stycznia 2025
29 Stycznia 2025
29 Stycznia 2025
29 Stycznia 2025
29 Stycznia 2025