Instrukcja obsługi AMX JPK-1300 APAC
AMX Niesklasyfikowane JPK-1300 APAC
Przeczytaj poniżej 📖 instrukcję obsługi w języku polskim dla AMX JPK-1300 APAC (2 stron) w kategorii Niesklasyfikowane. Ta instrukcja była pomocna dla 18 osób i została oceniona przez 7 użytkowników na średnio 4.7 gwiazdek
Strona 1/2
Overview
7.
RS232Pass-through:
9.
Poweronallattacheddevices:
2.
Repeatsteps1fortheCTP-1301TX/RX.
2. Repeat step 1 for the other side of the CTP-1301 TX/RX
The JPK-1300 Jetpack 3x1 Switching, Transport, and Control solution
includes a 3-input wall-plate transmitter, a multi-function receiver,
and a keypad for control. The purpose of this document is to illustrate
how the solution is to be installed and set up in its simplest configuration
by a trained technician.
The following items are included with the JPK-1300:
• [1] JPK-1300 Wall-plate Transmitter (with Screws)
• [1] JPK-1300 Keypad (with Screws)
• [1] JPK-1300 Receiver
• [1] DC 24V 3.75A Power Adapter
• [2] Power Cords (US&AU for UA version; EU&UK for EK version)
• [1] Phoenix Connector (3.81mm, 2 Pins)
• [4] Phoenix Connector (3.81mm, 3 Pins)
• [1] Phoenix Connector (5.08mm, 4 Pins)
• [1] IR Wideband Emitter Cable (1.5 meters)
• [2] Mounting Bracket (with Screws)
Active power requirements:
• Voltage, DC (typical): 24V DC 3.75A
• Power consumption (max): 80W (TX + RX + Keypad)
The environmental requirements for the JPK-1300 are as follows:
• Operating Temperature: 32° F (0° C) to 104° F (40° C)
• Storage Temperature: -4° F (-20° C) to 140° F (60° C)
• Operating Humidity: 20% to 90% RH(non-condensing)
• Storage Humidity: 20% to 90% RH (non-condensing)
1. Position and install the mounting brackets of JPK-1300 RX with the
4 mounting screws provided, as shown below.
2. Mount and secure the JPK-1300 to a surface or a suitable location
using appropriate mounting screws.
JPK-1300
Jetpack 3x1 Switching, Transport, and Control Solution
AV FOR AN IT WORLD
®
QUICK START GUIDE
JPK-1300 RX
Installation and Connection
What’s in the Box?
Power
Environmental Requirements
Cable Requirements
1. CONTROL port connection distance is up to 164ft/50m via a Shielded
Cat 6/6A/7 cable. The CONTROL cable must be pre-run from the
Wall-plate Transmitter backbox to the Keypad backbox.
2. AV LINK port connection distance is up to 230ft/70m for 1080P video
or 131ft/40m for 4K video via a Shielded Cat 6/6A/7 cable. The AV
LINK cable must be pre-run from the Receiver installation location to
the Wall-plate Transmitter backbox.
Install Jetpack Receiver
Connect Jetpack Receiver
1. Connect the pre-run AV LINK cable to the AV LINK port on the JPK-
1300 RX.
2. Connect the power adapter provided to the JPK-1300 RX.
3. Connect HDMI OUT
Connect an HDMI display device (such as a projector) to the HDMI
OUT port of the JPK-1300 RX.
4. Connect USB DEVICE
Connect an USB device (such as a Smart Board) to the USB DEVICE
port of the JPK-1300 RX.
5. Connect MICROPHONE or OTHER ROOM AUDIO SOURCE
Connect an audio source (such as a microphone) to the MIC/LINE
IN port of the JPK-1300 RX. (Make sure the MIC/LINE switch is turned
to MIC when connecting a microphone to the MIC/LINE IN port.)
6. Connect AUDIO OUT
Connect the AUDIO OUT port to an amplifier or powered speakers
and/or connect the AMP OUT port to 4/8 Ohm speakers using
appropriate speaker cables.
7. Connections for additional control options:
• LAN control (Web UI/PC tool/Telnet/SSH): Connect JPK-1300 RX
to the same network of the PC or control system via the LAN.
• RS-232/IR/RELAY control: Connect the RS-232 or IR OUT port of the
JPK-1300 RX to the display device such as a projector via an RS-232
cable or the IR emitter cable provided, and connect the RELAY
port (1-2) to the electric lifting projection screen.
• Remote mute control: Connect the REMOTE MUTE port of the
JPK-1300 RX to the contact closure of the fire alarm system.
Note: Please refer to the Instruction manual for the configuration of
RS-232/IR/RELAY control and the REMOTE MUTE.
Connect Jetpack Devices
1. Connect one end of the pre-run CONTROL cable to the CONTROL
port on the JPK-1300 Wall-plate TX and the other end to the
CONTROL port on the JPK-1300 keypad.
2. Connect the free end of the pre-run AV LINK cable to the AV LINK
port on the JPK-1300 Wall-plate TX.
USB-CHDMI 1HDMI 2LINKPWRHDCP
SOURCE
USB-C INHDMI IN 1
HDMI IN 2IRUSB HOST
JPK-1300-UA TX
VOLUME
DISPLAY
ON
DISPLAY
OFF
HDMI 1HDMI 2
USB-C
ON/OFF
SYSTEM
JPK-1300-UA Keypad
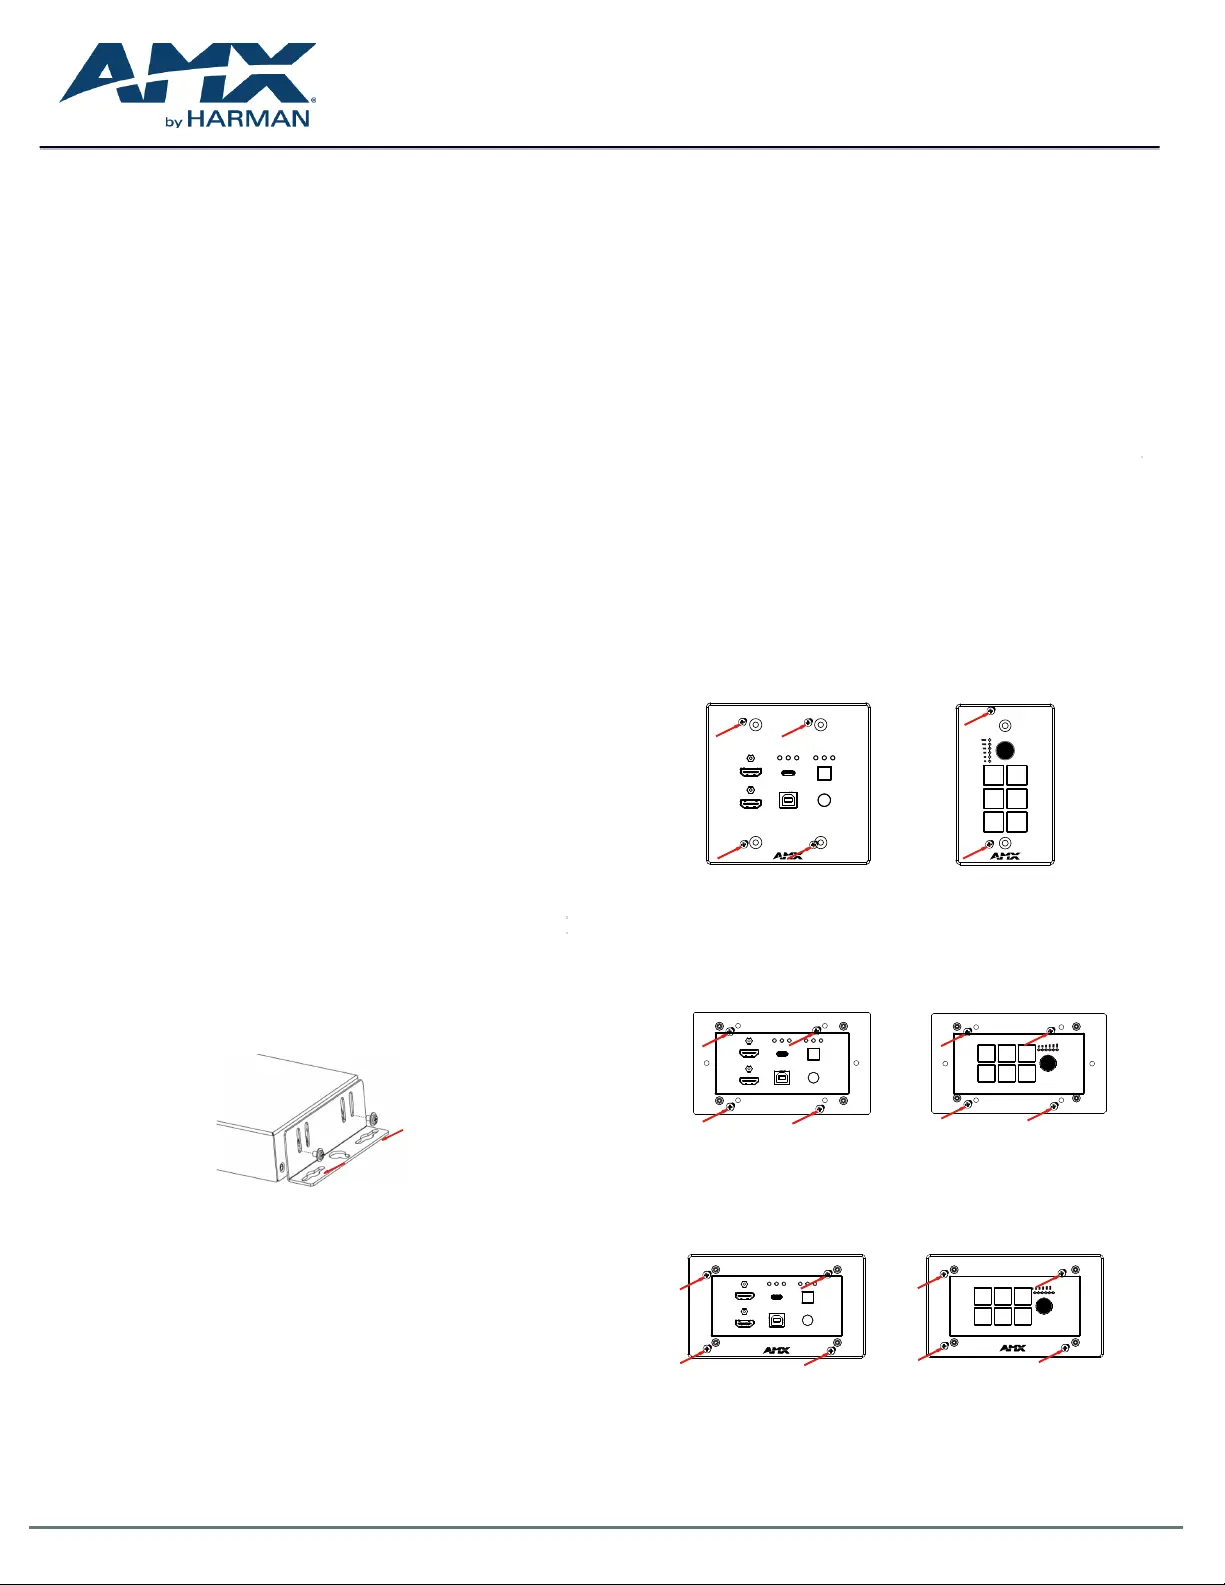
To install the EK version JPK-1300 Wall-plate TX and Keypad:
1. Remove the white screws on the cover of the wall-plate TX and
keypad and remove the cover.
2. Place the wall-plate TX and keypad into an EU standard back box,
and secure with the screws provided, as shown below.
Note: Use the two screw holes on the left and right ends to install the
EK version wall-plate TX and keypad into UK standard back boxes.
To install the UA version JPK-1300 Wall-plate TX and Keypad:
1. Place the wall-plate TX and keypad into US standard back box.
2. Secure the wall-plate TX and keypad with the white screws provided,
as shown below.
3. Secure the cover back to the wall-plate TX and keypad with the
white screws provided, as shown below.
USB-C IN
HDMI IN 2
PWRUSB-CHDMI 1HDMI 2LINKHDCP
HDMI IN 1
SOURCE
IRUSB HOST
JPK-1300-EK TX
HDMI 2
VOLUME
DISPLAY
OFF
USB-CHDMI 1
DISPLAY
ON
SYSTEM
ON/OFF
JPK-1300-EK Keypad
Installing Jetpack Wall-plate Transmitter and Keypad
USB-C IN
HDMI IN 2
PWRUSB-CHDMI 1HDMI 2LINKHDCP
HDMI IN 1
SOURCE
IRUSB HOST
JPK-1300-EK TX
HDMI 2
VOLUME
DISPLAY
OFF
USB-CHDMI 1
DISPLAY
ON
SYSTEM
ON/OFF
JPK-1300-EK Keypad
Connecting Jetpack TX to Source Equipment
1. Connect HDMI / USB-C IN
Connect the HDMI and/or USB-C video sources to the HDMI IN 1, 2,
or USB-C port of the JPK-1300 TX.
2. Connect USB HOST
If using an HDMI input, connect the USB HOST port on the JPK-1300
TX wall-plate to the USB port of the PC.
Specyfikacje produktu
| Marka: | AMX |
| Kategoria: | Niesklasyfikowane |
| Model: | JPK-1300 APAC |
Potrzebujesz pomocy?
Jeśli potrzebujesz pomocy z AMX JPK-1300 APAC, zadaj pytanie poniżej, a inni użytkownicy Ci odpowiedzą
Instrukcje Niesklasyfikowane AMX

1 Stycznia 2025
1 Stycznia 2025
1 Stycznia 2025
1 Stycznia 2025
1 Stycznia 2025
7 Grudnia 2024
8 Października 2024
8 Października 2024
2 Października 2024
2 Października 2024
Instrukcje Niesklasyfikowane
Najnowsze instrukcje dla Niesklasyfikowane
29 Stycznia 2025
29 Stycznia 2025
29 Stycznia 2025
29 Stycznia 2025
29 Stycznia 2025
29 Stycznia 2025
29 Stycznia 2025
29 Stycznia 2025
29 Stycznia 2025
29 Stycznia 2025