Instrukcja obsługi Nitecore 18650
Nitecore Niesklasyfikowane 18650
Przeczytaj poniżej 📖 instrukcję obsługi w języku polskim dla Nitecore 18650 (2 stron) w kategorii Niesklasyfikowane. Ta instrukcja była pomocna dla 21 osób i została oceniona przez 7 użytkowników na średnio 4.0 gwiazdek
Strona 1/2
Batterie Einbau / Ausbau
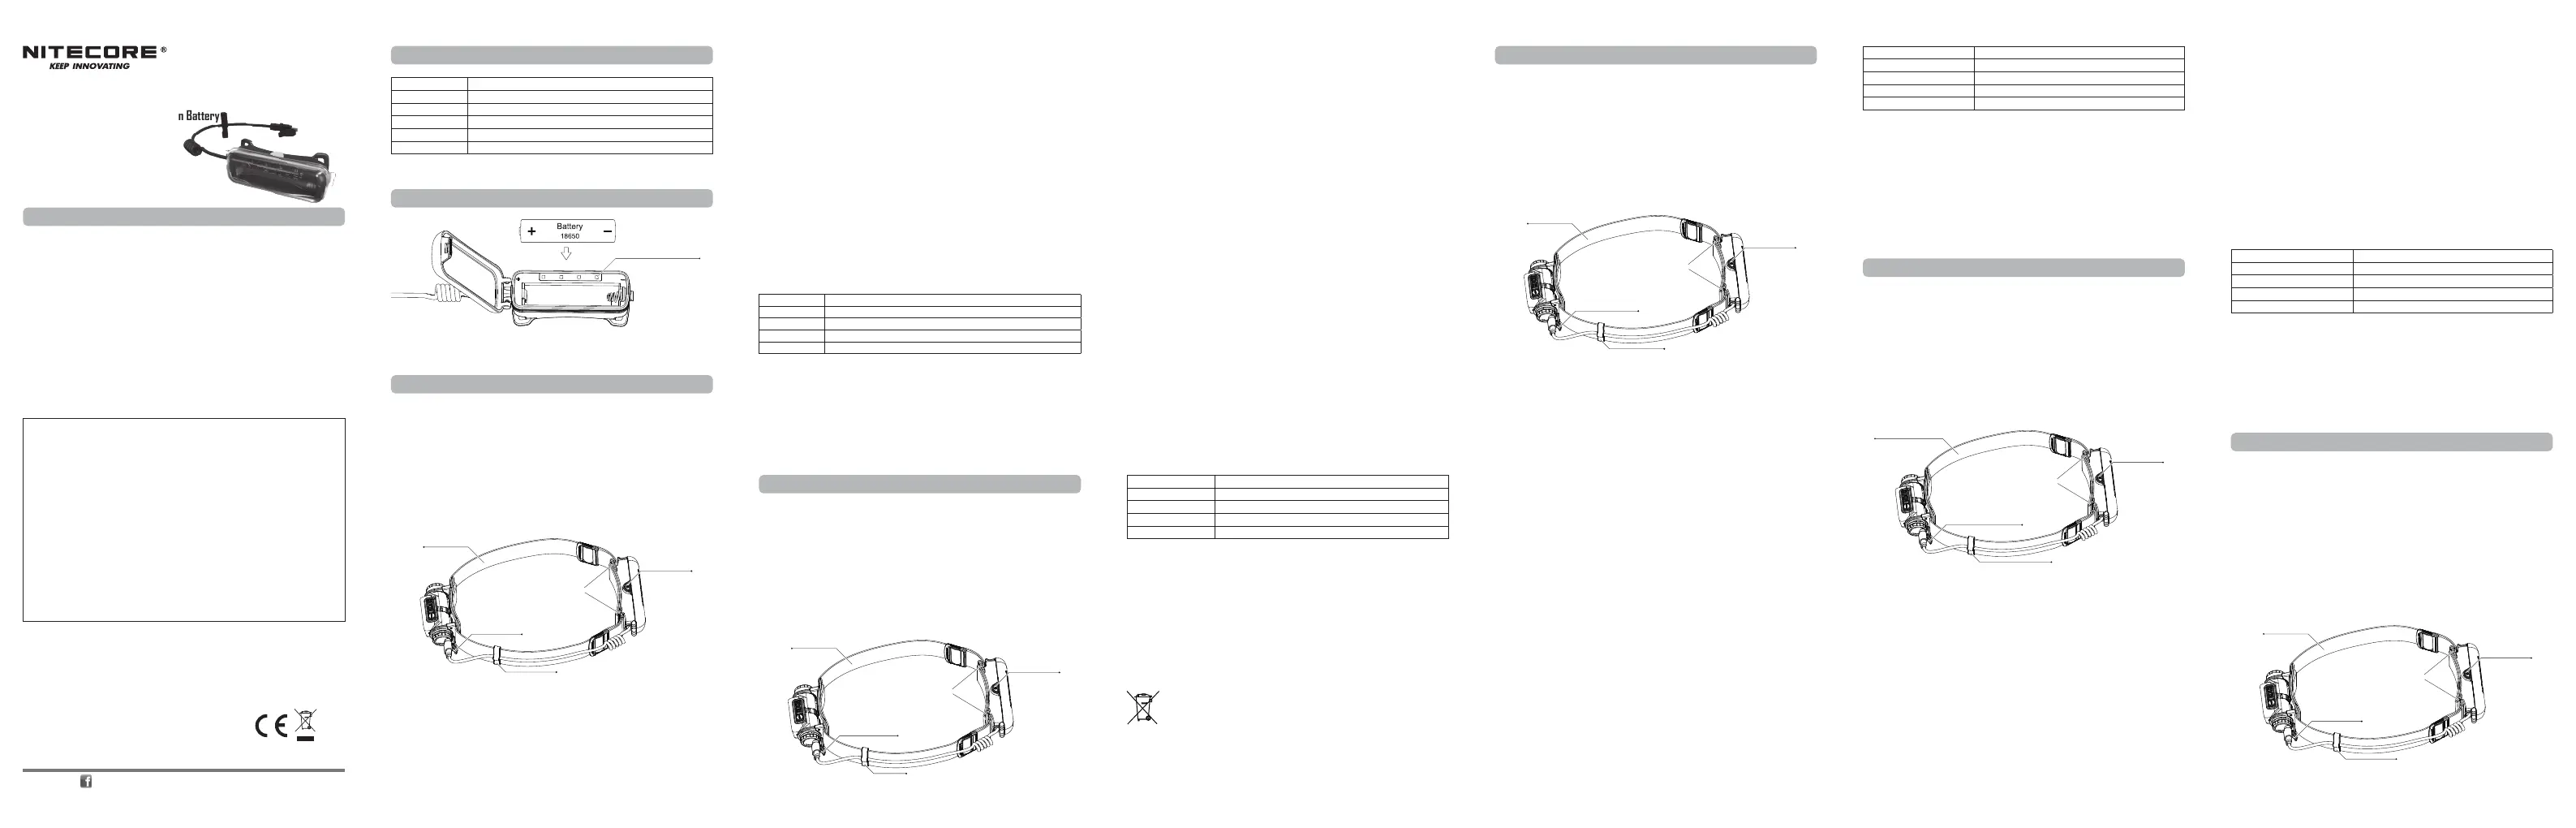
Wie in der Abbildung gezeigt, legen Sie nach dem Önen des Akkufachs den Akku ein
oder nehmen sie diesen heraus und schließen danach das Akkufach.
Warnungen:
1. Vergewissern Sie sich, dass der Akku in Übereinstimmung mit den Polaritätsmarkierungen
eingelegt ist. Das Produkt funktioniert nicht, wenn der Akku falsch eingelegt ist.
2. Wenn die Akkuleistung nachlässt, verwenden Sie das Produkt nicht mehr und laden Sie
den Akku so schnell wie möglich auf, um Schäden am Akku zu vermeiden.
3. Wenn das Produkt längere Zeit nicht benutzt wird, nehmen Sie bitte den Akku heraus,
um ein Auslaufen des Akkus zu verhindern.
Installationsanweisung
Power Indicators
SYSMAX Innovations Co., Ltd.
TEL: +86-20-83862000
FAX: +86-20-83882723
E-mail: info@nitecore.com
Web: www.nitecore.com
Address: Unit 6355, 5/F, No. 1021 Gaopu Road, Tianhe District,
Guangzhou, 510653, Guangdong, China
Please nd us on facebook : NITECORE Flashlight
Battery Installation / Removal
As illustrated, after opening the battery case, insert or remove the battery and then close
the battery case.
Warnings:
1. Ensure the battery is inserted in accordance with the polarity marks. The product will
not work if the battery is incorrectly inserted.
2. When the battery power is low, please stop using the product and recharge the
battery as soon as possible to avoid damage to the battery.
3. When the product is left unused for a prolonged time, please remove the battery to
prevent battery leakage.
Installation Guide
Operating Instructions
Connect:
Connect the USB cable of the battery case to the headlamp to automatically start the
charging process. The headlamp will be rst powered by the battery case.
Note: If the battery in the battery case is low on power when the headlamp is on, the
headlamp will ash to indicate this status and stop charging. In this case, the headlamp
will be automatically powered by its built-in battery.
Technical Data
Battery Installation / Removal
(English)
(Deutsch)
Warranty Service
Made in China
18650280623
Input5V⎓2A
Output5V⎓2A
Battery Option18650 Li-ion Battery (Flat Top Battery Excluded)
Dimensions106mm x 40mm x 35mm (4.17" x 1.57" x 1.38")
Weight65g (2.29 oz)
AccessoryCable Clip
Note: The 18650 Li-ion battery is sold separately.
All NITECORE
®
products are warranted for quality. Any DOA / defective product can
be exchanged for a replacement through a local distributor/dealer within 15 days of
purchase. After that, all defective / malfunctioning NITECORE
®
products can be repaired
free of charge within 12 months from the date of purchase. Beyond 12 months, a
limited warranty applies, covering the cost of labor and maintenance, but not the cost of
accessories or replacement parts.
The warranty will be nullied if
1. the product(s) is / are broken down, reconstructed and / or modied by unauthorized
parties.
2. the product(s) is/are damaged due to improper use. (e.g. reversed polarity installation)
3. the product(s) is/are damaged due to battery leakage.
For the latest information on NITECORE
®
products and services, please contact a local
NITECORE
®
distributor or send an email to service@nitecore.com.
※ All images, texts and statements specied herein this user manual are for reference
purposes only. Should any discrepancy occur between this manual and information
specied on www.nitecore.com, Sysmax Innovations Co., Ltd. reserves the rights to
interpret and amend the content of this document at any time without prior notice.
18650 Extension Battery Case
• Compatible with 18650 Li-ion Battery
• USB-C Input & Output
• Red Flashing
Headband
Connector Clip
Cable Clip
Power Button
①Install the battery case
to the headband
②Connect the USB cable
of the battery case to
the headlamp
③Secure the USB cable to the headband
using the included cable clip
Stirnband
Anschlussklemme
Kabelclip
EIN-/AUS-Taste
①Befestigen Sie das
Akkugehäuse am
Stirnband
②Verbinden Sie das USB-Kabel des
Akkugehäuses mit der Stirnlampe
③Befestigen Sie das USB-Kabel am Stirnband
mit dem mit-gelieferten Kabelclip
Disconnect:
• When the headlamp is o, disconnect the USB cable of the battery case to stop the
charging process.
• When the headlamp is on, disconnect the USB cable of the battery case, the headlamp
will ash twice (3 times each) and stop charging. In this case, the headlamp will be
automatically powered by its built-in battery.
Charge the Battery:
This product is equipped with intelligent charging function. Connect the USB cable to a USB-C
adapter to begin charging the battery. During the charging process, the four blue indicator
lights will transition gradually from ashing to a steady light, one by one, displaying the
battery level. Once the battery is fully charged, all four indicators will remain steady.
Red Flashing
On: When the power indicators are o, long press the Power Button for 1 second to turn
on the red ashing.
O: When the red ashing is on, long press the Power Button for 1 second to turn it o.
Note: When the battery in the battery case is low on power, the red ashing will be o
automatically.
Power Indication
When the power indicators are o, short press the Power Button. The power indicators will
illuminate in blue one by one to indicate the battery level, and they will go o after 2 seconds.
Power IndicatorPower Level
4 Constant-on≤100%
3 Constant-on≤75%
2 Constant-on≤50%
1 Constant-on≤25% (Please charge the product as soon as possible)
Warnings
1. DO NOT disassemble or modify the product as doing so will cause damage to it and
render the product warranty invalid. Please refer to the warranty section in the manual
for complete warranty information.
2. DO NOT place the product in water.
3. DO NOT install the battery with wet hands.
4. DO NOT place the product close to the re to avoid accidents and damage to the product.
5. Dispose of the device/batteries in accordance with applicable local laws and regulations.
Worldwide Warranty Service
Model number Date of purchase
————————————————— —————————————————
Serial number Store Stamp
————————————————— —————————————————
This is the certicate of authenticity if this item and we conrm that it has been
subjected to the most exacting quality controls by SYSMAX Innovations Co., Ltd.
NOTE:
Please ensure this warranty card is fully completed by the distributor or retailer after
purchasing the product. Should the product fail to operate correctly during the warranty
period, it may be returned with the completed warranty card and original sales receipt to
the retailer or local distributor for replacement or repair.
Customer Service Email: service@nitecore.com
Bedienungsanleitung
Verbinden:
Schließen Sie das USB-Kabel des Akkugehäuses an die Stirnlampe an, um den
Ladevorgang automatisch zu starten. Die Stirnlampe wird zuerst durch das Akkugehäuse
mit Strom versorgt.
Hinweis: Wenn der Akku im Akkugehäuse bei eingeschalteter Stirnlampe zu schwach ist,
blinkt die Stirnlampe, um diesen Status anzuzeigen und den Ladevorgang wird beended.
In diesem Fall wird die Stirnlampe automatisch über den eingebauten Akku mit Strom
versorgt.
Trennen:
• Wenn die Stirnlampe ausgeschaltet ist, ziehen Sie das USB-Kabel des Akkugehäuses
ab, um den Ladevorgang zu beenden.
• Wenn die Stirnlampe eingeschaltet ist und Sie das USB-Kabel des Akkugehäuses
abziehen, blinkt die Stirnlampe zweimal (jeweils dreimal) und beended den
Ladevorgang. In diesem Fall wird die Stirnlampe automatisch von ihrem eingebauten
Akku mit Strom versorgt.
Laden des Akkus:
Dieses Produkt ist mit einer intelligenten Ladefunktion ausgestattet. Schließen Sie das
USB-Kabel an einen USB-C-Adapter an, um mit dem Laden des Akkus zu beginnen.
Während des Ladevorgangs gehen die vier blauen Anzeigeleuchten allmählich von
Blinken zu Dauerlicht über. Eine nach der anderen leuchten dann stetig, und zeigen den
Akkuladestand an. Sobald der Akku vollständig geladen ist, leuchten alle vier Anzeigen
konstant.
Rotes Blinken
Ein: Wenn die Betriebsanzeigen ausgeschaltet sind, drücken Sie die EIN-/AUS-Taste 1
Sekunde lang, um das rote Blinken einzuschalten.
Aus: Wenn das rote Blinken eingeschaltet ist, halten Sie die EIN-/AUS-Taste 1 Sekunde
lang gedrückt, um es auszuschalten.
Hinweis: Wenn der Akku im Akkugehäuse nur noch wenig Strom hat, wird das rote
Blinken automatisch ausgeschaltet.
Restenergie-Anzeige
Wenn die Betriebsanzeigen erloschen sind, drücken Sie kurz die EIN-/AUS-Taste. Die
Betriebsanzeigen leuchten nacheinander blau auf, um den Energiestand anzuzeigen, und
erlöschen nach 2 Sekunden.
Anzeige-LEDsRestenergie
4 konstant an≤100%
3 konstant an≤75%
2 konstant an≤50%
1 konstant an≤25% ( Bitte laden Sie das Produkt so bald wie möglich auf)
Warnungen
1. Zerlegen oder modizieren Sie das Produkt NICHT, da dies zu Schäden führt und die
Produktgarantie ungültig wird. Vollständige Informationen zur Garantie nden Sie im
Abschnitt "Garantiebedingungen".
2. Legen Sie das Produkt NICHT ins Wasser.
3. Setzen Sie den Akku NICHT mit nassen Händen ein.
4. Stellen Sie das Gerät NICHT in die Nähe des Feuers, um Unfälle und Schäden am
Gerät zu vermeiden.
5. Entsorgen Sie das Gerät/die Akkus in Übereinstimmung mit den geltenden örtlichen
Gesetzen und Vorschriften.
Entsorgung von Elektro- und Elektronikgeräten
Die durchgestrichene Mülltonne bedeutet, dass Sie gesetzlich verpichtet sind,
diese Geräte einer vom unsortierten Siedlungsabfall getrennten Erfassung
zuzuführen. Die Entsorgung über die Restmülltonne oder die gelbe Tonne ist
untersagt. Enthalten die Produkte Batterien oder Akkus, die nicht fest verbaut
sind, müssen diese vor der Entsorgung entnommen und getrennt als Batterie entsorgt
werden.
(Francais)
(Italiano)
(Русский)
Installation / retrait de la batterie
Comme illustré, après avoir ouvert le boîtier de la batterie, insérer ou retirer la batterie,
puis refermer le boîtier.
Avertissements :
1. Assurez-vous que la batterie soit insérée conformément aux marques de polarité. Le
produit ne fonctionnera pas si la batterie n'est pas correctement insérée.
2. Lorsque la batterie est faible, arrêter d'utiliser le produit et recharger la batterie dès
que possible pour éviter de l'endommager.
3. Lorsque le produit reste inutilisé pendant une période prolongée, veuillez retirer la
batterie an d'éviter toute fuite.
Guide d'installation
Instructions d'utilisation
Connecter :
Connecter le câble USB de l'étui à piles à la lampe frontale pour lancer automatiquement
le processus de chargement. La lampe frontale sera d'abord alimentée par l'étui à piles.
Remarque : Si la batterie de l'étui est faible lorsque la lampe frontale est allumée, la
lampe frontale clignotera pour indiquer cet état et cessera de se charger. Dans ce cas, la
lampe frontale sera automatiquement alimentée par sa batterie intégrée.
Déconnecter :
• Lorsque la lampe frontale est éteinte, débrancher le câble USB du boîtier de la batterie
pour arrêter le processus de charge.
• Lorsque la lampe frontale est allumée, débrancher le câble USB du boîtier de la
batterie, la lampe frontale clignotera deux fois (3 fois chacune) et arrêtera de se
charger. Dans ce cas, la lampe frontale sera automatiquement alimentée par sa
batterie intégrée.
Charger la batterie :
Ce produit est équipé d'une fonction de charge intelligente. Connecter le câble USB à
un adaptateur USB-C pour commencer à charger la batterie. Pendant le processus de
charge, les quatre voyants bleus passeront progressivement du clignotement à une
lumière xe, un par un, achant le niveau de la batterie. Une fois la batterie entièrement
chargée, les quatre voyants resteront xes.
Rouge clignotant
Allumé : Lorsque les indicateurs d'alimentation sont éteints, appuyer longuement sur le
bouton d'alimentation pendant 1 seconde pour activer le clignotement rouge.
Éteint : lorsque le clignotement rouge est activé, appuyer longuement sur le bouton
marche/arrêt pendant 1 seconde pour l'éteindre.
Remarque : lorsque la batterie du boîtier est faible, le clignotement rouge s'éteint
automatiquement.
Indication de l'alimentation
Lorsque les indicateurs d'alimentation sont éteints, appuyer brièvement sur le bouton
d'alimentation. Les indicateurs d'alimentation s'allument en bleu l'un après l'autre pour
indiquer le niveau de la batterie, et s'éteignent au bout de 2 secondes.
Bandeau
Clip de connexion
Clip de xation
du câble
Bouton marche/
arrêt
①Installer le boîtier de la
batterie sur le bandeau
②Connecter le câble
USB de l'étui à piles
à la lampe frontale.
③Fixer le câble USB au bandeau à
l'aide de l'attache de câble fournie.
Indicateurs de puissanceNiveau de puissance
4 Constants≤100%
3 Constants≤75%
2 Constants≤50%
1 Constant≤25% (Veuillez charger le produit dès que possible)
Avertissements
1. NE PAS démonter ou modier le produit, car cela l'endommagerait et rendrait la
garantie du produit invalide. Veuillez vous référer à la section garantie du manuel pour
des informations complètes sur la garantie.
2. NE PAS placer le produit dans l'eau.
3. NE PAS installer la batterie avec des mains mouillées.
4. NE PAS placer le produit à proximité du feu an d'éviter les accidents et les dommages
au produit.
5. Éliminer l'appareil/les piles conformément aux lois et réglementations locales en
vigueur.
Installazione/Rimozione della Batteria
Come illustrato, dopo aver aperto la custodia della batteria, inserire o rimuovere la
batteria e quindi chiudere la custodia della batteria.
Avvertenze
1. Assicurarsi che la batteria sia inserita correttamente seguendo i segni di polarità. Il
prodotto non funzionerà se la batteria è inserita in modo errato.
2. Quando la batteria è scarica, interrompere l'uso del prodotto e ricaricare la batteria il
prima possibile per evitare danni alla stessa.
3. Quando il prodotto non viene utilizzato per un lungo periodo, rimuovere la batteria per
evitare perdite di liquido dalla batteria.
Guida all'installazione
Istruzioni per l'uso
Collegamento:
Collegare il cavo USB della custodia batteria alla lampada frontale per avviare
automaticamente il processo di ricarica. La lampada frontale sarà alimentata inizialmente
dalla custodia batteria.
Nota: Se la batteria nella custodia batteria p1-ha poca carica quando la lampada frontale
è accesa, la lampada frontale lampeggerà per indicare questo stato e interromperà la
ricarica. In questo caso, la lampada frontale sarà alimentata automaticamente dalla sua
batteria interna.
Disconnessione
• Quando la lampada frontale è spenta, scollegare il cavo USB della custodia batteria per
interrompere il processo di ricarica.
• Quando la lampada frontale è accesa, scollegare il cavo USB della custodia batteria. La
lampada frontale lampeggerà due volte (3 volte ciascuna) e interromperà la ricarica. In
questo caso, la lampada frontale sarà alimentata automaticamente dalla sua batteria
interna.
Cinturino della
lampada frontale
Clip del connettore
Clip del connettore
Pulsante di
accensione
①Installare la custodia
batteria al cinturino
della lampada frontale.
②Collegare il cavo USB
della custodia batteria
alla lampada frontale.
③Fissare il cavo USB al cinturino
della lampada frontale utilizzando
la clip per cavi inclusa.
Ricarica della Batteria
Questo prodotto è dotato di una funzione di ricarica intelligente. Collegare il cavo USB a
un adattatore USB-C per iniziare la ricarica della batteria. Durante il processo di ricarica,
le quattro luci indicatrici blu passeranno gradualmente da lampeggianti a una luce
ssa, una dopo l'altra, visualizzando il livello della batteria. Una volta che la batteria è
completamente carica, tutte e quattro le luci indicatrici rimarranno sse.
Luce Rossa Lampeggiante
Accensione: Quando le luci indicatrici di alimentazione sono spente, premere a lungo il
pulsante di accensione per 1 secondo per accendere la luce rossa lampeggiante.
Spegnimento: Quando la luce rossa lampeggiante è accesa, premere a lungo il pulsante
di accensione per 1 secondo per spegnerla.
Nota: Quando la batteria nella custodia batteria p1-ha poca carica, la luce rossa
lampeggiante si spegnerà automaticamente.
Indicazione di Alimentazione
Quando le luci indicatrici di alimentazione sono spente, premere brevemente il pulsante di
accensione. Le luci indicatrici di alimentazione si illumineranno in blu una dopo l'altra per
indicare il livello di carica della batteria, e si spegneranno dopo 2 secondi.
Indicatore di AlimentazioneLivello di Carica
4 Luci Costanti≤100%
3 Luci Costanti≤75%
2 Luci Costanti≤50%
1 Luci Costanti≤25% (Si prega di caricare il prodotto al più presto)
Avvertenze
1. NON smontare o modicare il prodotto, poiché ciò potrebbe causarne il
danneggiamento e invalidare la garanzia. Si prega di fare riferimento alla sezione sulla
garanzia nel manuale per informazioni complete sulla garanzia.
2. NON immergere il prodotto nell'acqua.
3. NON installare la batteria con le mani bagnate.
4. NON posizionare il prodotto vicino al fuoco per evitare incidenti e danni al prodotto.
5. Smaltire il dispositivo/le batterie in conformità alle leggi e ai regolamenti locali applicabili.
Установка / извлечение аккумулятора
Как показано на иллюстрации, после открытия аккумуляторного отсека вставьте
или извлеките аккумулятор и затем закройте отсек.
Меры предосторожности:
1. Убедитесь, что аккумулятор вставлен в соответствии с обозначениями
полярности. Устройство не будет работать, если аккумулятор вставлен
неправильно.
2. Когда заряд аккумулятора низкий, пожалуйста, прекратите использование
продукта и перезарядите аккумулятор как можно скорее во избежание
повреждения аккумулятора.
3. Если изделие не используется в течение длительного времени, извлеките
аккумулятор во избежание его утечки.
Инструкция по установке
Головное
крепление
Соединительный
зажим
Зажим кабеля
Кнопка
питания
①Установите
аккумуляторный отсек
на головное крепление
②Подключите USB-кабель
аккумуляторного отсека
к налобному фонарю.
③Закрепите USB-кабель
на оголовье с помощью
прилагаемого зажима кабеля.
Specyfikacje produktu
| Marka: | Nitecore |
| Kategoria: | Niesklasyfikowane |
| Model: | 18650 |
Potrzebujesz pomocy?
Jeśli potrzebujesz pomocy z Nitecore 18650, zadaj pytanie poniżej, a inni użytkownicy Ci odpowiedzą
Instrukcje Niesklasyfikowane Nitecore

4 Grudnia 2024
4 Grudnia 2024
4 Grudnia 2024
4 Grudnia 2024
29 Września 2024
29 Września 2024
26 Września 2024
16 Września 2024
13 Września 2024
11 Września 2024
Instrukcje Niesklasyfikowane
Najnowsze instrukcje dla Niesklasyfikowane
29 Stycznia 2025
29 Stycznia 2025
29 Stycznia 2025
29 Stycznia 2025
29 Stycznia 2025
29 Stycznia 2025
29 Stycznia 2025
29 Stycznia 2025
29 Stycznia 2025
29 Stycznia 2025